Customer Tags
1.Overview
By building customer tags, labeling users, and portraying user portraits based on the tags, understanding customers in-depth, and conducting precision marketing are commonly used methods in the digital marketing era.
There are two major categories of customer tags in DM Hub: ordinary tags (tags with only names) and value tags ( tags with name and corresponding values).
In terms of new types of tags, customer tags are divided into static tags, smart tags, model tags, and external tags. Among them, static tags and smart tags are ordinary tags, and model tags are value tags. External tags include both value tags and ordinary tags.
2.Tag Management
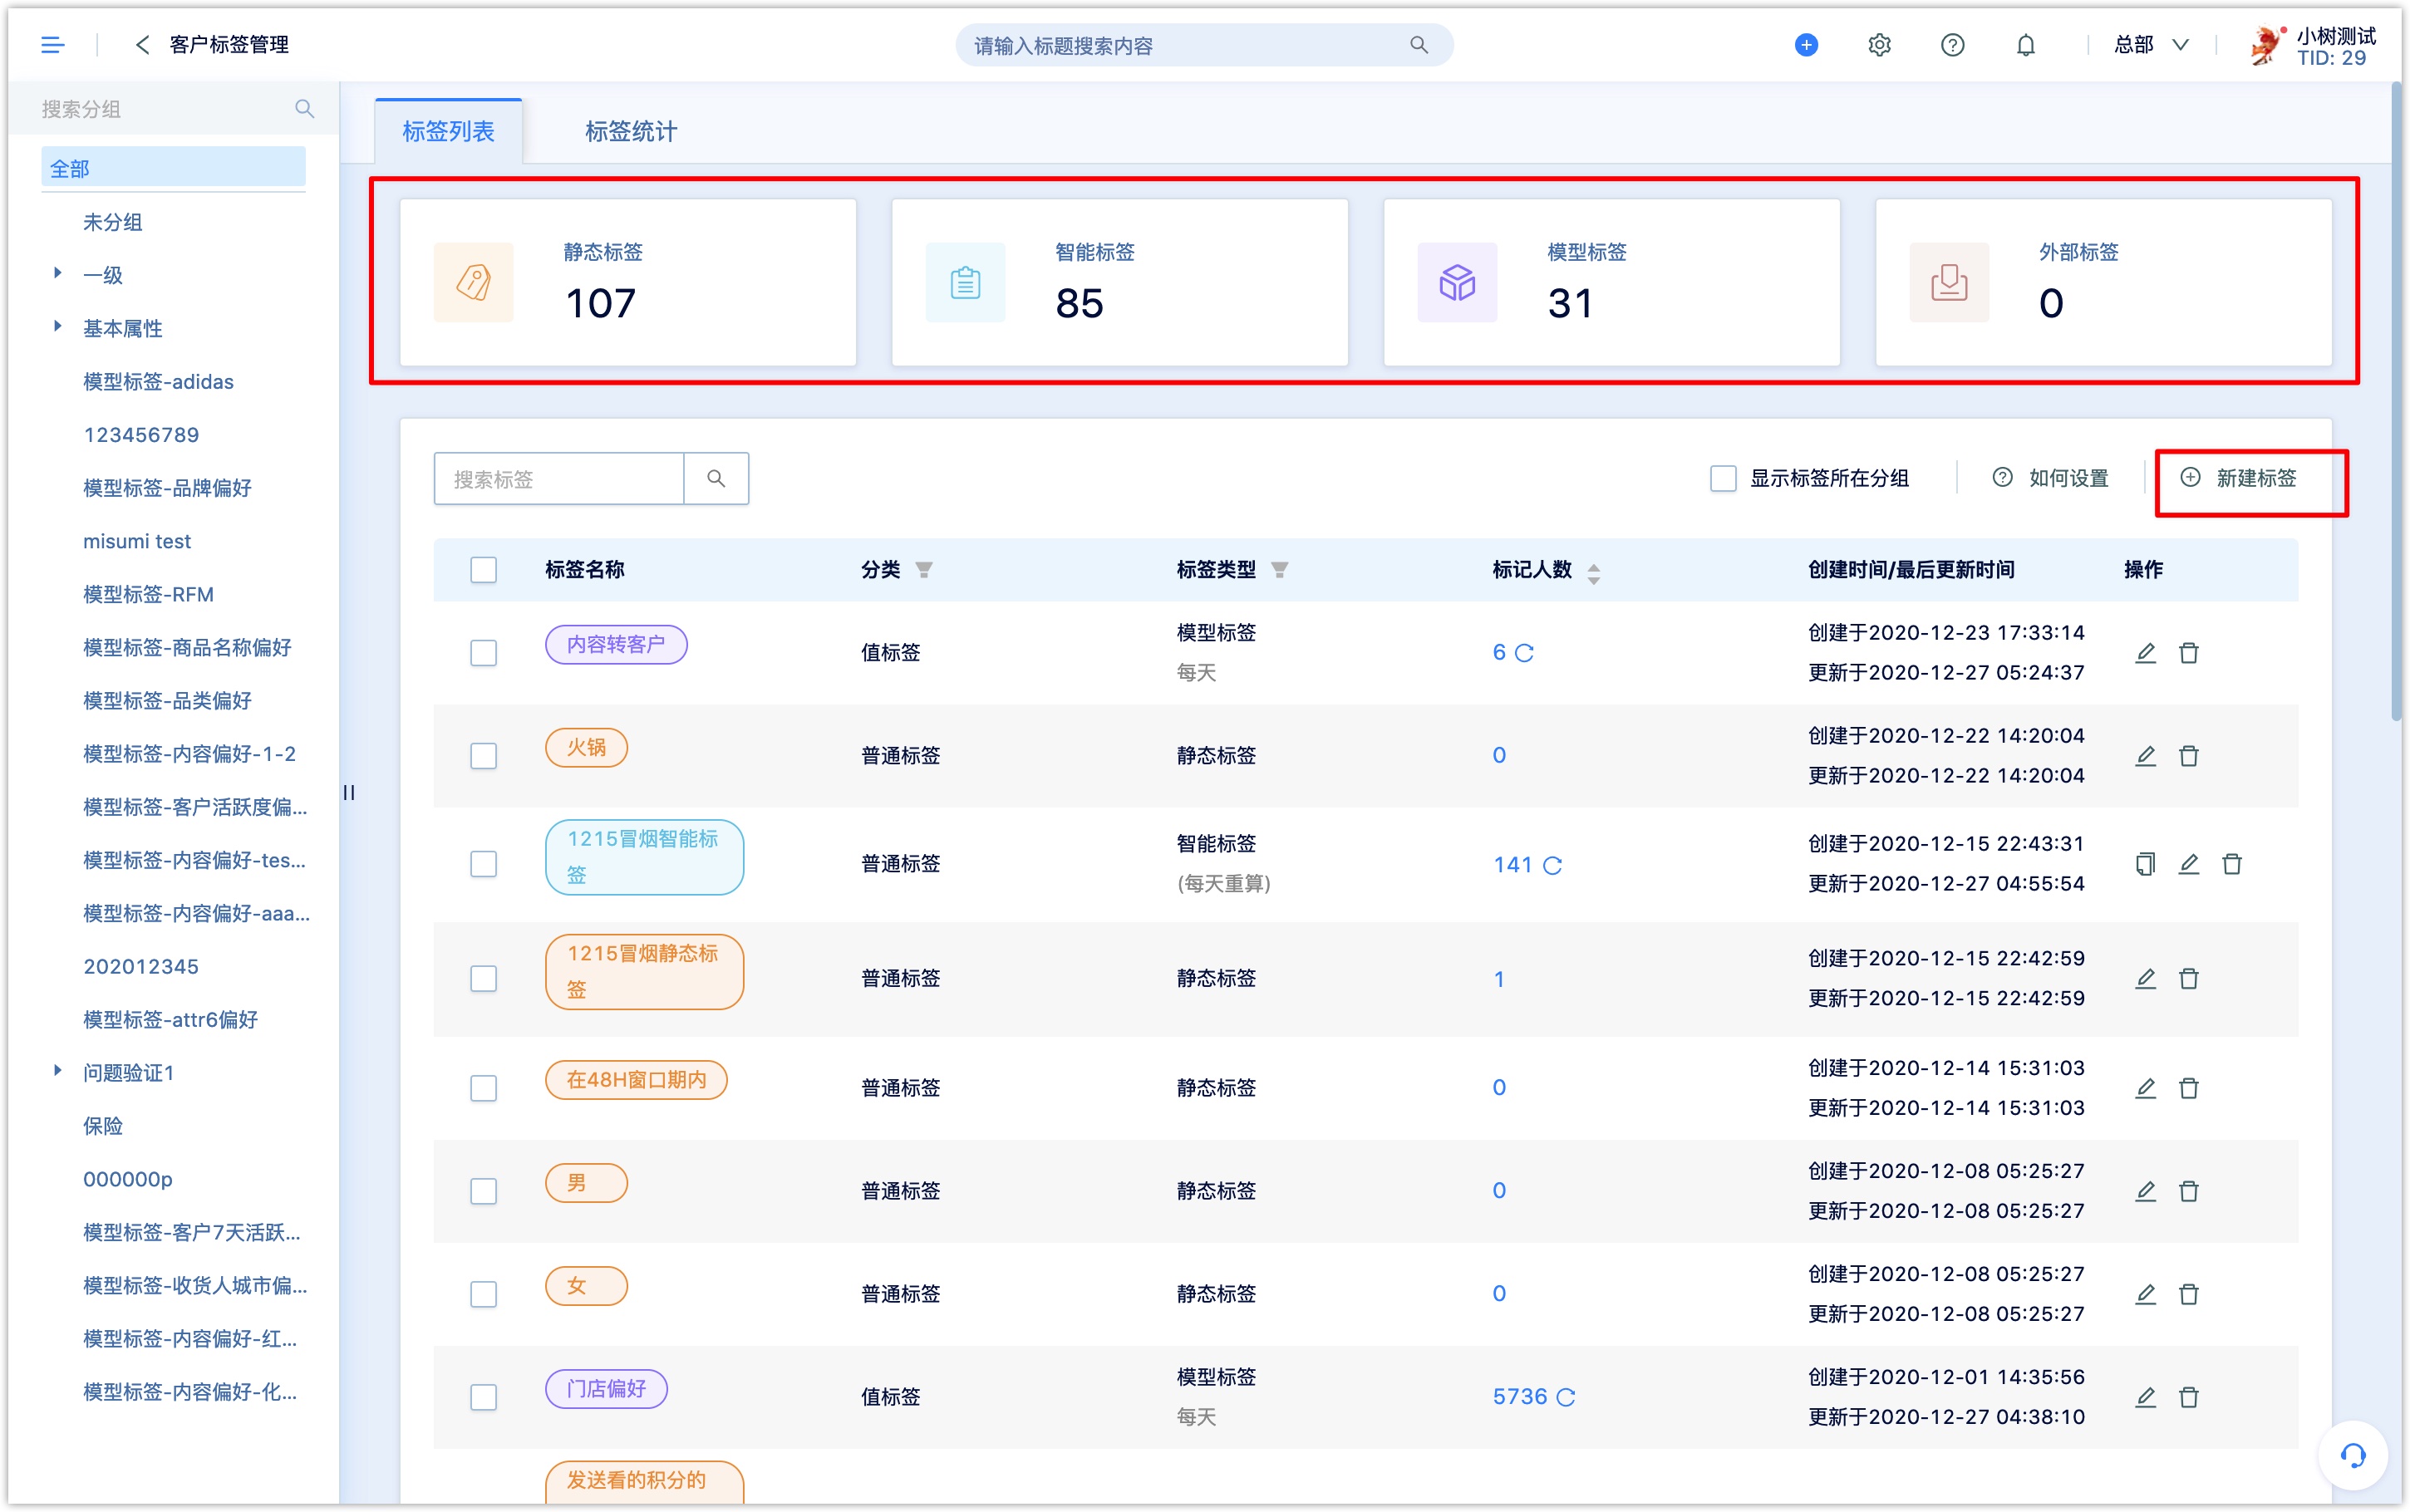
At the top of the tag list page, you can see the number of tags of each type.
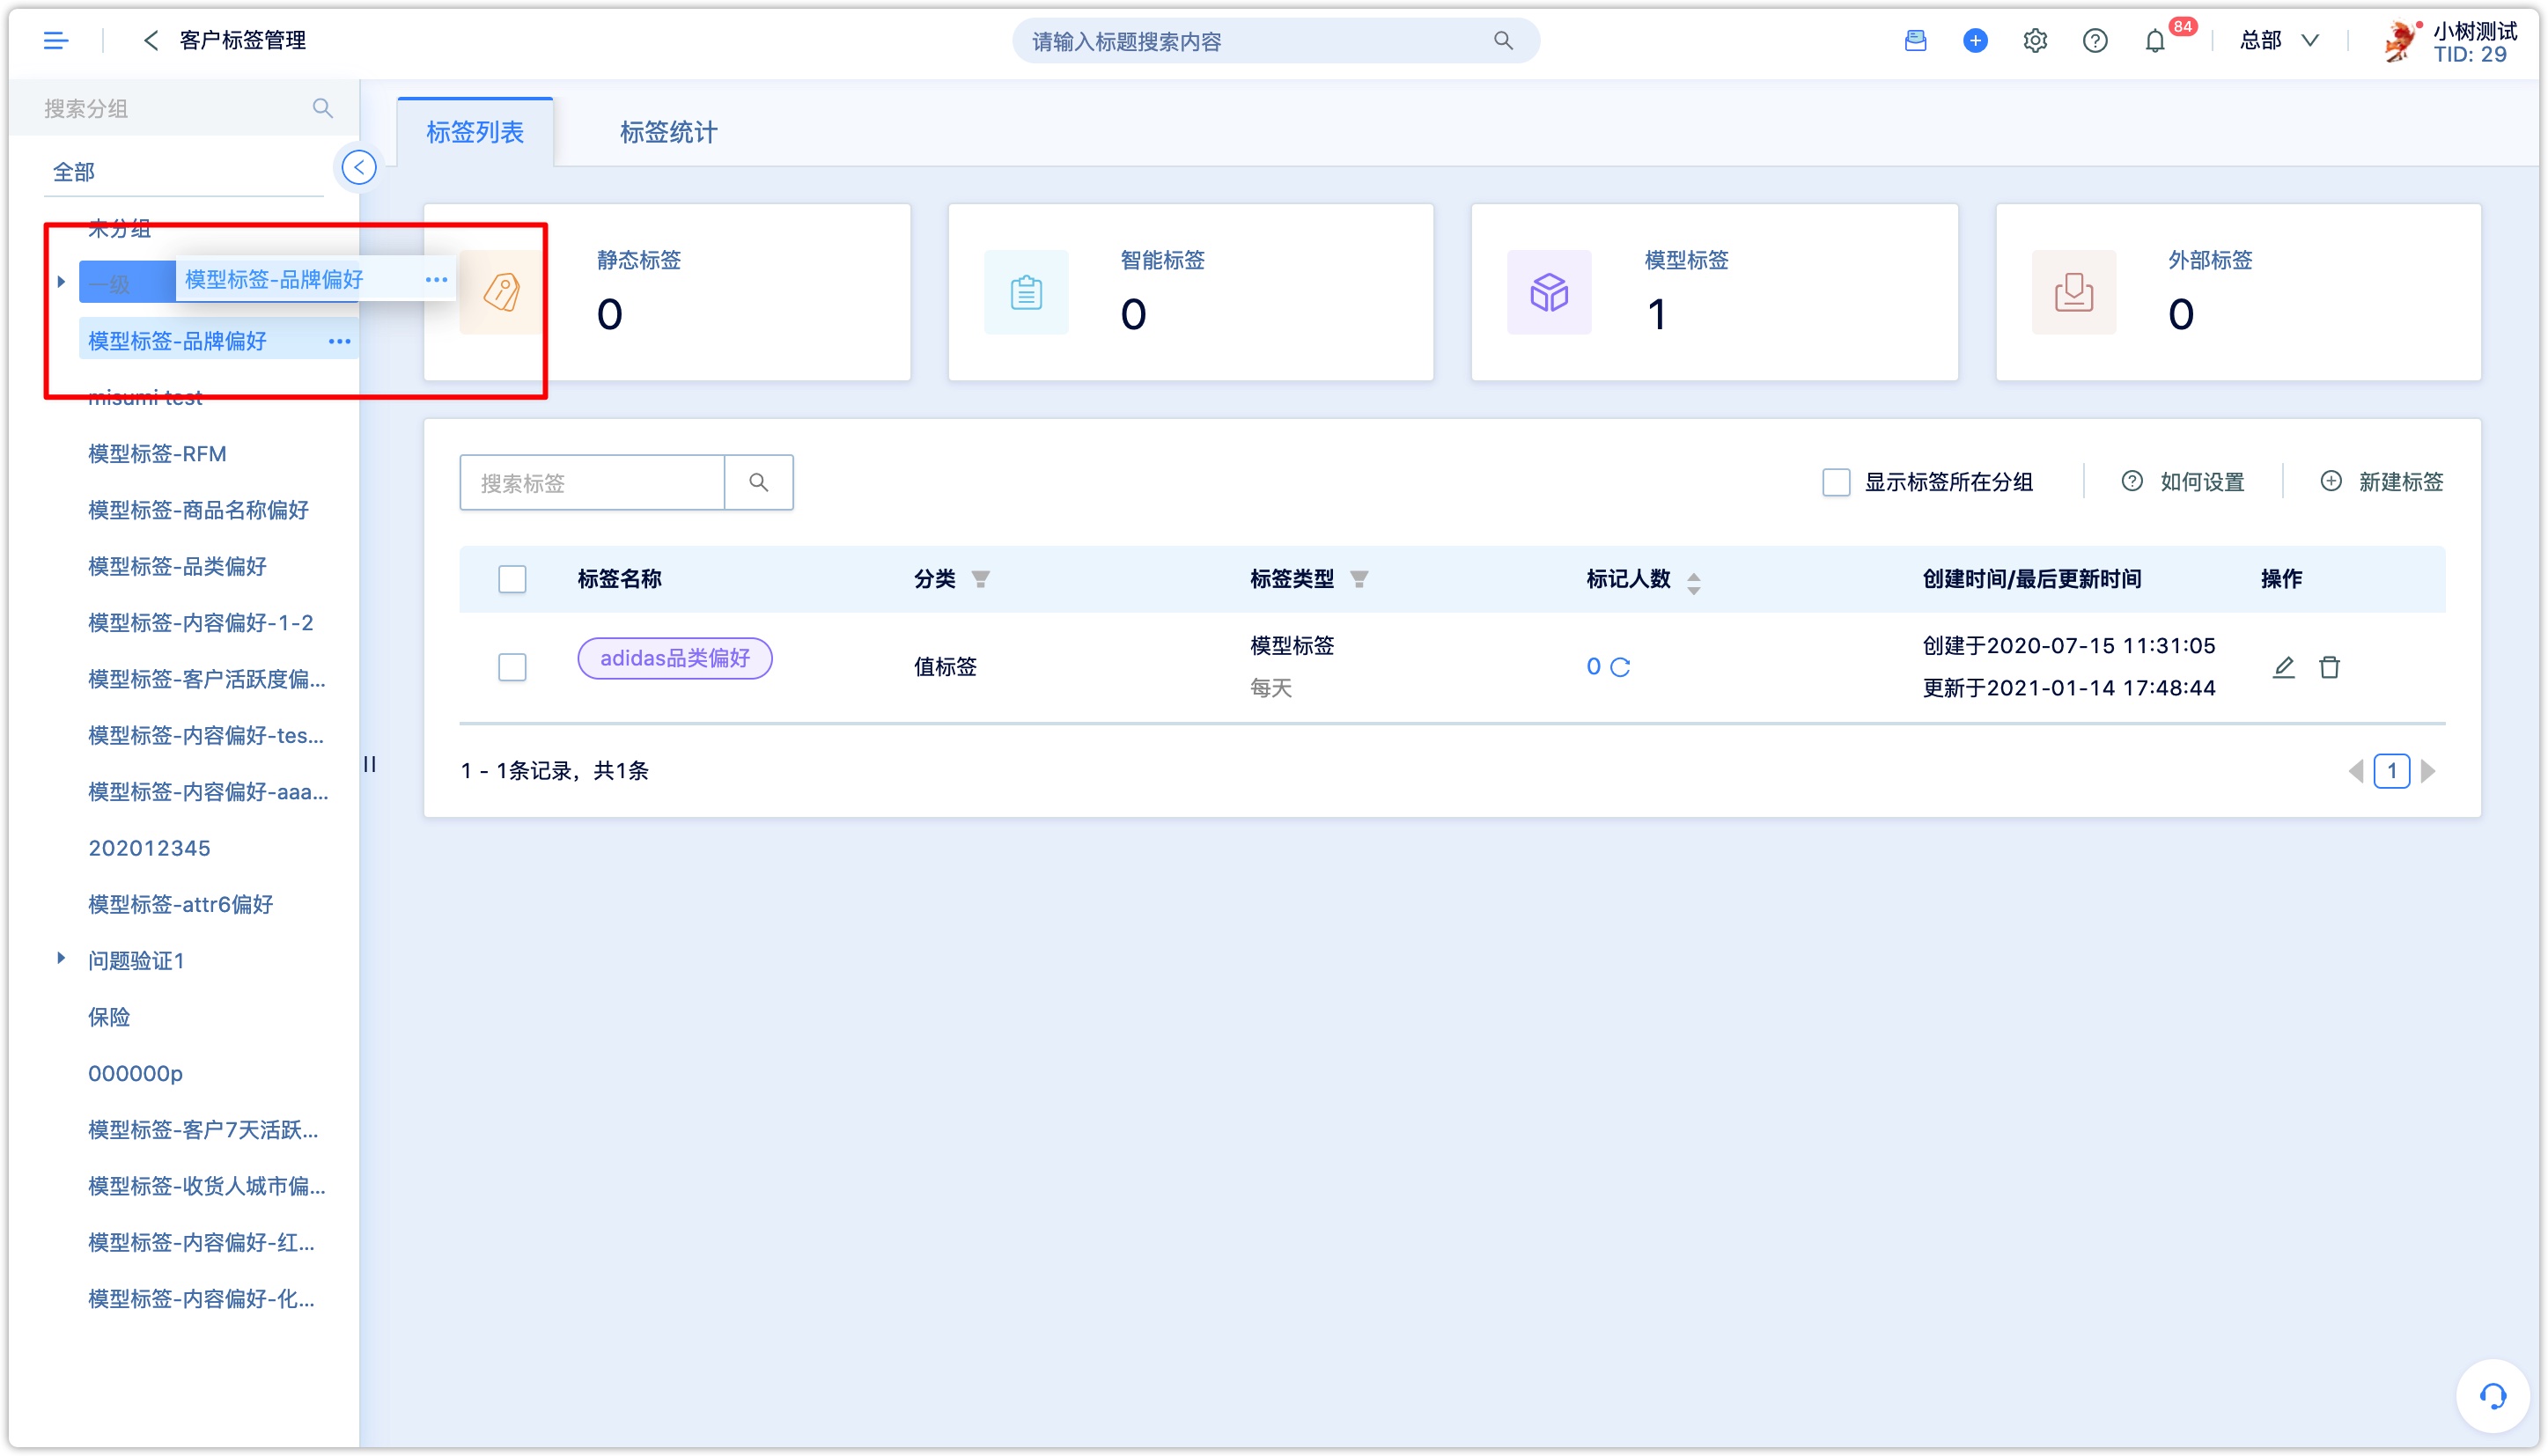
Tag management supports multi-level grouping
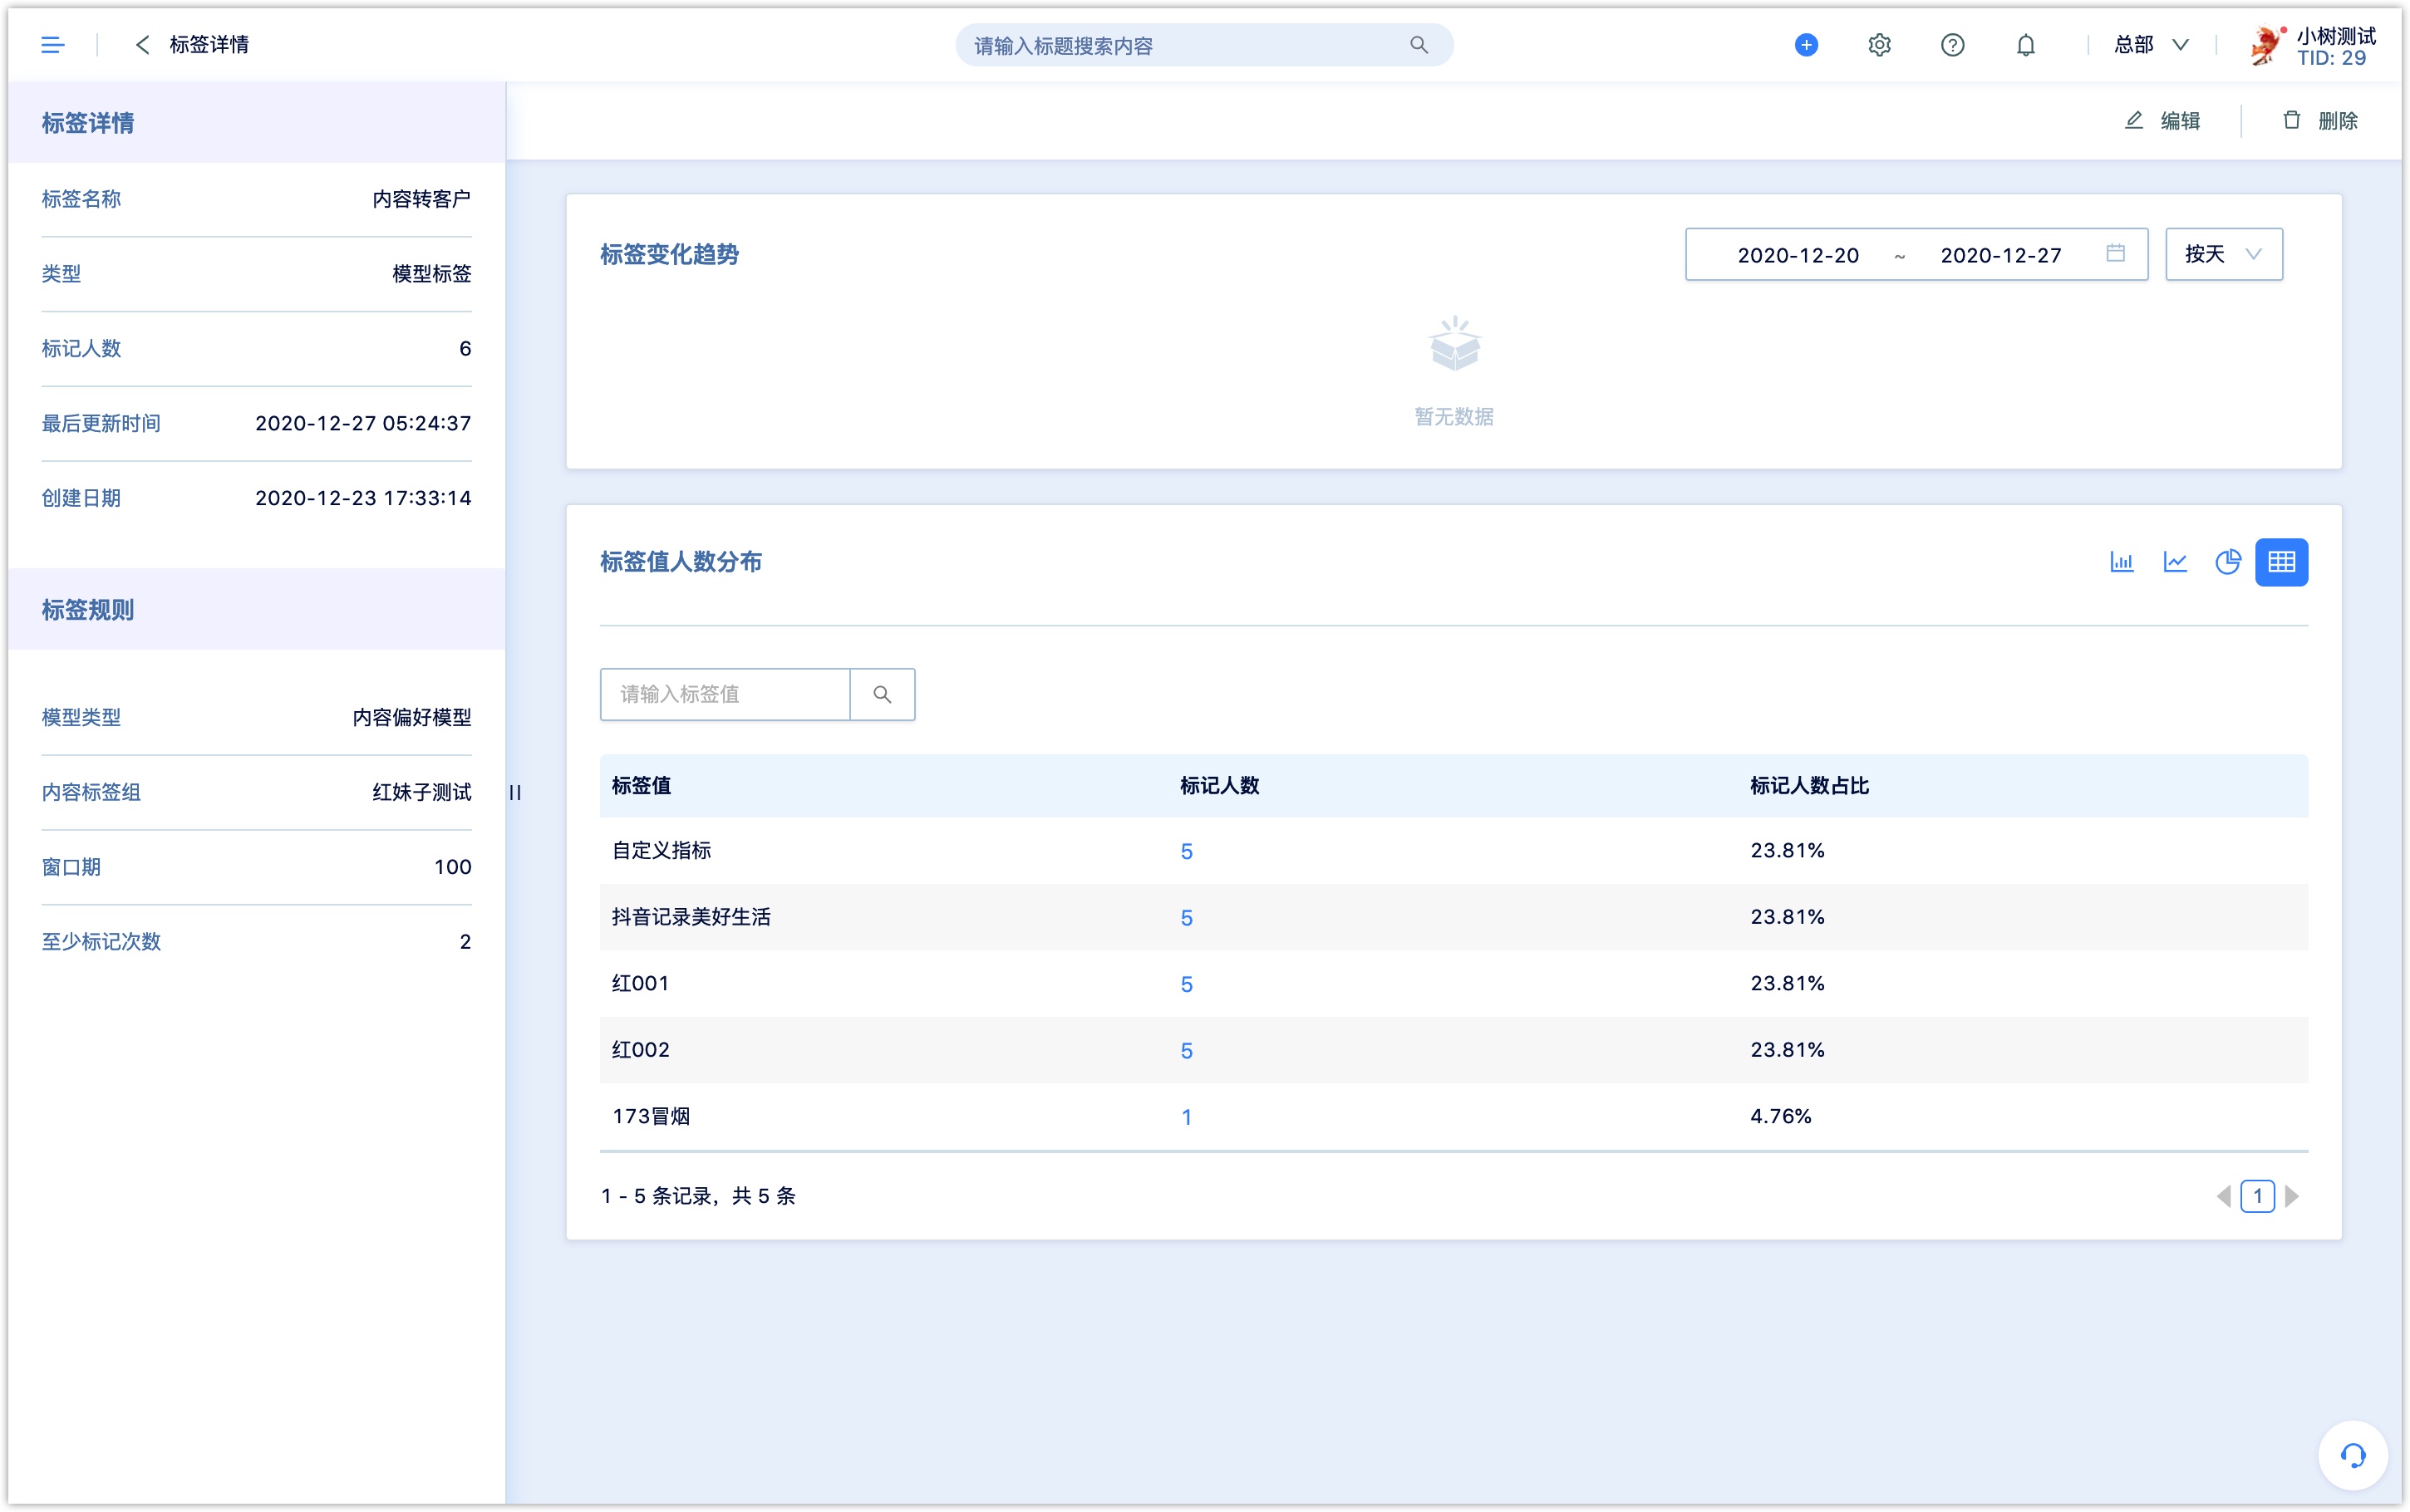
Tag Statistics
Click the tag name to view the statistics and trend graph of the number of people marked by the tag.
3.Static tags
Click New Tag, select Static Tag, manually input or upload the tag names in batch with Excel file. For Excel upload, please download the template file first, fill it in and upload it.
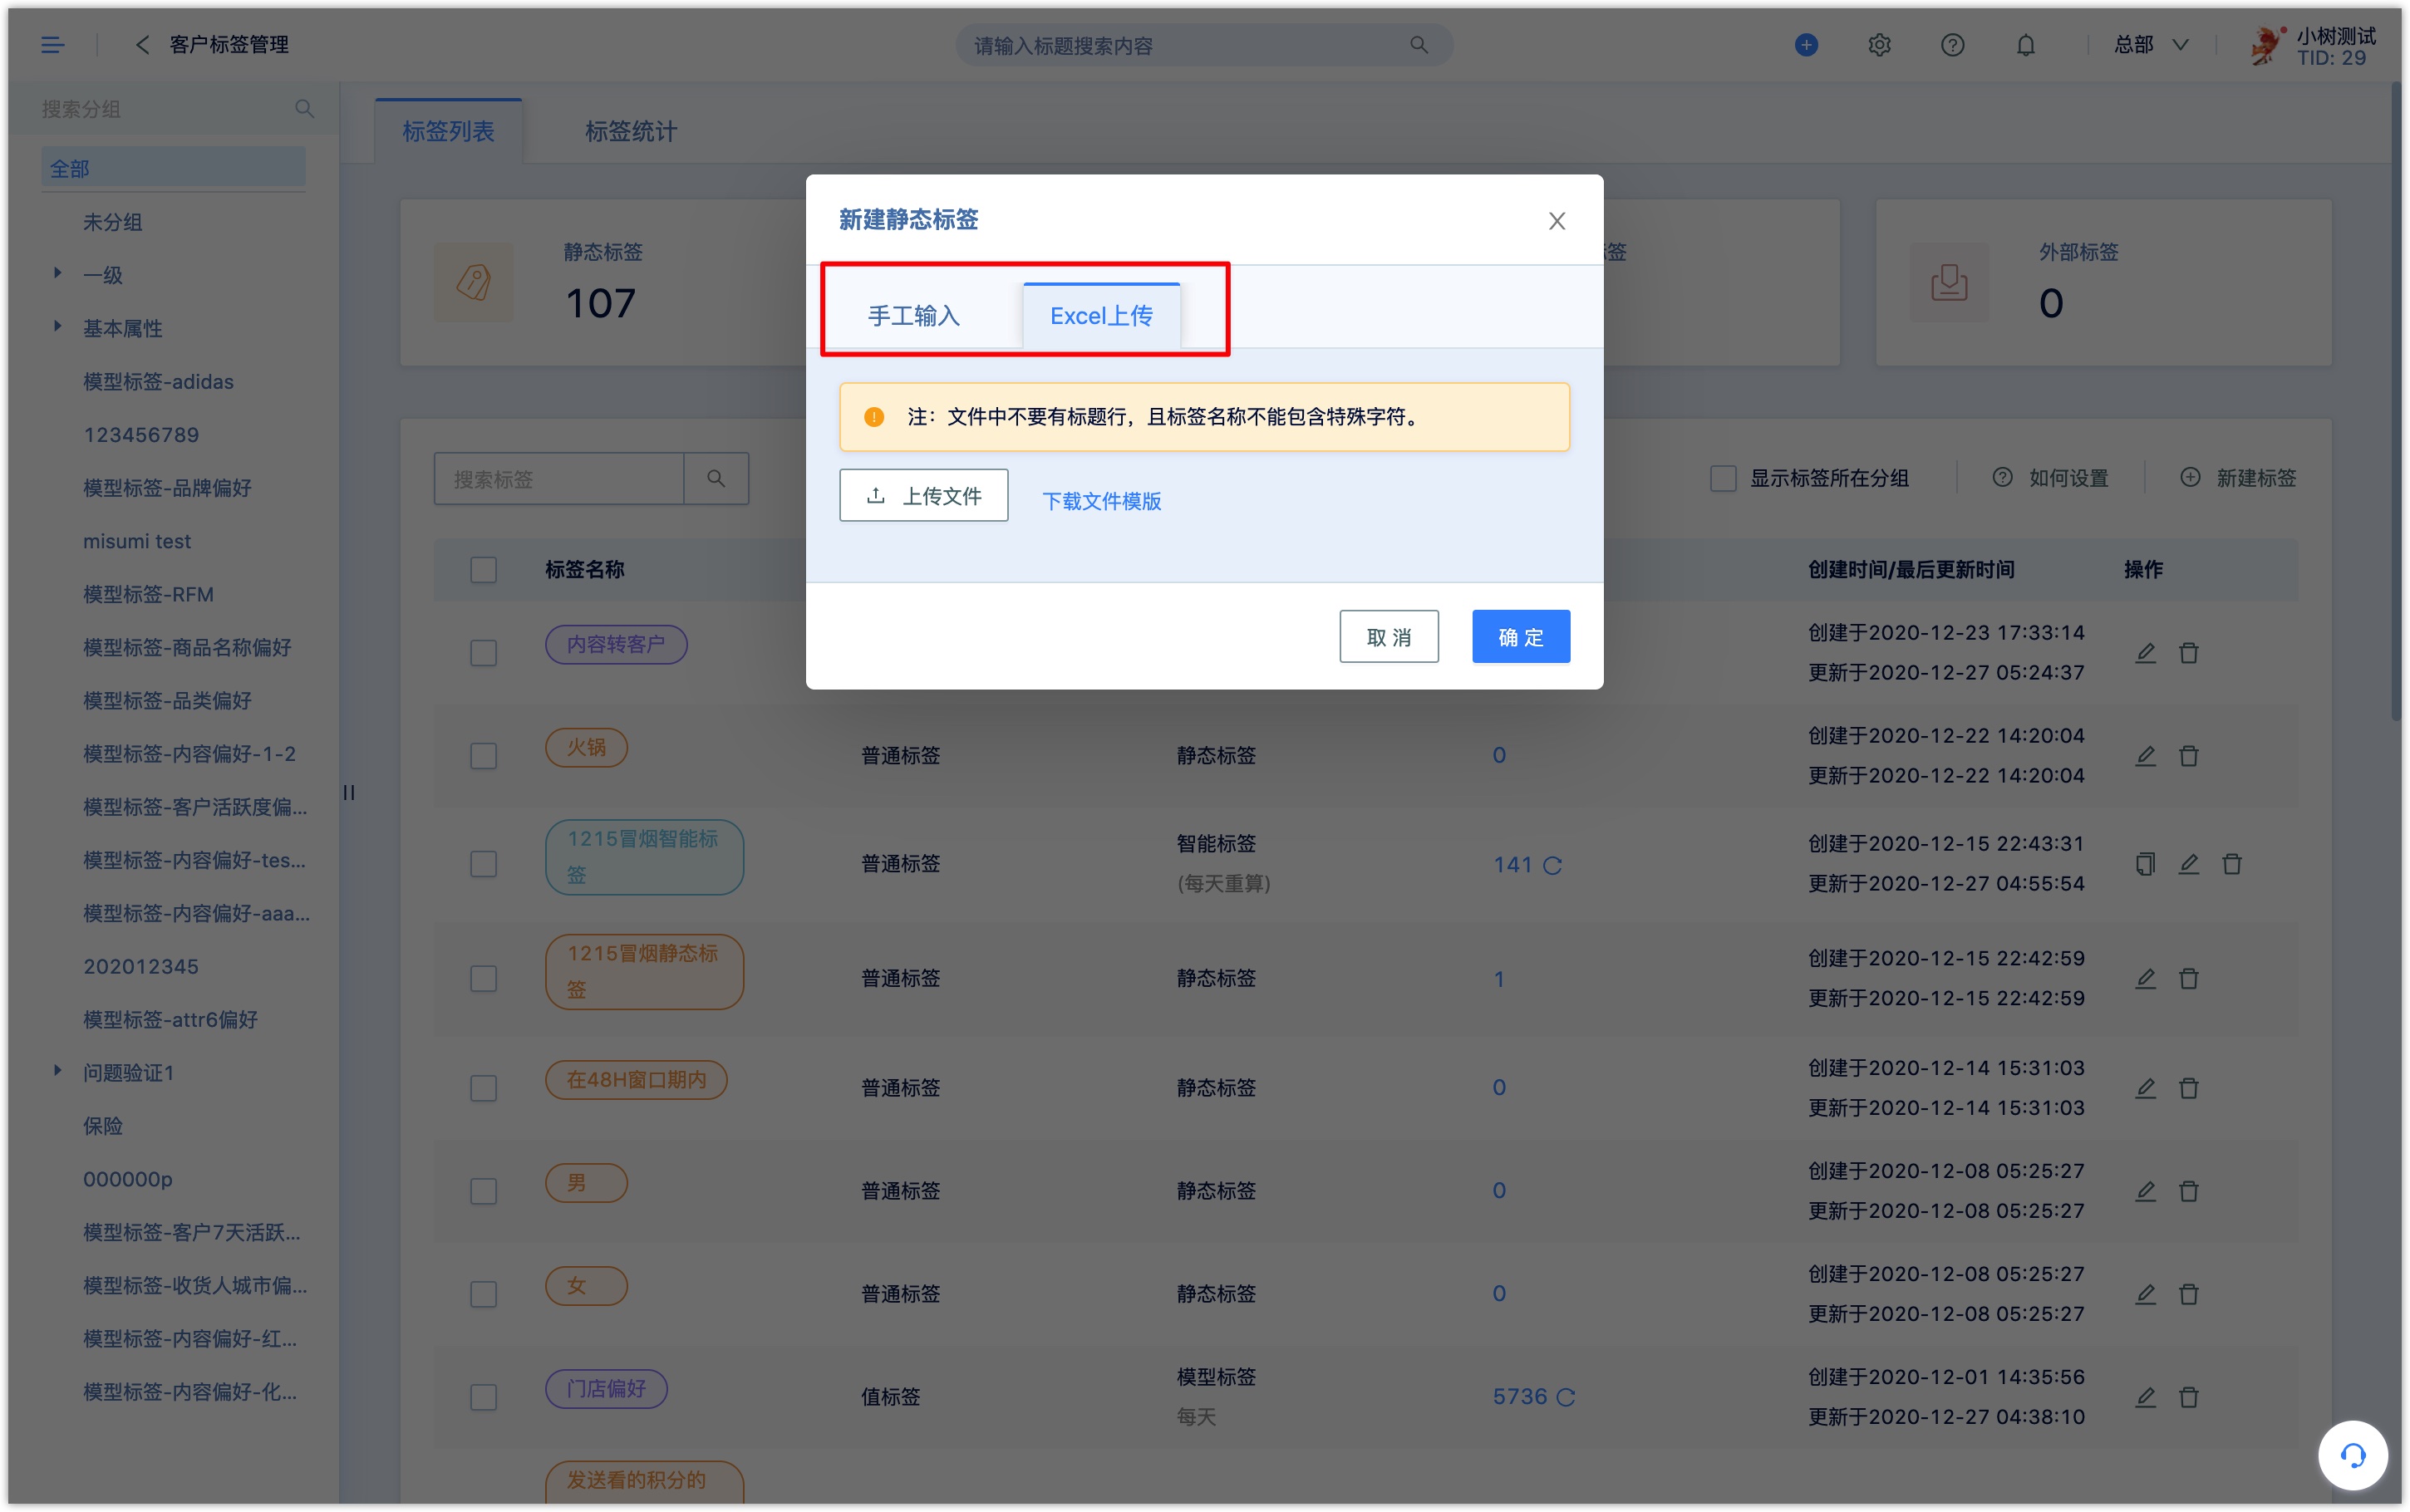
Add static tags to customers in the following ways:
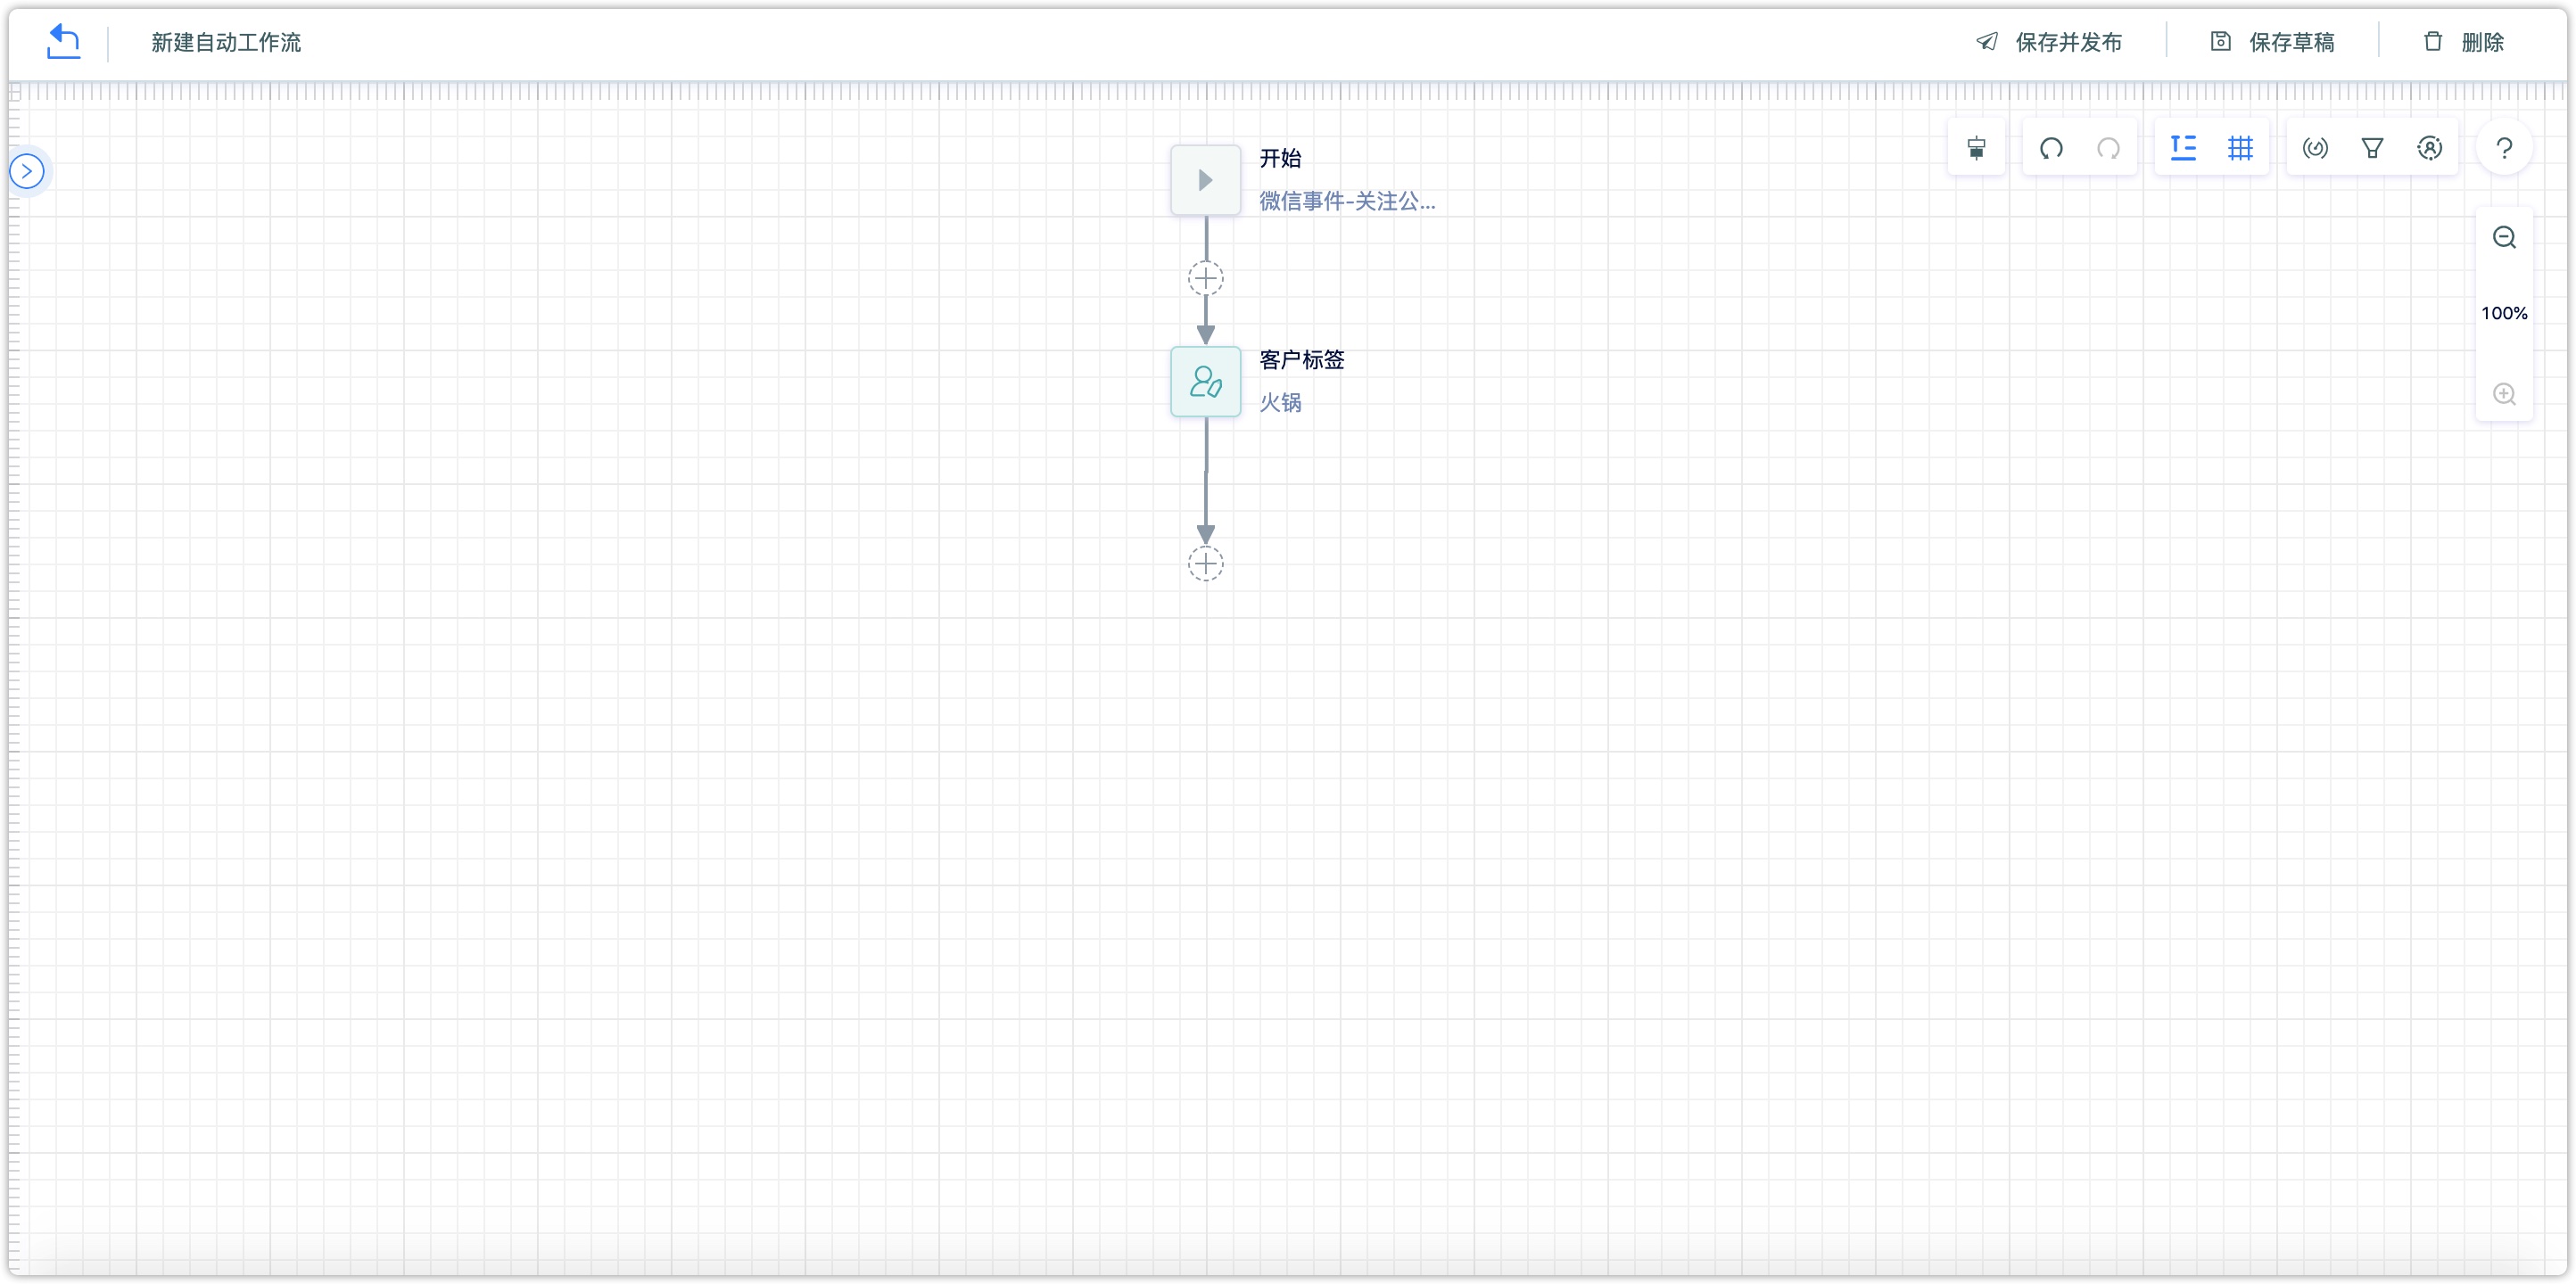
- Tag customers in Automation Flow
- Group batch operation to tag customers
- On the customer details page, manually enter and select the static tag
- Call the Customer Tag API to tag customers
4.Smart tags
Smart tags can automatically tag customers based on complex Advanced Filter conditions and recalculate regularly according to the set calculation cycle (by day, by week, by month, by year). For each recalculation, customers who meet the conditions will automatically be marked with this labe; customers who no longer meet the conditions will be automatically removed from the tag.
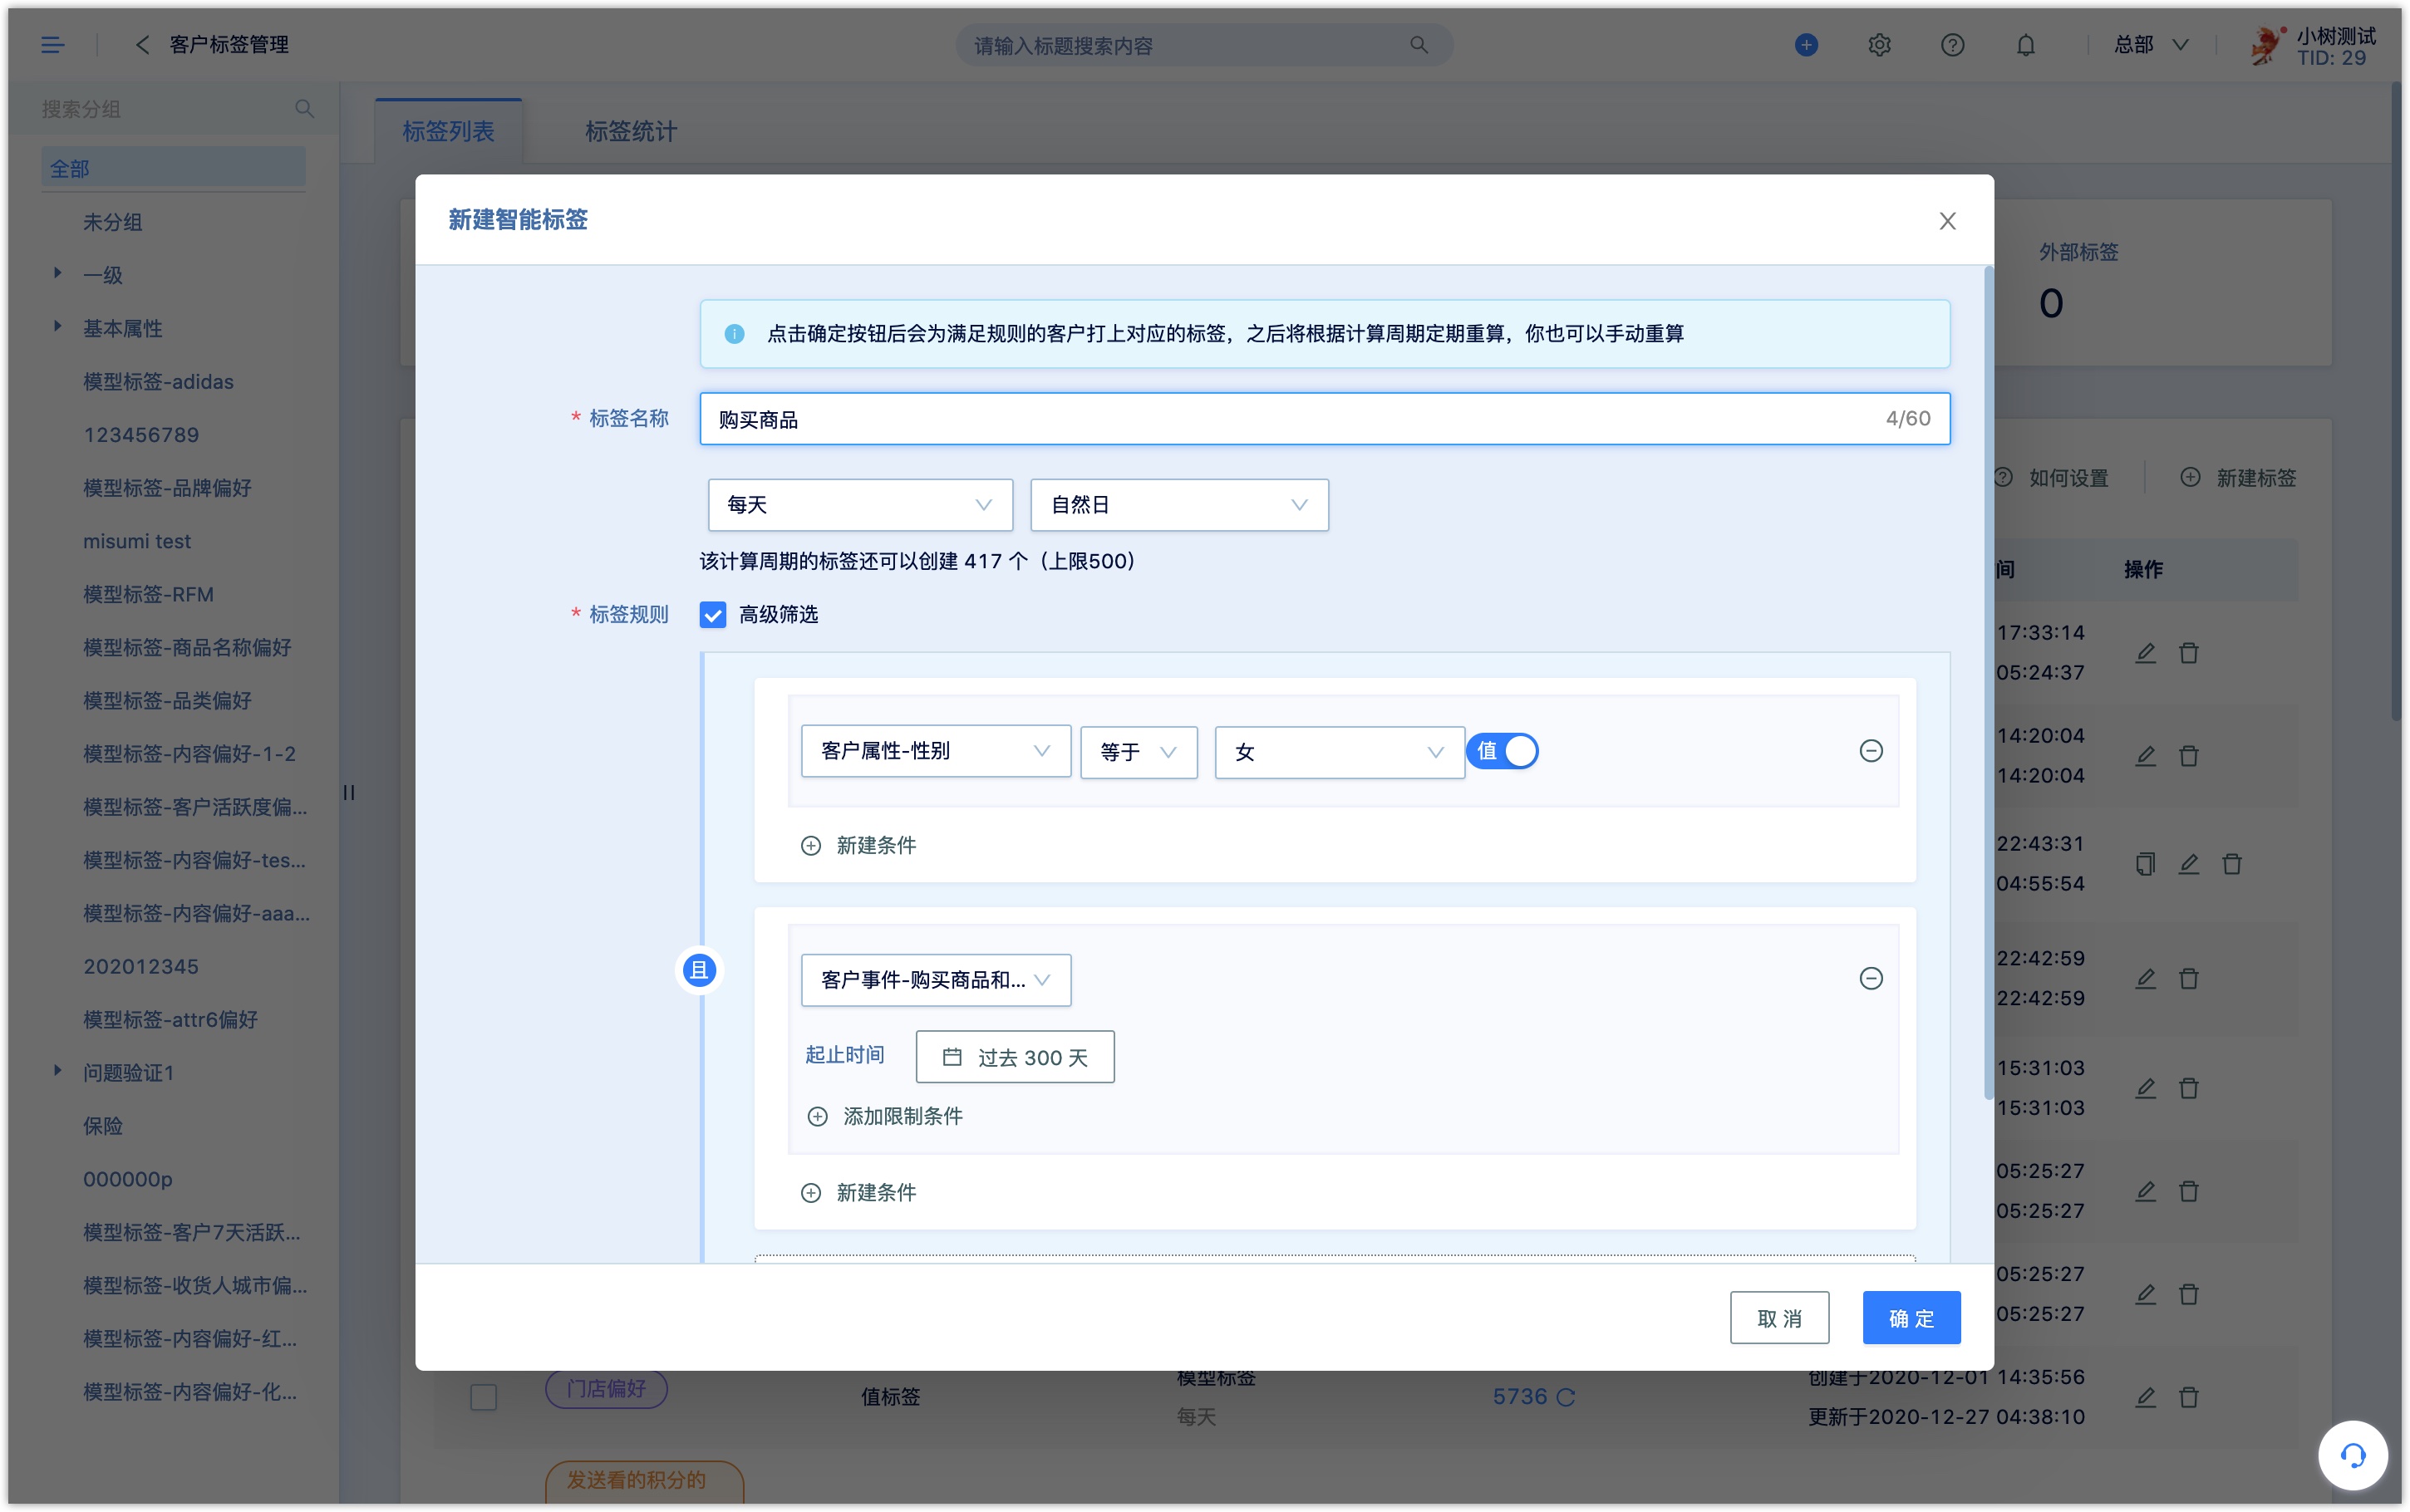
5.Model tags
The model tag is a sort of value tag. After setting the parameters of the model preset by the system, the eligible customers will be automatically marked and the tag value corresponding to each customer will be calculated.
Take the Brand Preference model as an example. If define a tag as 30-Day Brand Preference, set the model parameters as a brand that the customer purchases more than 4 times in the past 30 days will be marked as a preference brand, and the tag value vary to the customers . For example, customer A’s 30-day brand preference: brand X, customer B’s 30-day brand preference: brand Y.
Each model can support up to 10 tags with different parameters.
In DM Hub,single-value tags can also be inserted into different marketing contacts as variables as follows:
- WeChat related:WeChat template message, WeChat reply text & external page & mini program.
- Non-WeChat:Message, Webhook, APP Push, Email, Wechat page.
5.1 Brand/Category Preference model
Based on the order data of DM Hub, analyze the customer's buying habits and calculate the customer's brand and category preference tags.
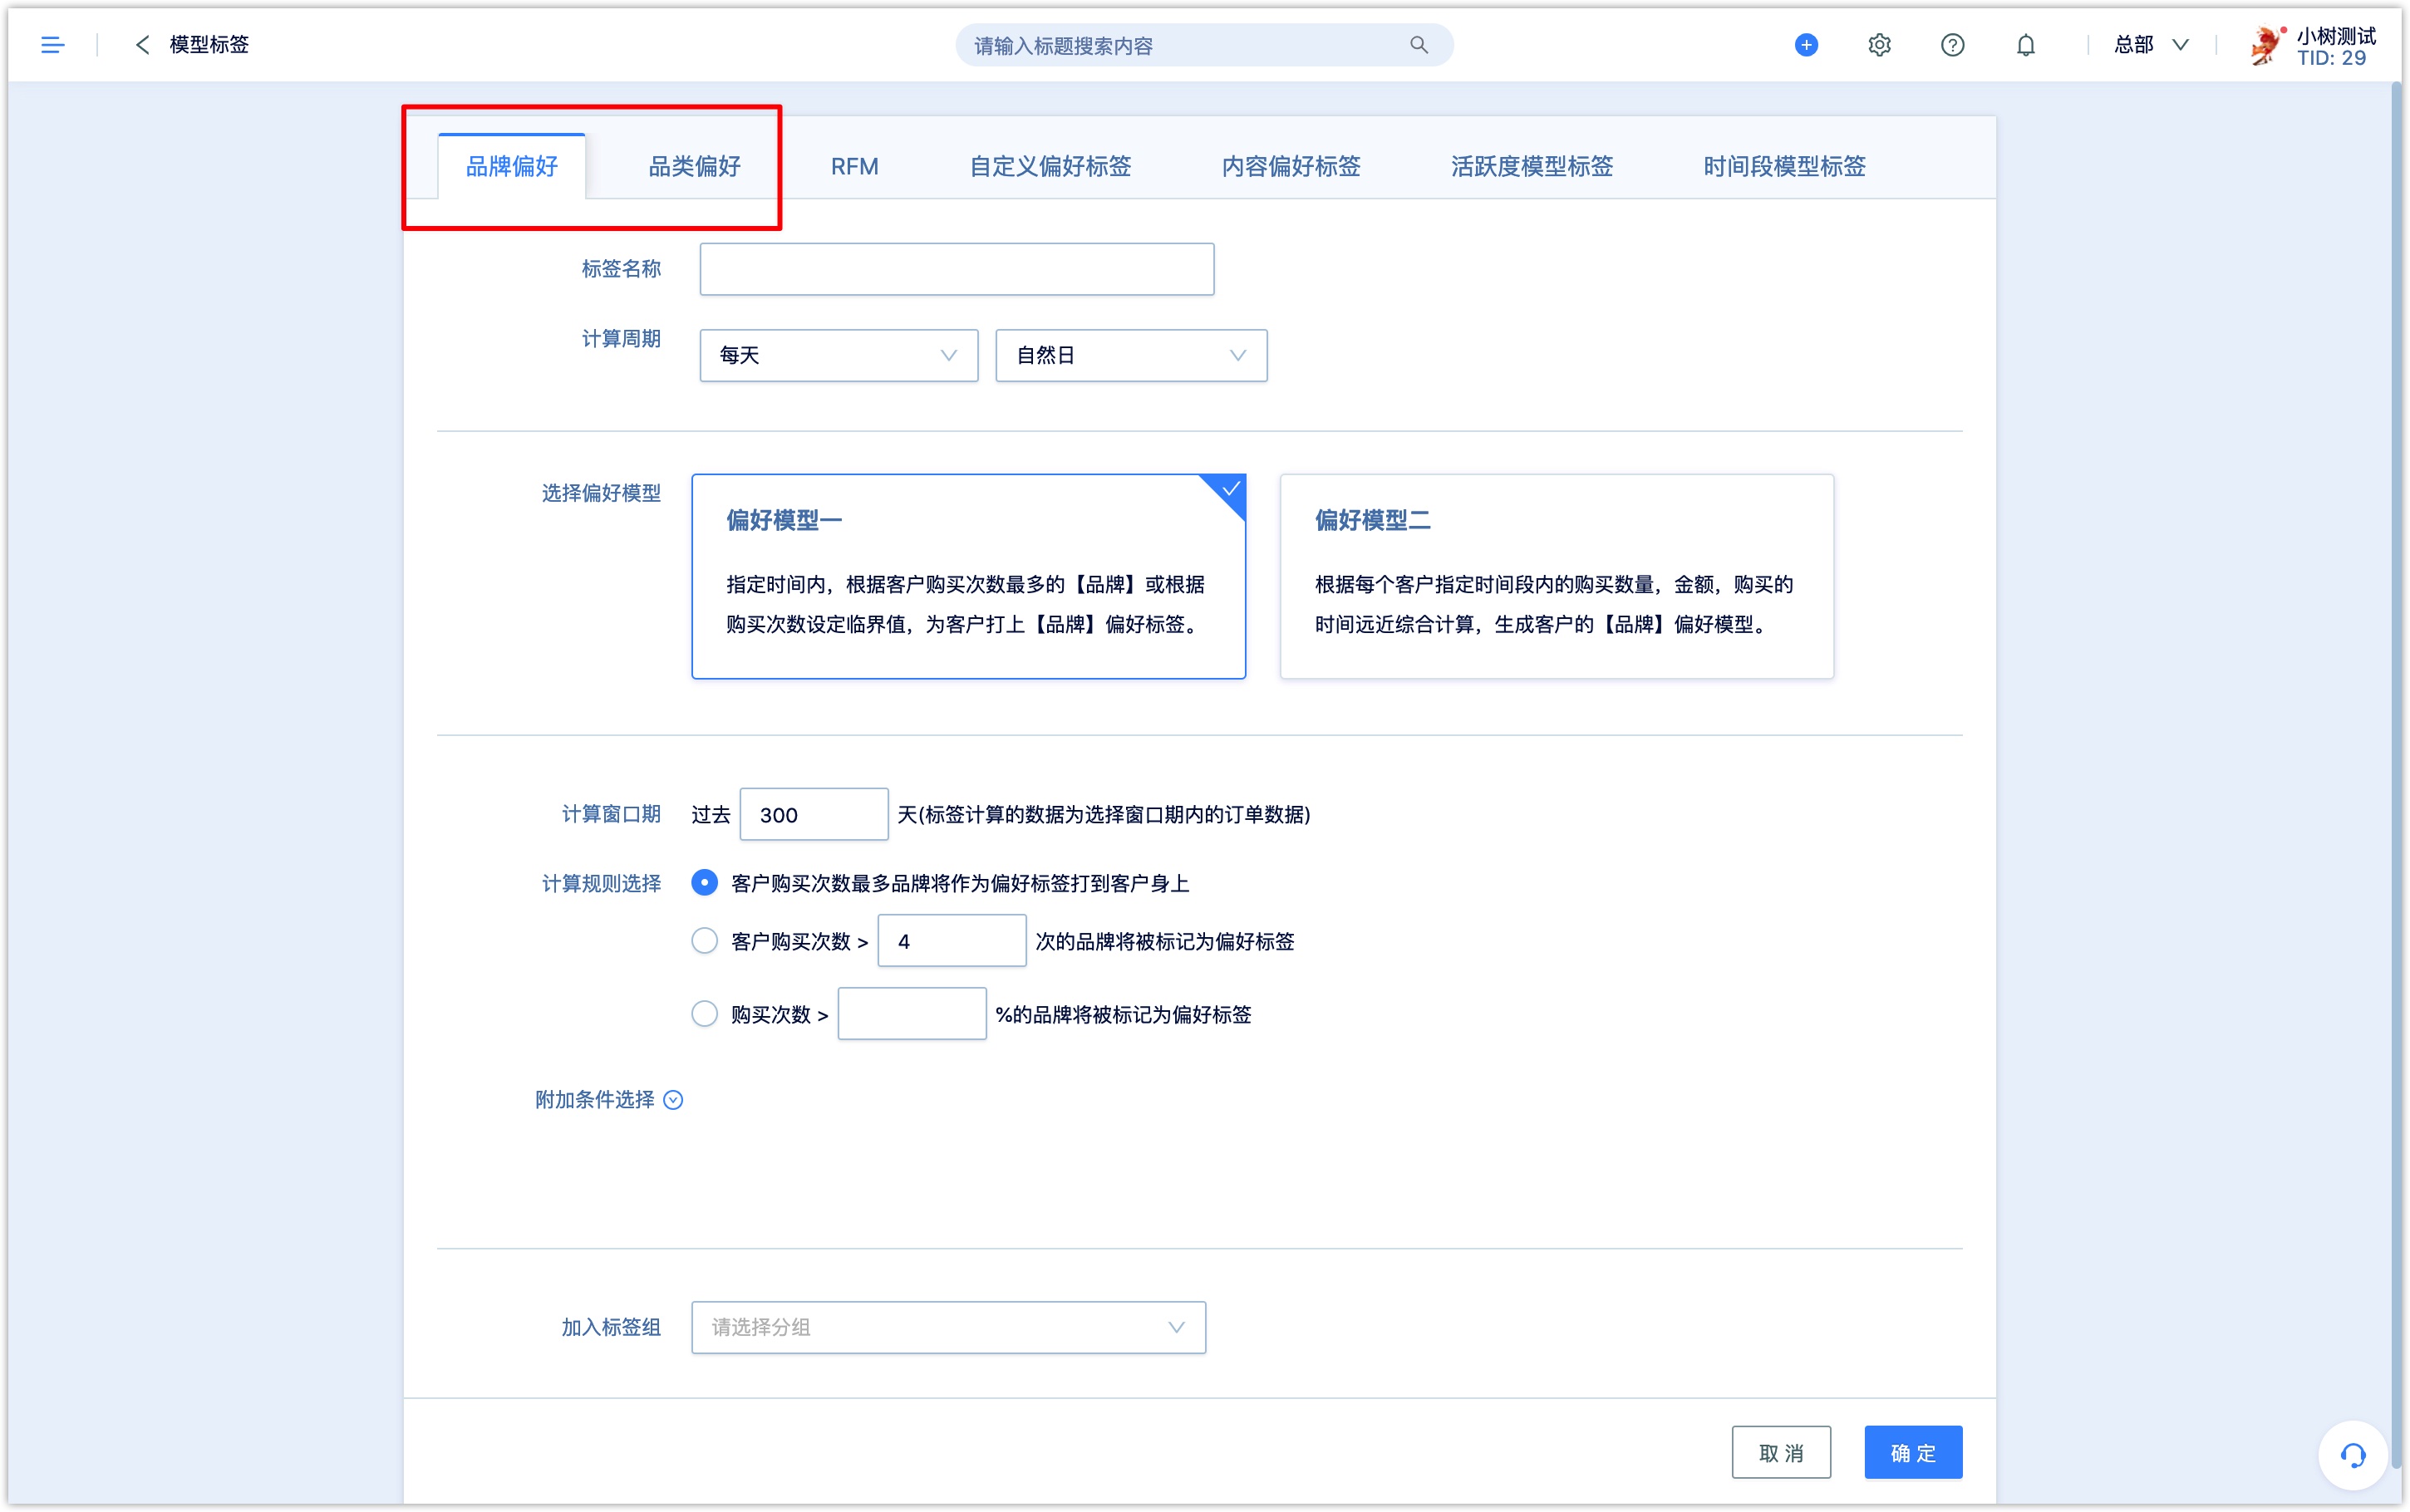
There are two calculation models for the brand/category preference tag model: model 1 is mainly based on the customer's purchase frequency, and model 2 is based on the customer's purchase time, the number of goods purchased, and the consumption amount.
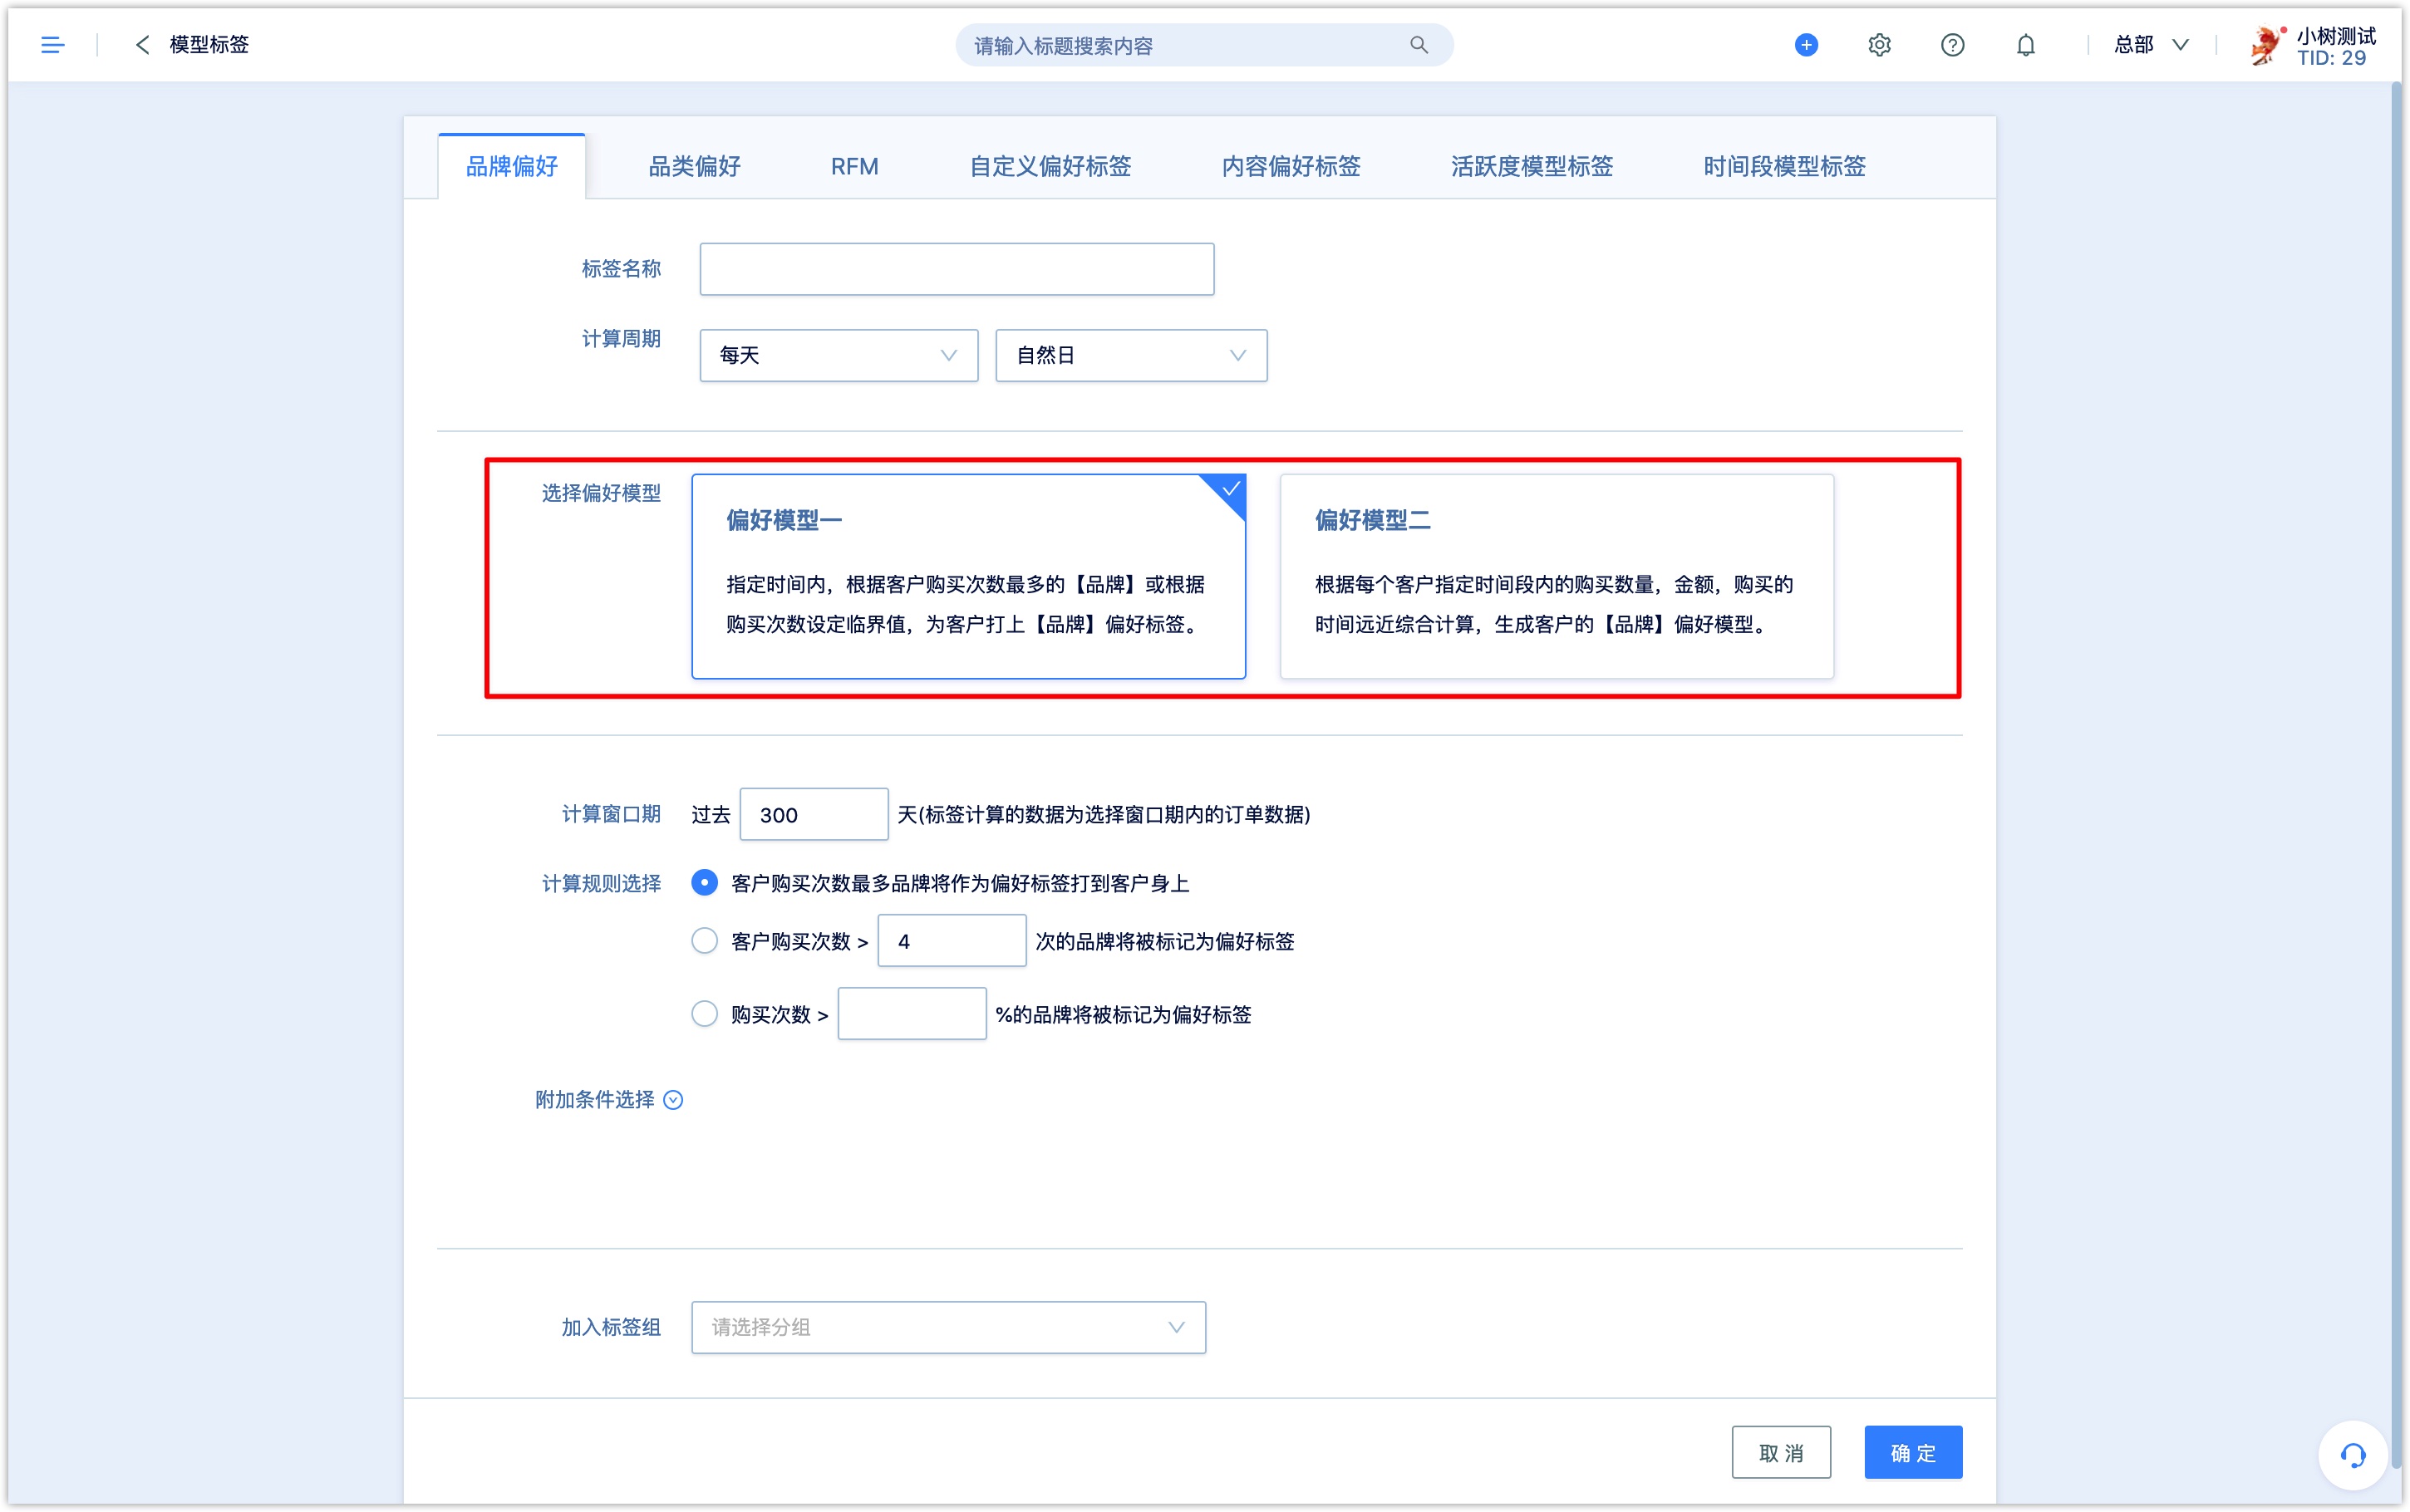
Model 1:
Set the window period for calculation: If you select the past 365 days, the tag will be calculated based on the order data in the past 365 days
Set calculation rules:there are 3 calculation rules below.(1) The brand/category with the most purchases by the customer to be the preference tag placed on the customer; (2) Brands/categories that customers purchase more than X (set a specific value) times to be marked as preference tags on customers;(3) Brands/categories with more than X % (set a specific value) purchases to be marked as preference tags on customers.
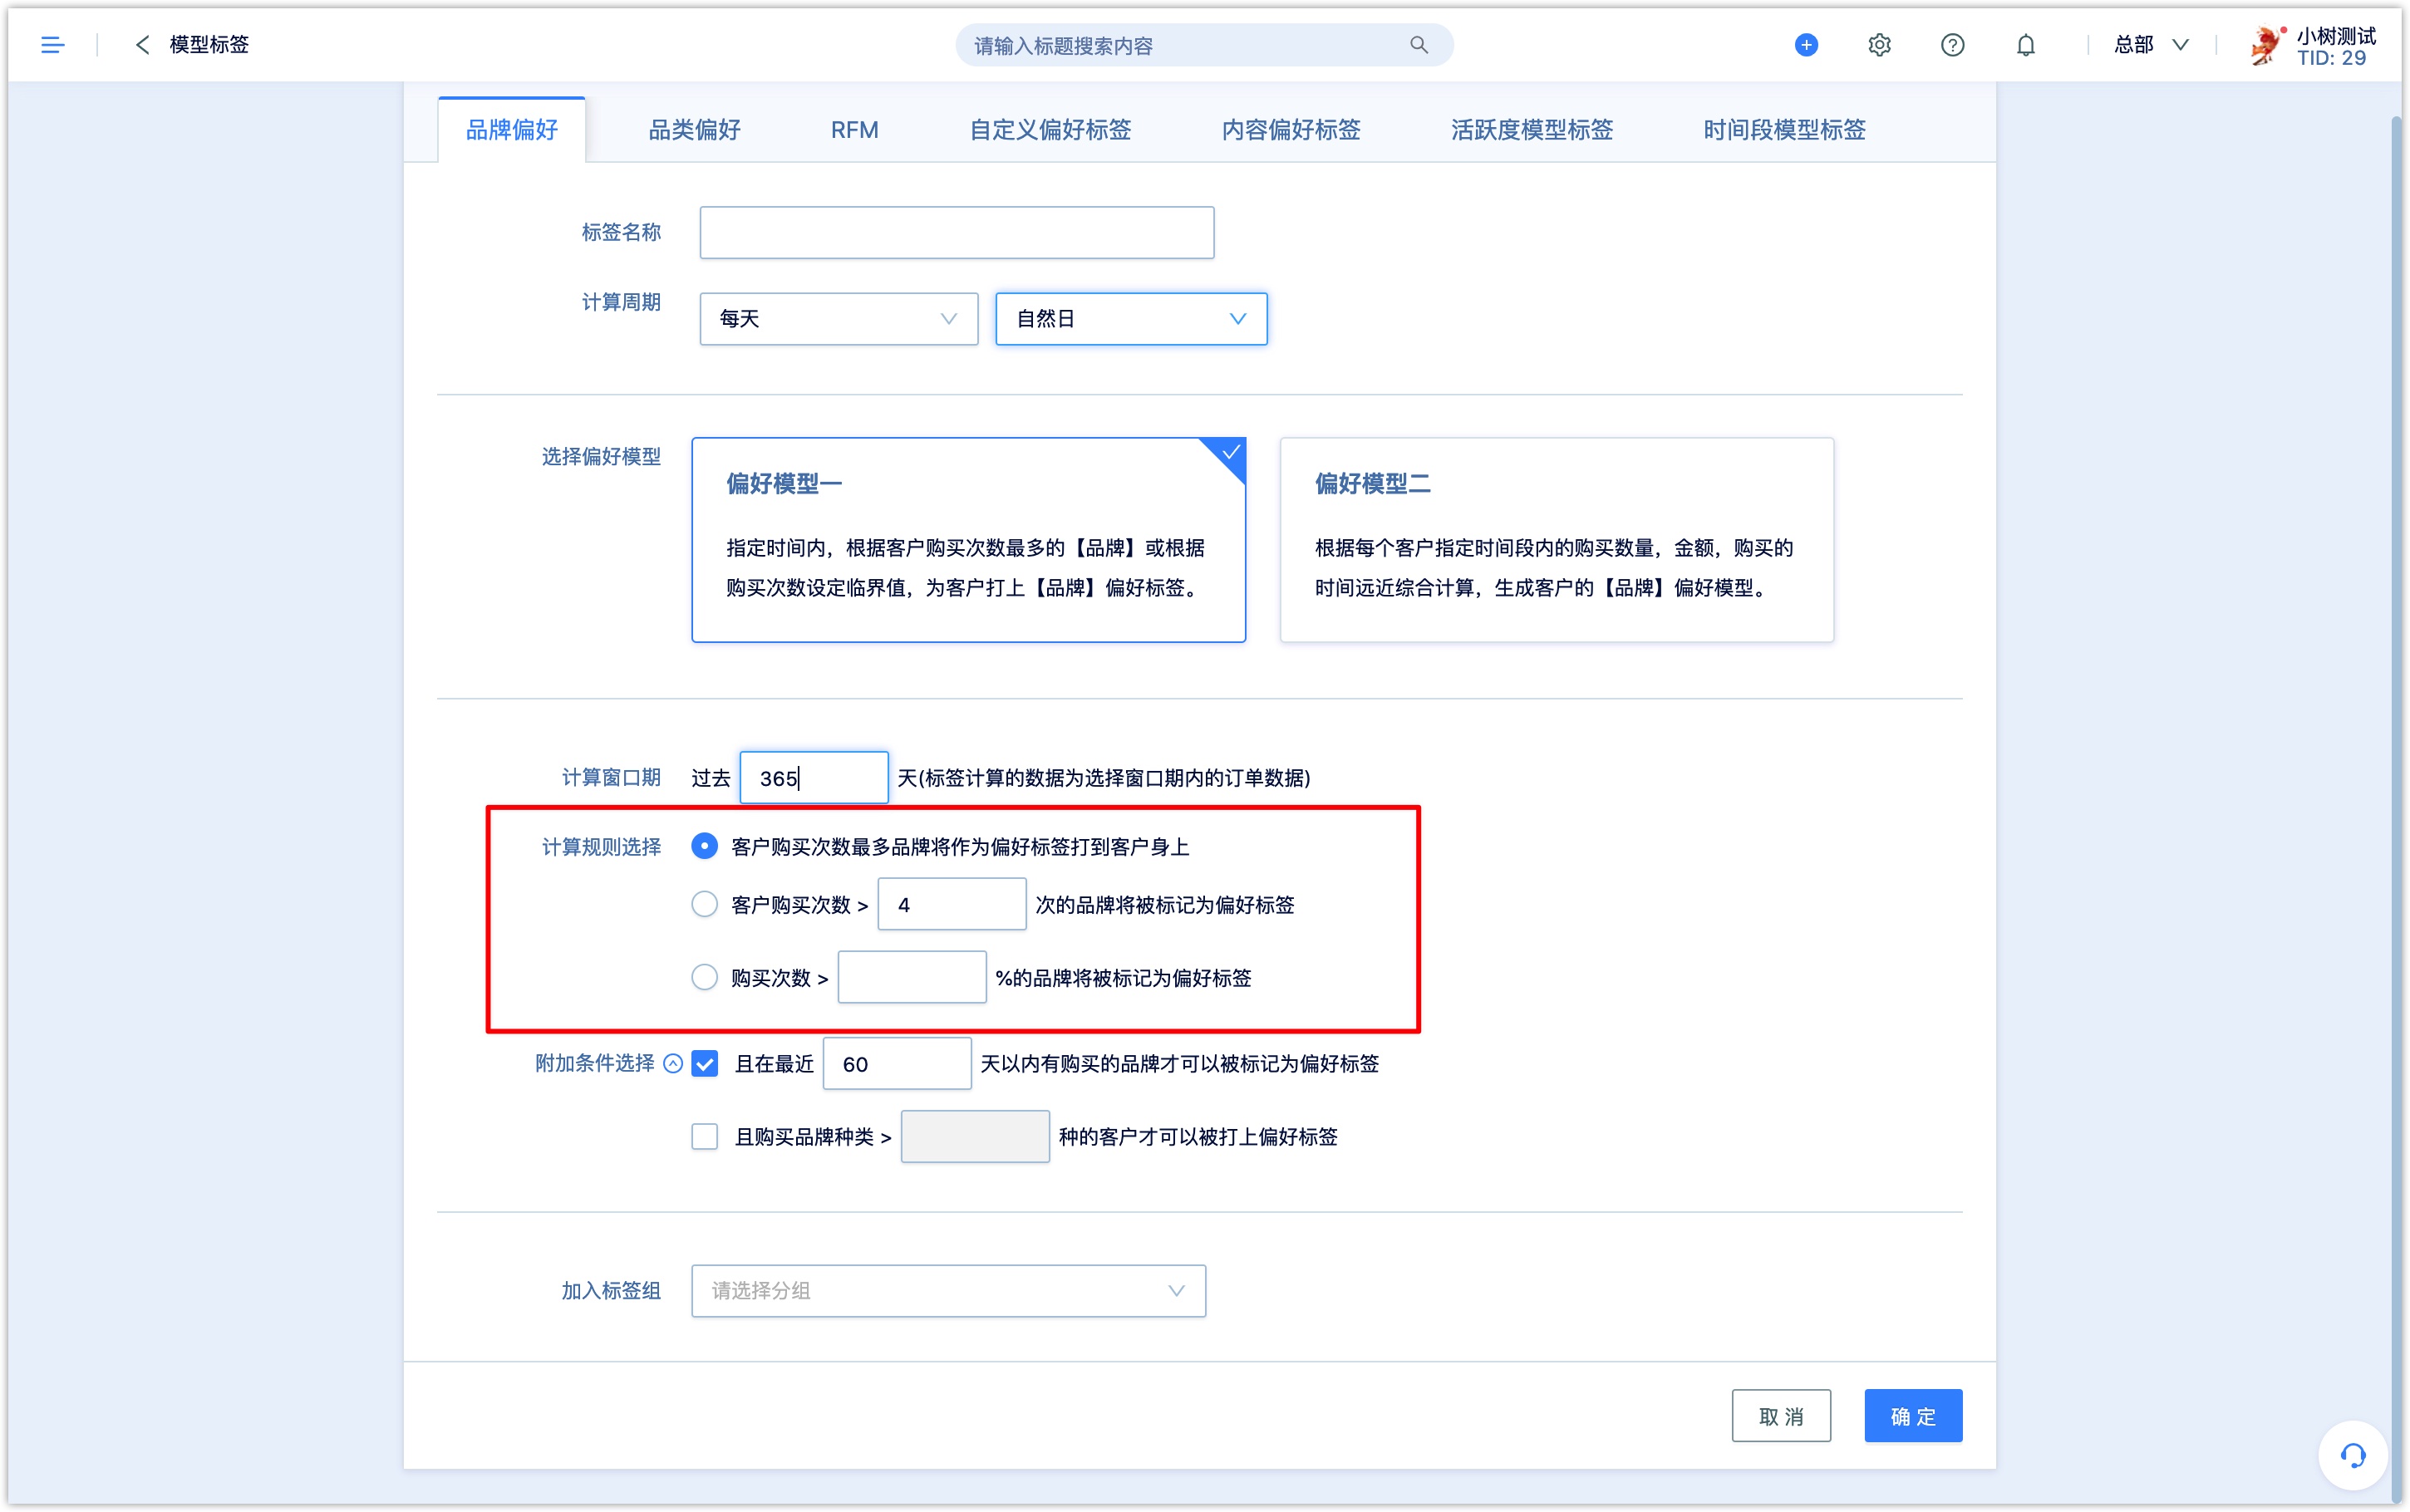
Additional conditions:restrictions can be added at the same time, such as only brands/categories that have been purchased within the last X days can be preference tags or only customers who have purchased more than X types of brands/categories will be marked with preference tags.
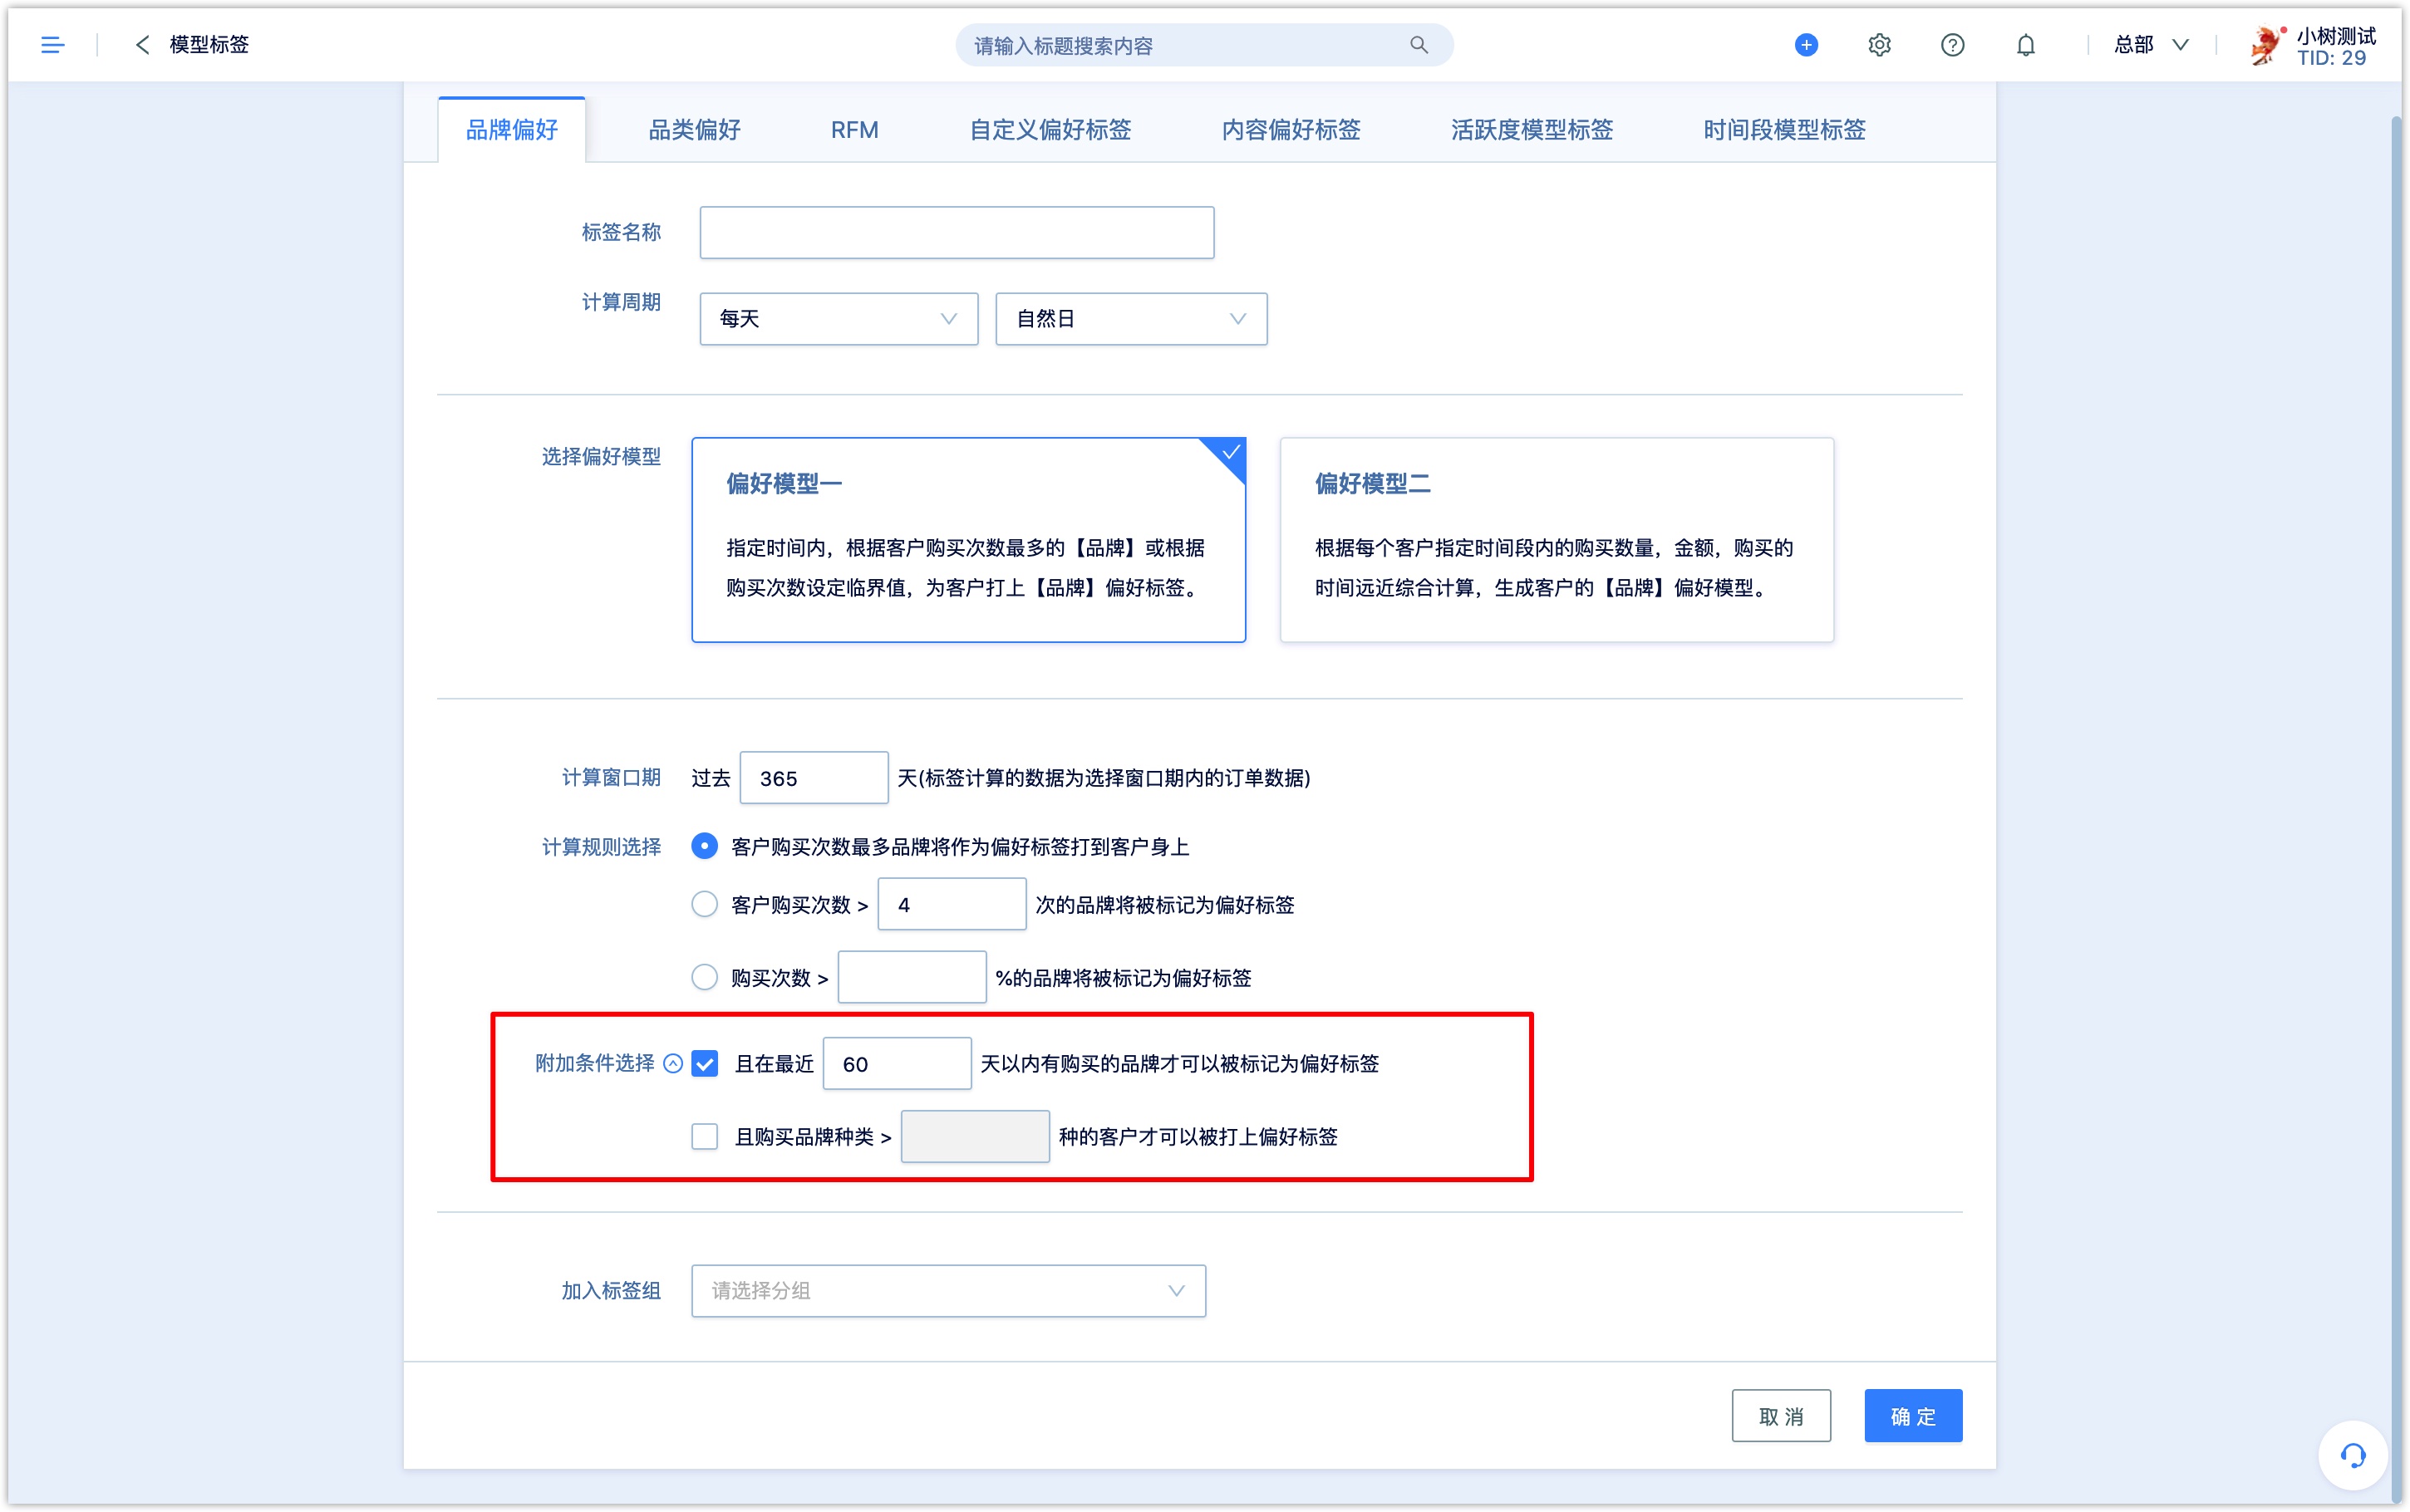
- Add to tag group:select a tag group from the drop-down box, the calculated preference tag will be placed in the group on the tag list page for easy search and management.
Model 2:
- Setting weight
Set the window period for calculation: If you select the past 365 days, the tag will be calculated based on the order data in the past 365 days
In addition, you can set a limit on the number of brands/categories that customers have purchased. For example, only customers who have purchased more than two brands/categories within the window can be marked with the tag。
Preference factor weights and time decay parameters::
Set the influence weights of three factors (time decay, number of purchases, purchase amount), and DM Hub will comprehensively calculate the score of each brand/category purchased by the customer based on the factors and weights. The formula is as follows:
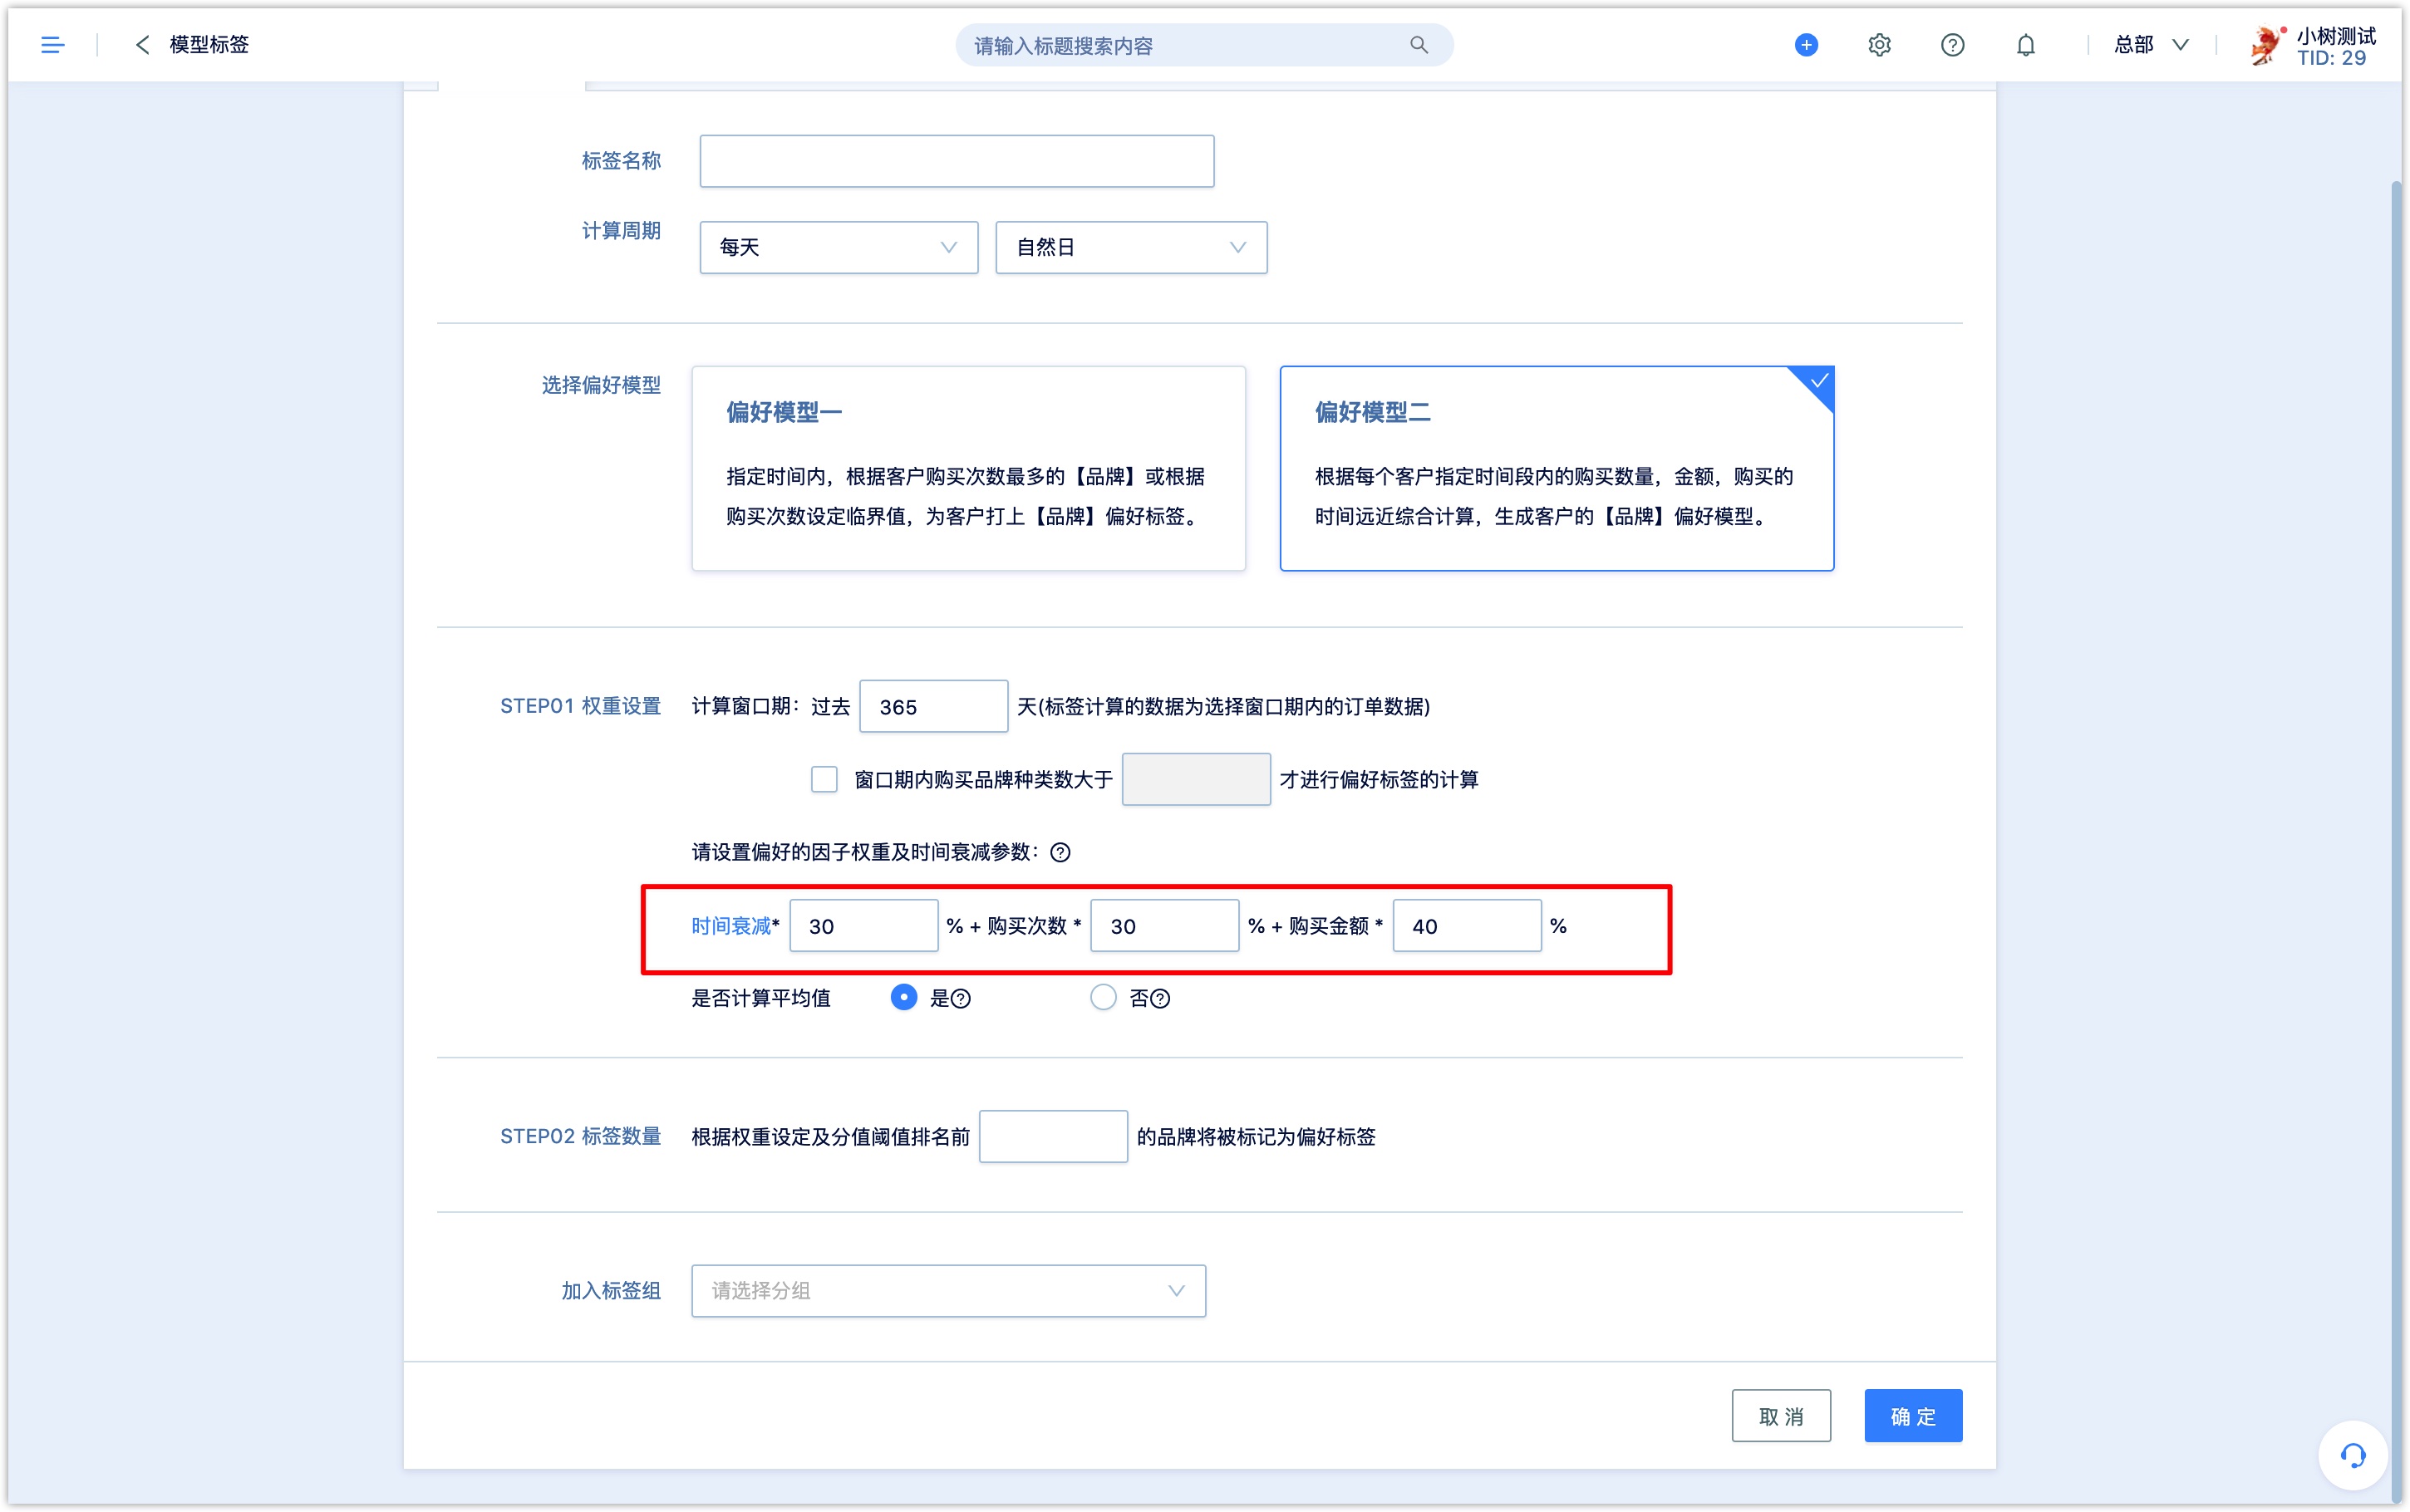
Time decay weight 1 (%) + number of purchases weight 2 (%) + purchase amount * weight 3 (%).
Note: The sum of the weights must be 100%. If a factor does not participate in the model calculation, the weight can be set to 0%.The factors are explained as follows:
- Time decay R value: The number of days since the last time the brand/category was purchased. The smaller the R value, the higher the customer's recent attention to the brand/category, and the higher the factor score.
- oThe R value presets 4 score ranges, from high to low, from 1 to 0.2 points. The number of days corresponding to the interval can be set by yourself.
- Number of purchases:the total number of purchases by customers corresponding to the brand/category Purchase amount:the total amount actually paid by the customer corresponding to the brand/category
- Set the number of places for the tag value
Sort the scores of brands/categories purchased by customers during the window period and the brands/categories with the top scores will be placed on customers as preference tags according to the number of places for the tag value.
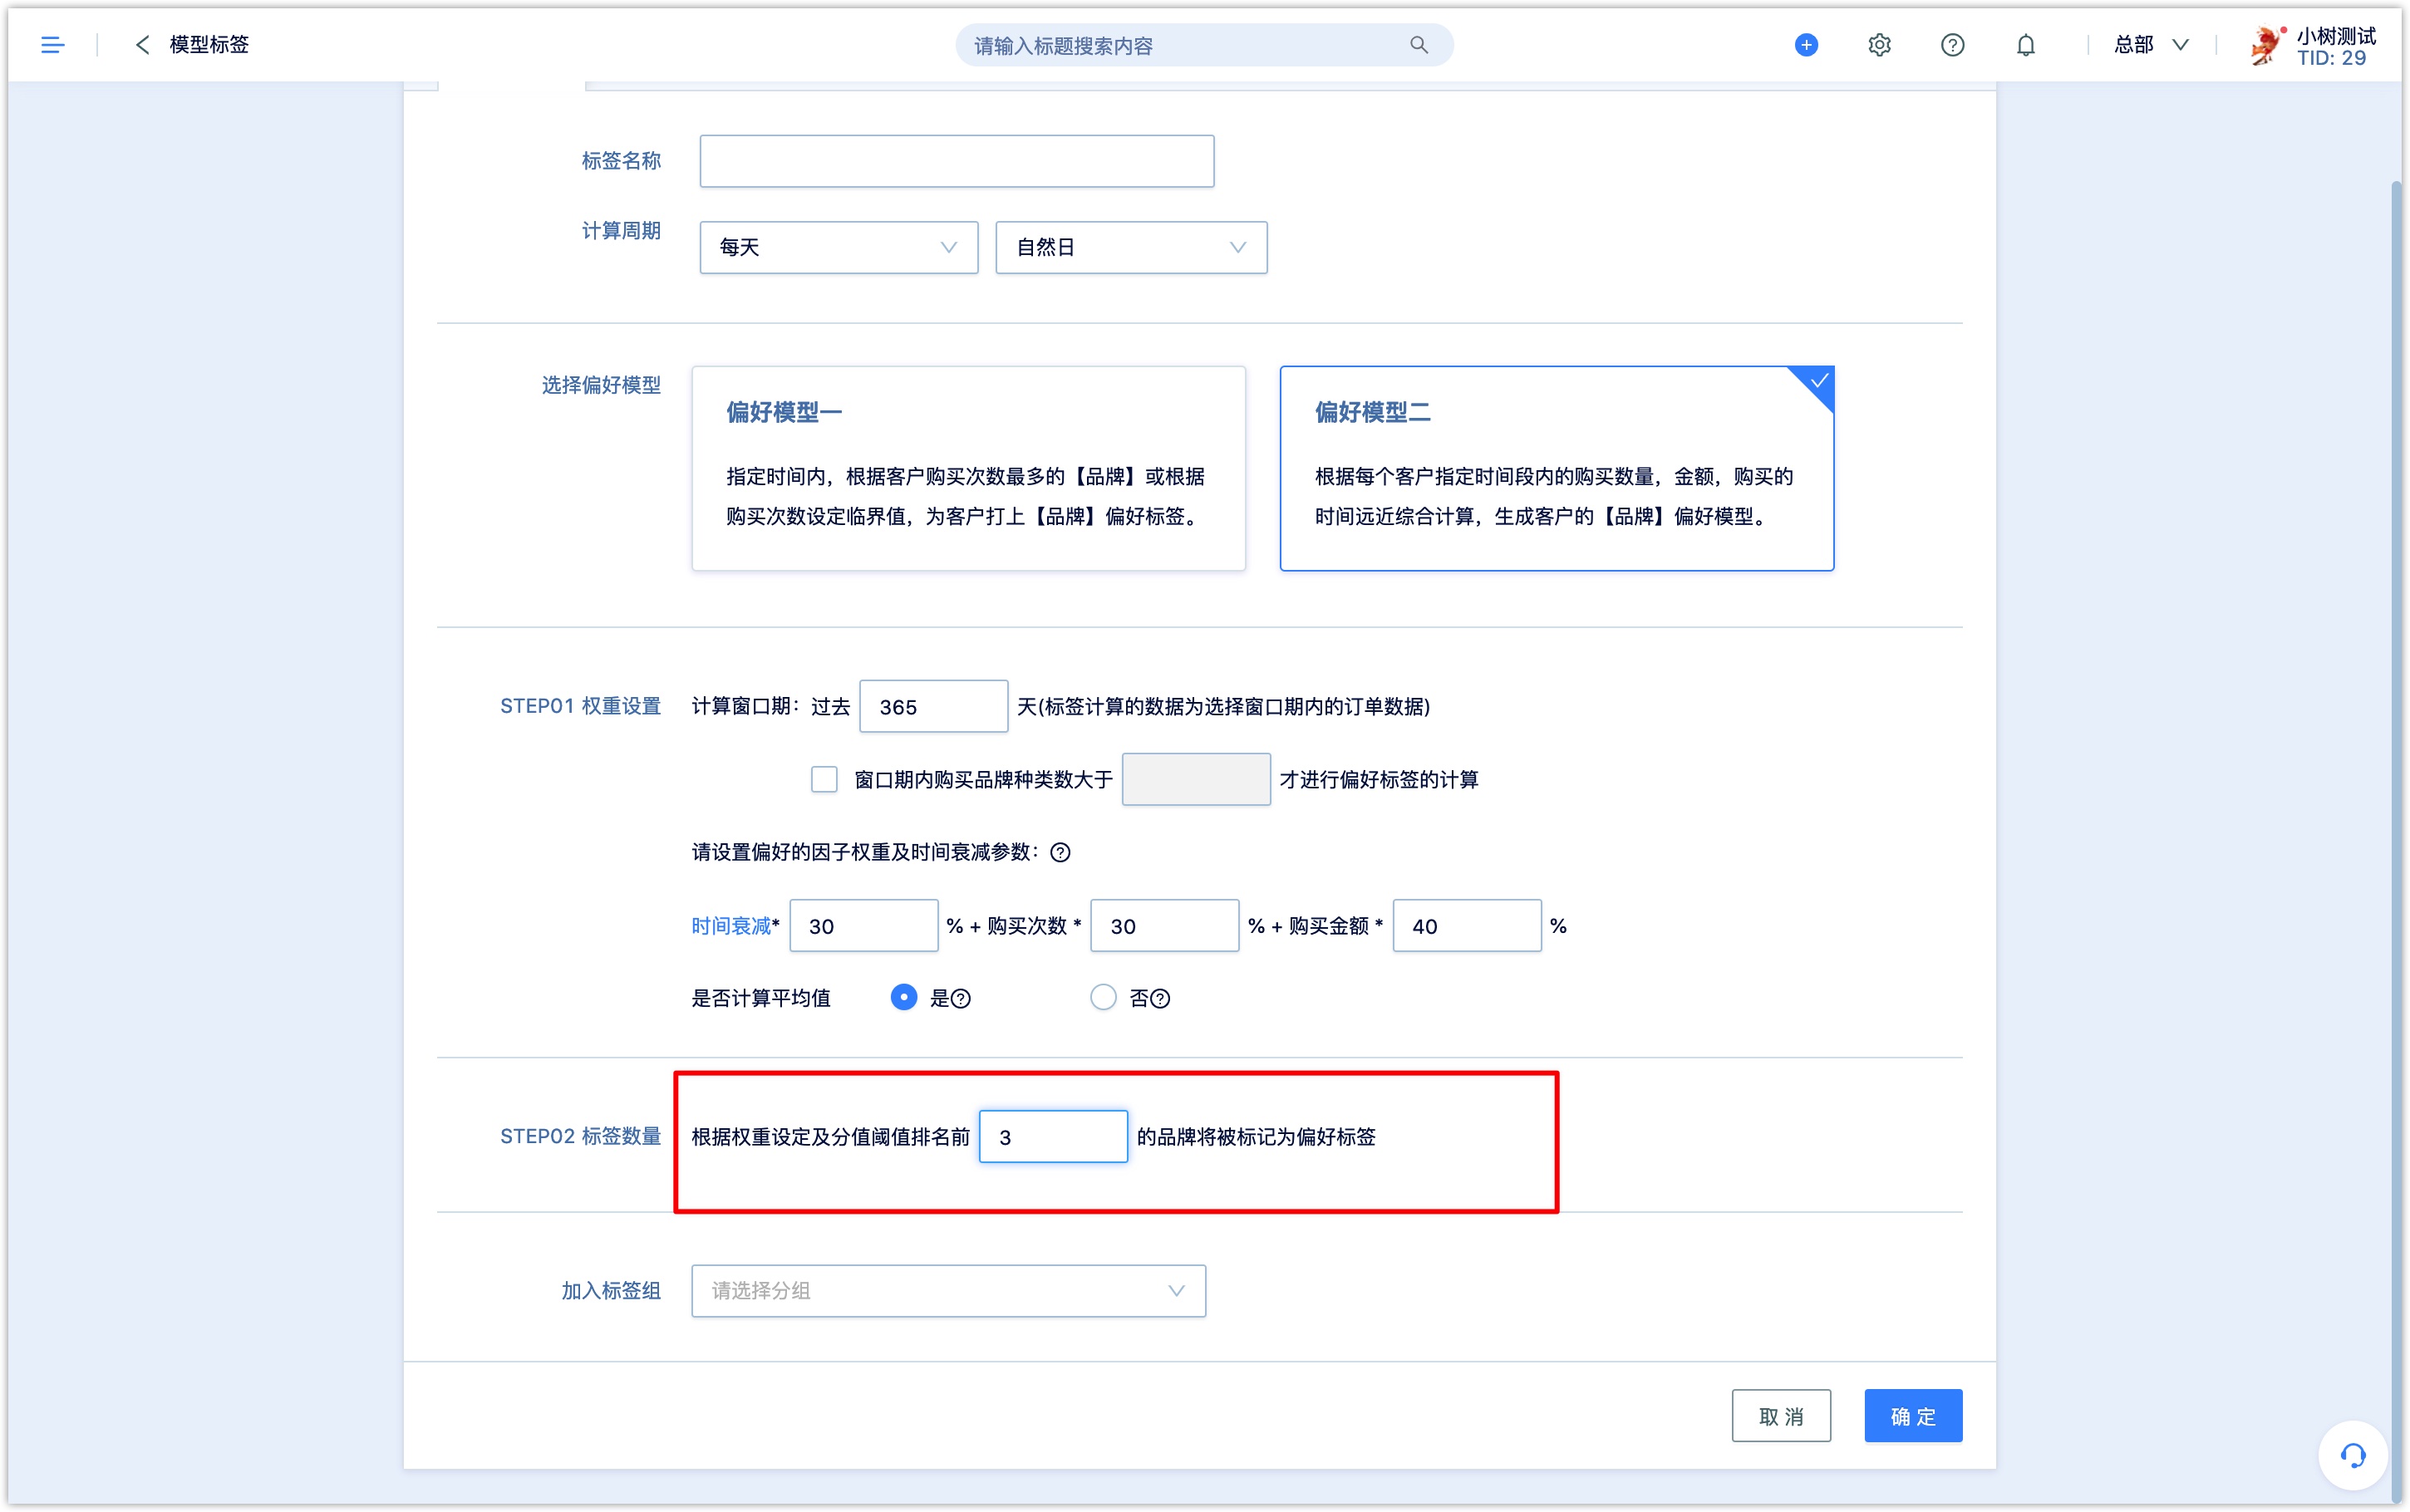
When calculating preference tags, you can set to exclude brands/categories whose scores are less than the average score of all the brands/categories to eliminate the interference of deviation scores, so as to ensure the accuracy of each customer's preference tag value.
- Add to tag group: select a tag group from the drop-down box, the calculated preference tag will be placed in the group on the tag list page for easy search and management.

5.2 RFM model
The RFM model dynamically measures the value of the customer by analyzing the three indicators of the customer's recent purchase behavior, the overall frequency of consumption, and the amount of consumption.
- Recency:How recently (by day)did the customer purchase? that is, the time interval (by day) since the most recent purchase within the window period.
- Frequency:How often do they purchase? the number of purchases within the window period.
- Monetary:How much do they spend? that is, the actual total payment amount of orders during the window period
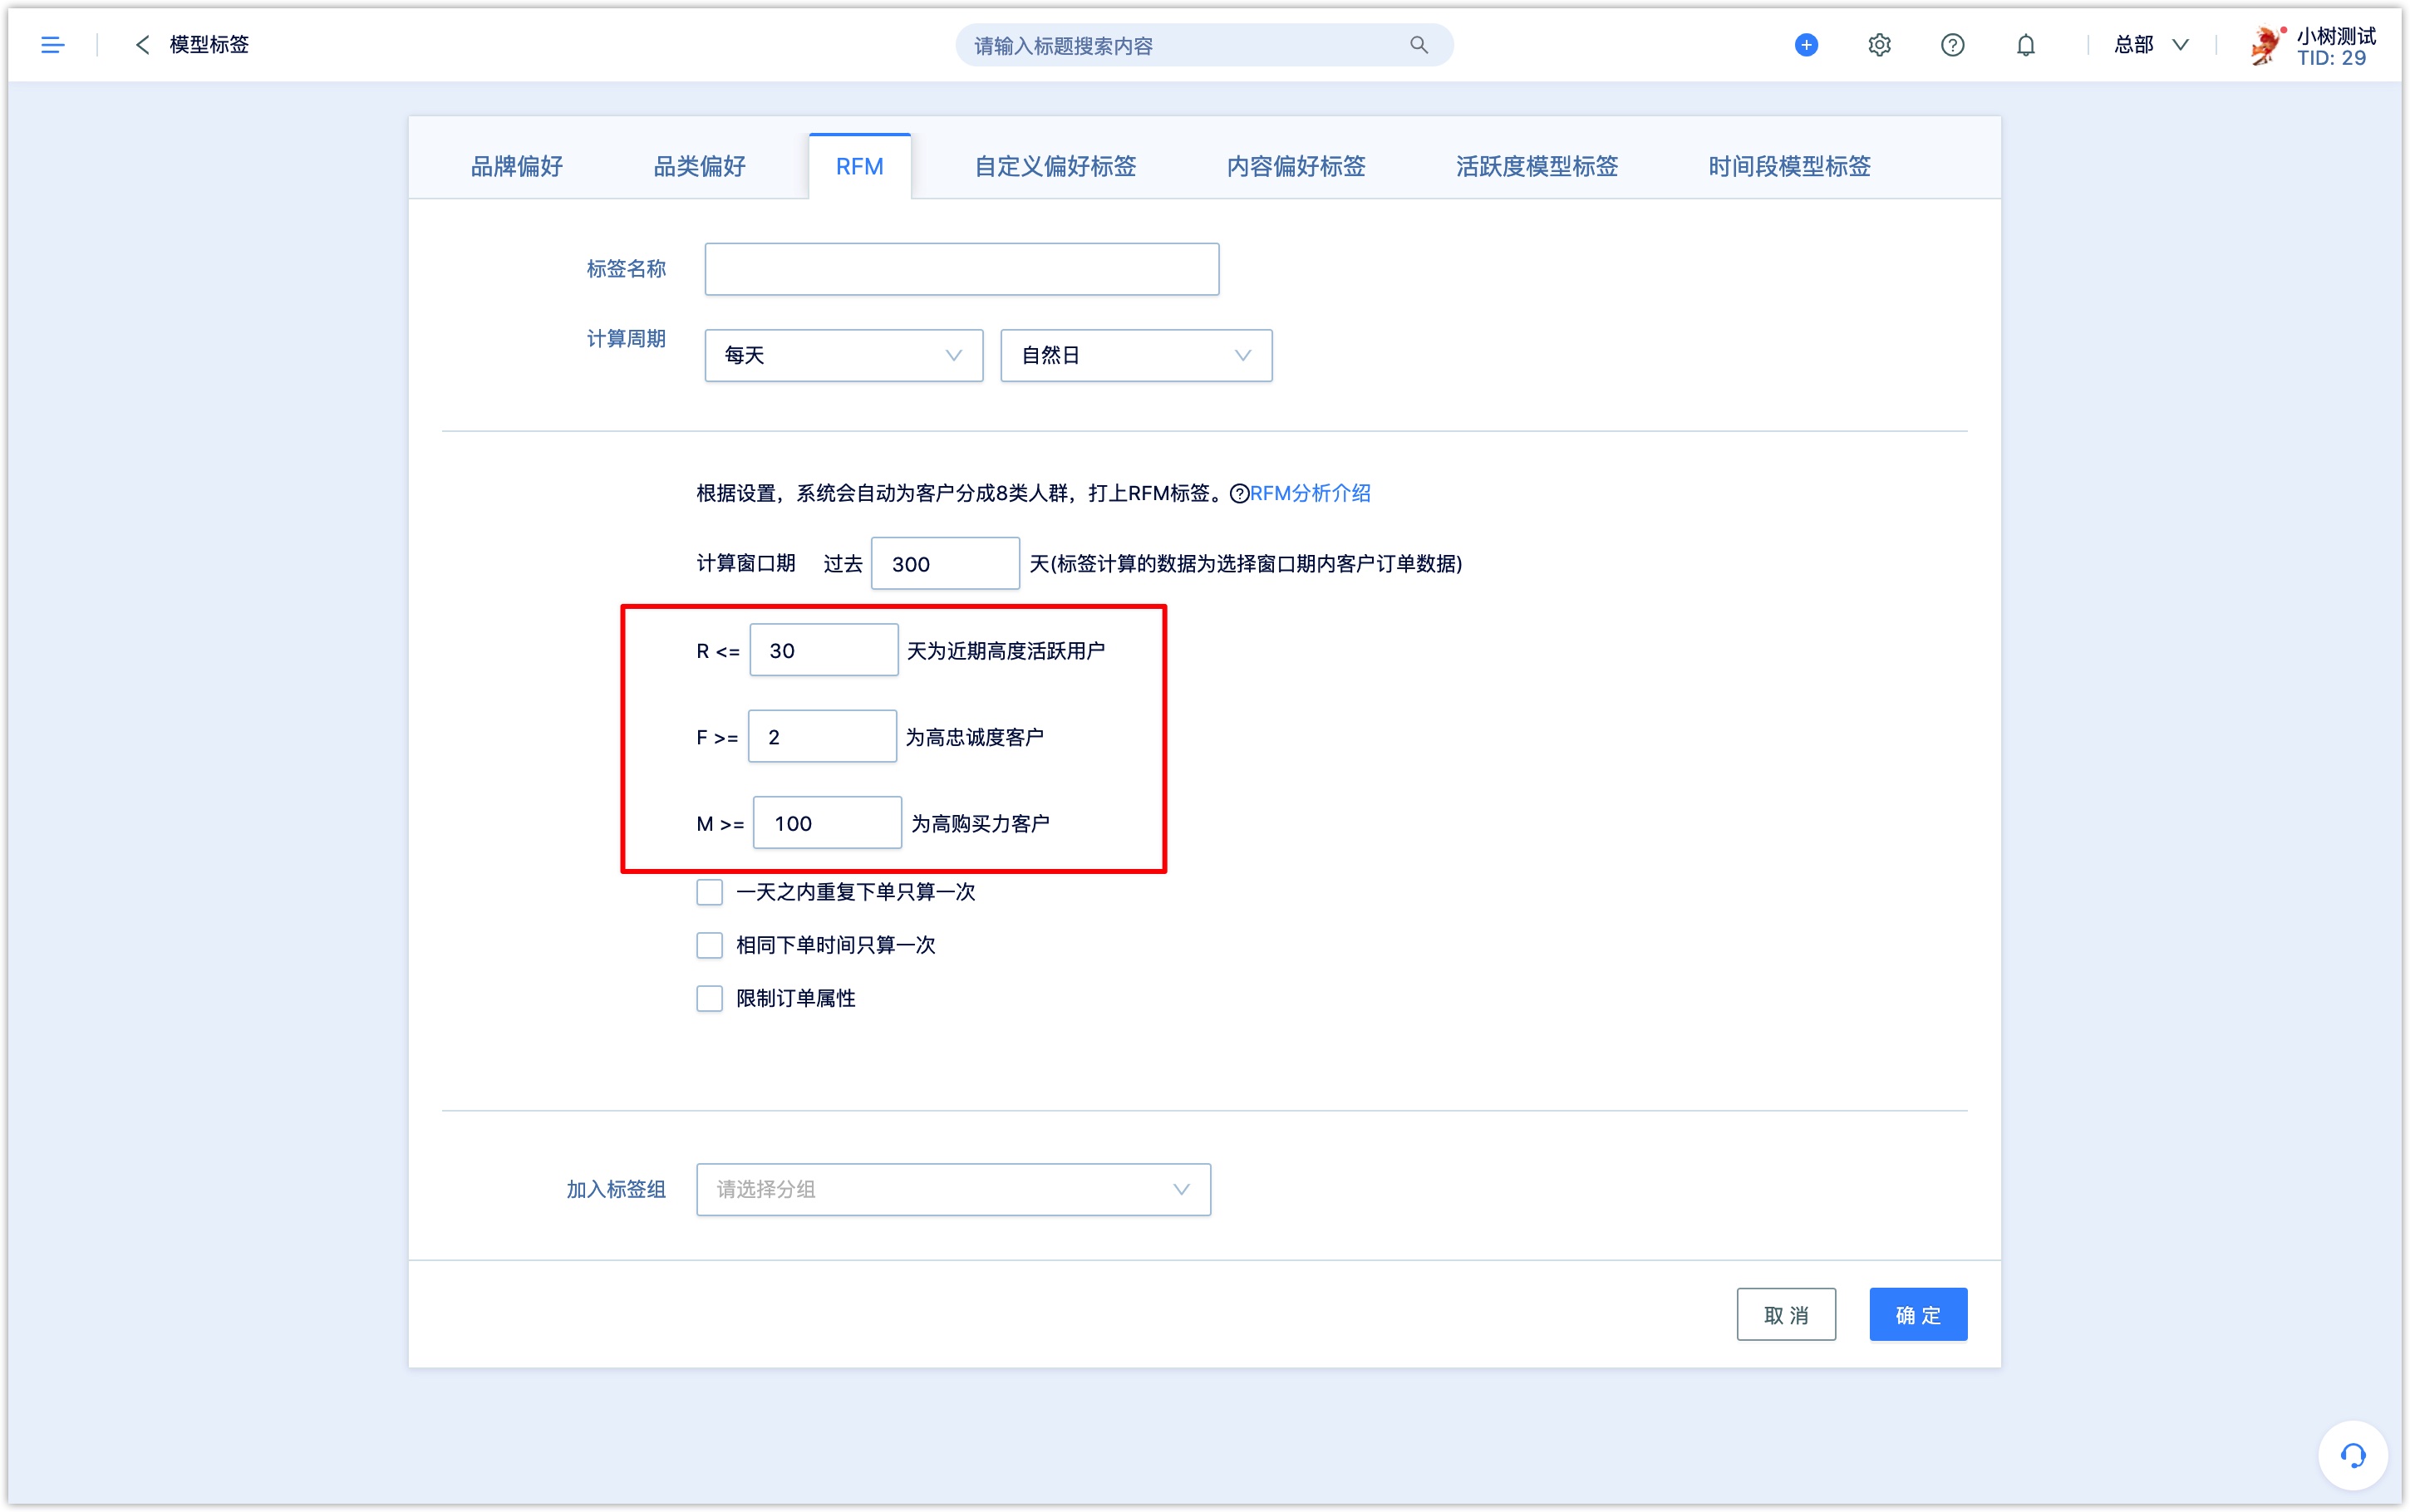
Set the parameters of three indicators. For example, R<=30 is a recent high-active user, then R>30 is a low-active user; F>=2 is a high-loyal user, then F<2 is a low-loyal user; M> =100 is a high purchasing power customer, then M<100 is a low purchasing power customer.
According to the parameters of these three indicators, customers are divided into 8 groups, and 8 groups of different RFM tag values are assigned to them.
5.3Custom Preference tag
In addition to supporting the calculation of brand and category preferences, the preference model tag can also customize any text attribute field of the order to perform preference calculation, including user-defined order attributes, such as Promotion Type.
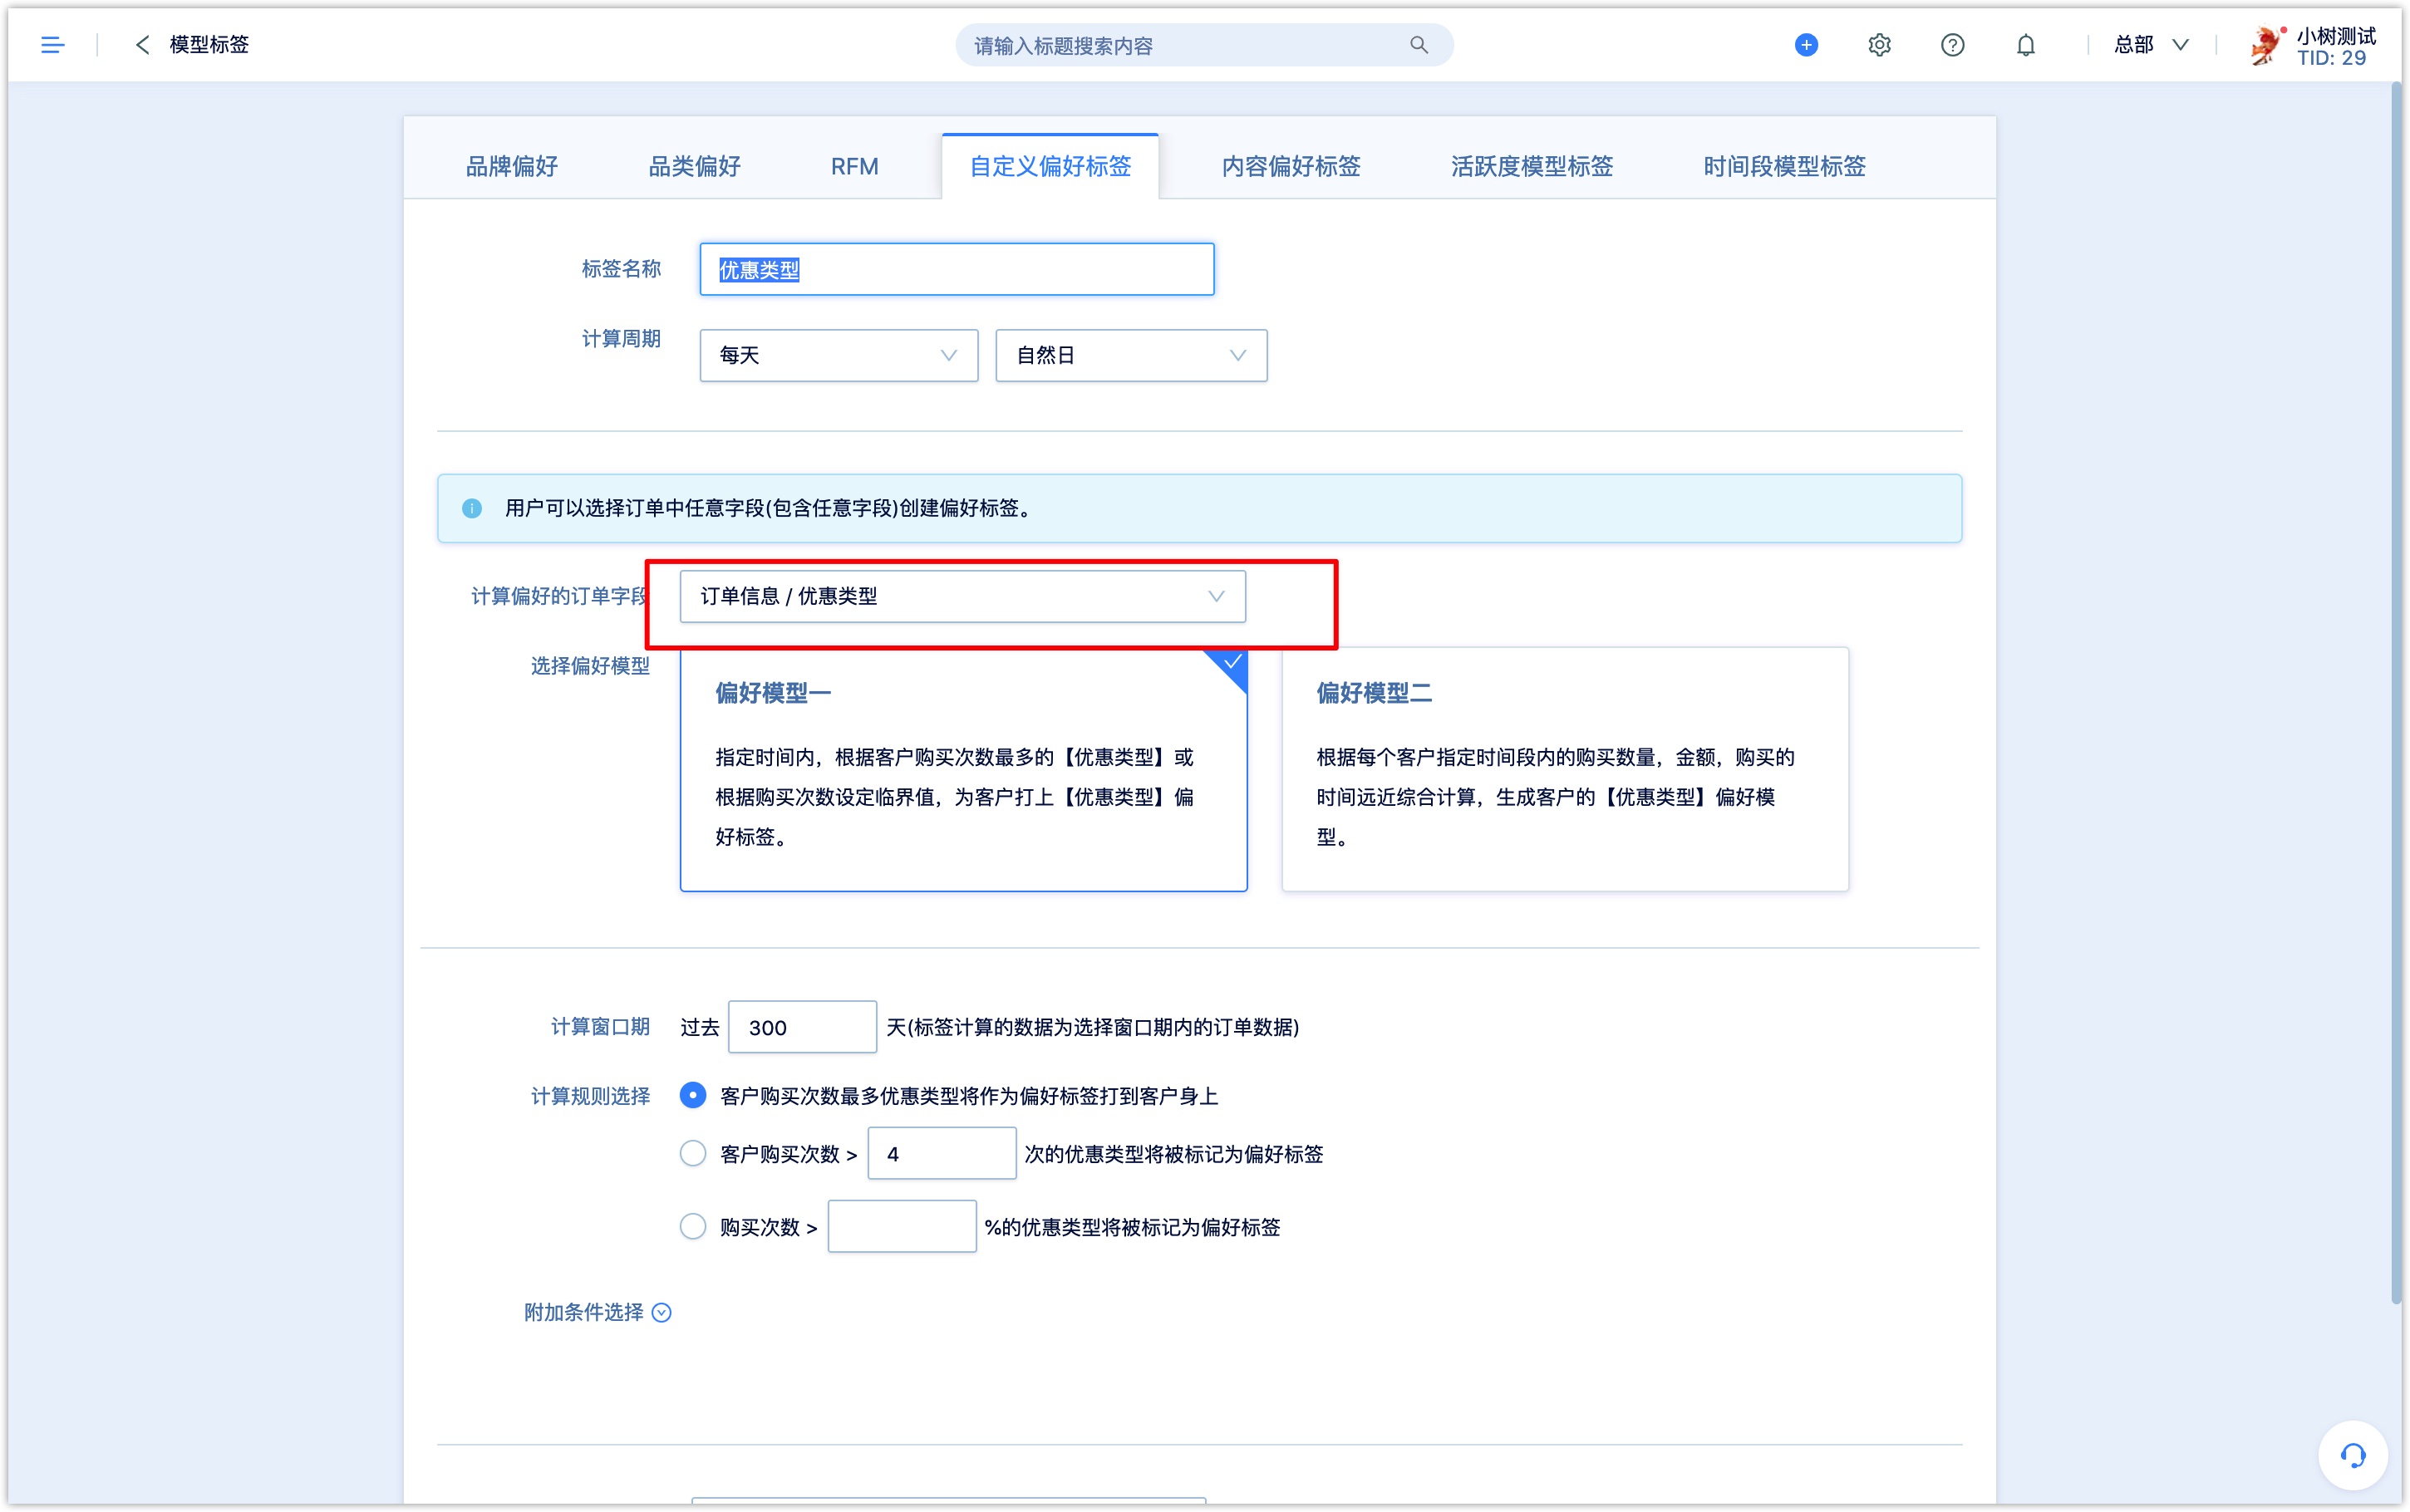
you can refer toBrand/Category Preference model
5.4Content Preference Model
In the DM Hub, you can set content tags on Wechat page, QR codes of official accounts, Menus of official accounts, emails, etc. When the customer interacts with the content, the corresponding content tag will be marked, and the number of times and marking time will be recorded. With the Content Preference Model, it is possible to calculate the customer's content preference and convert content tags into customer tags.
For example, the content tag group “product category” contains content tags: product A, product B, product C, and product D.
A customer has been tagged with content labeling product A (9 times), product B (10 times), and product C (11 times) in the last 30 days.
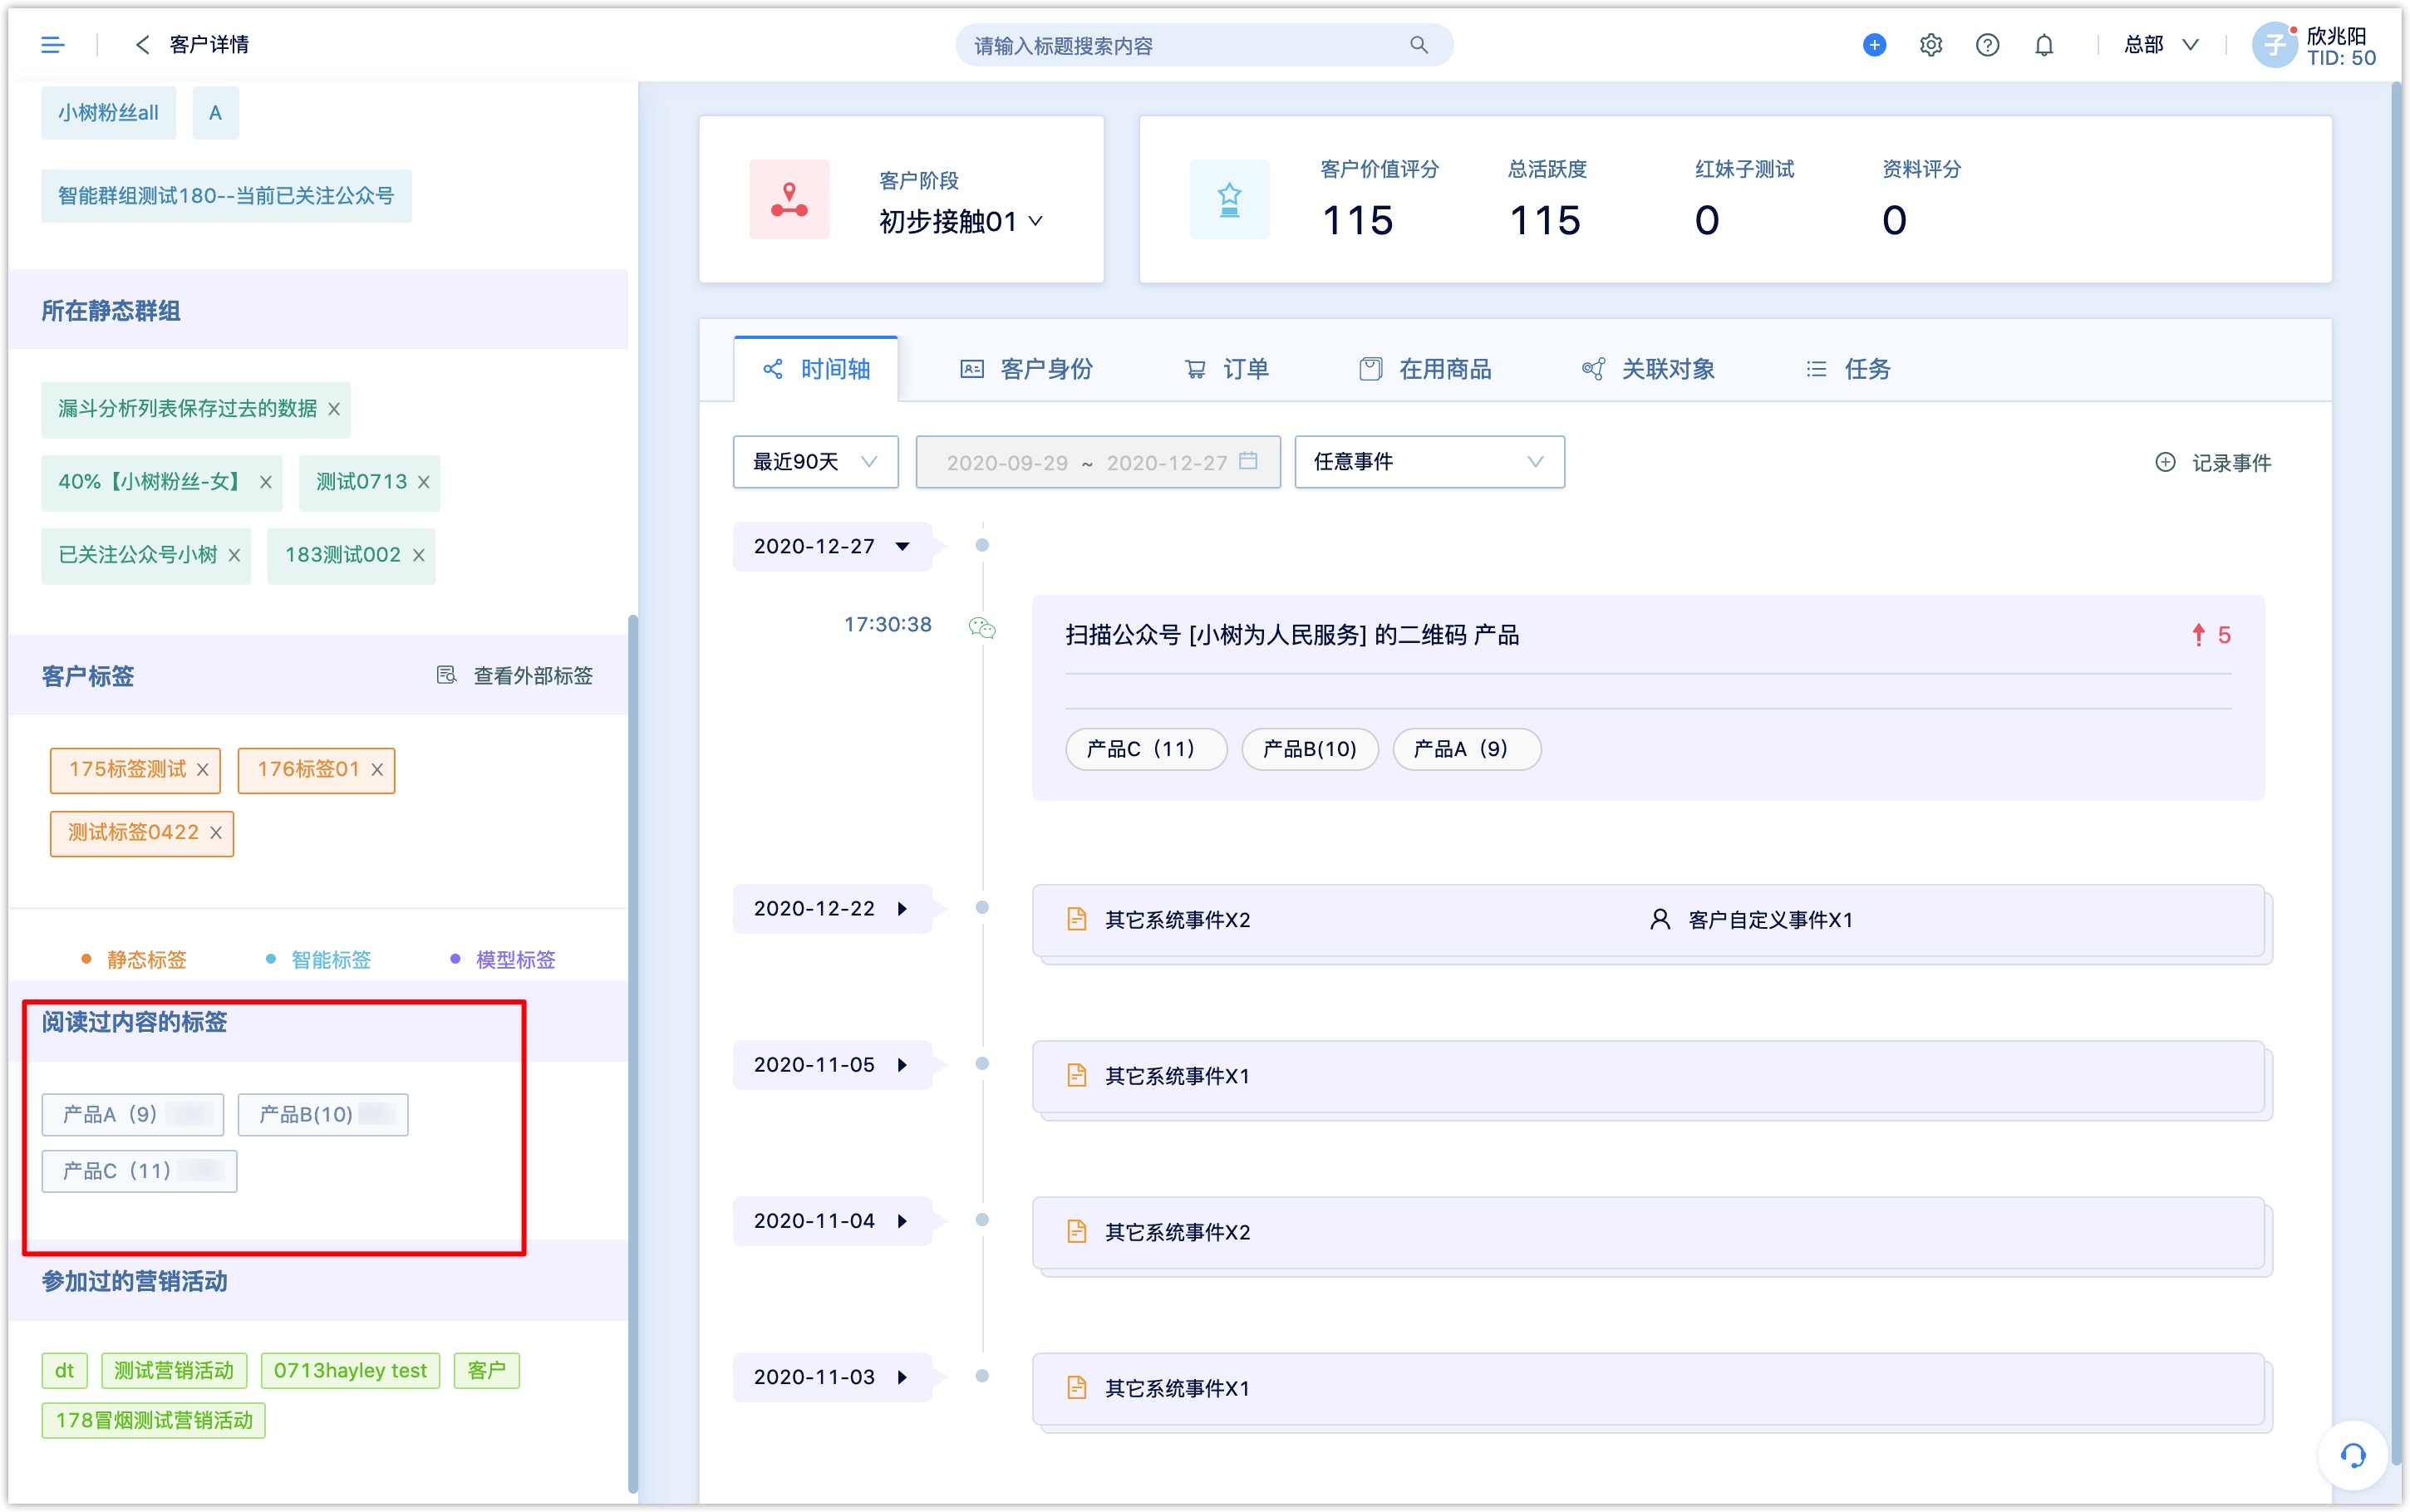
The calculation rules and settings of the content preference model are as follows:
Select a content tag group:the tags in the group will be calculated, and the content tags in the group should be of the same dimension for comparison. For example, select Product Category group.
Set window period:the most marked content tag of the group for each customer during the window period will be the value of the content preference tag.
Set the minimum number of times to be marked:If the number of times a customer is marked with a content tags is the most, but does not reach the minimum number of times, it will not be marked as a content preference tag.
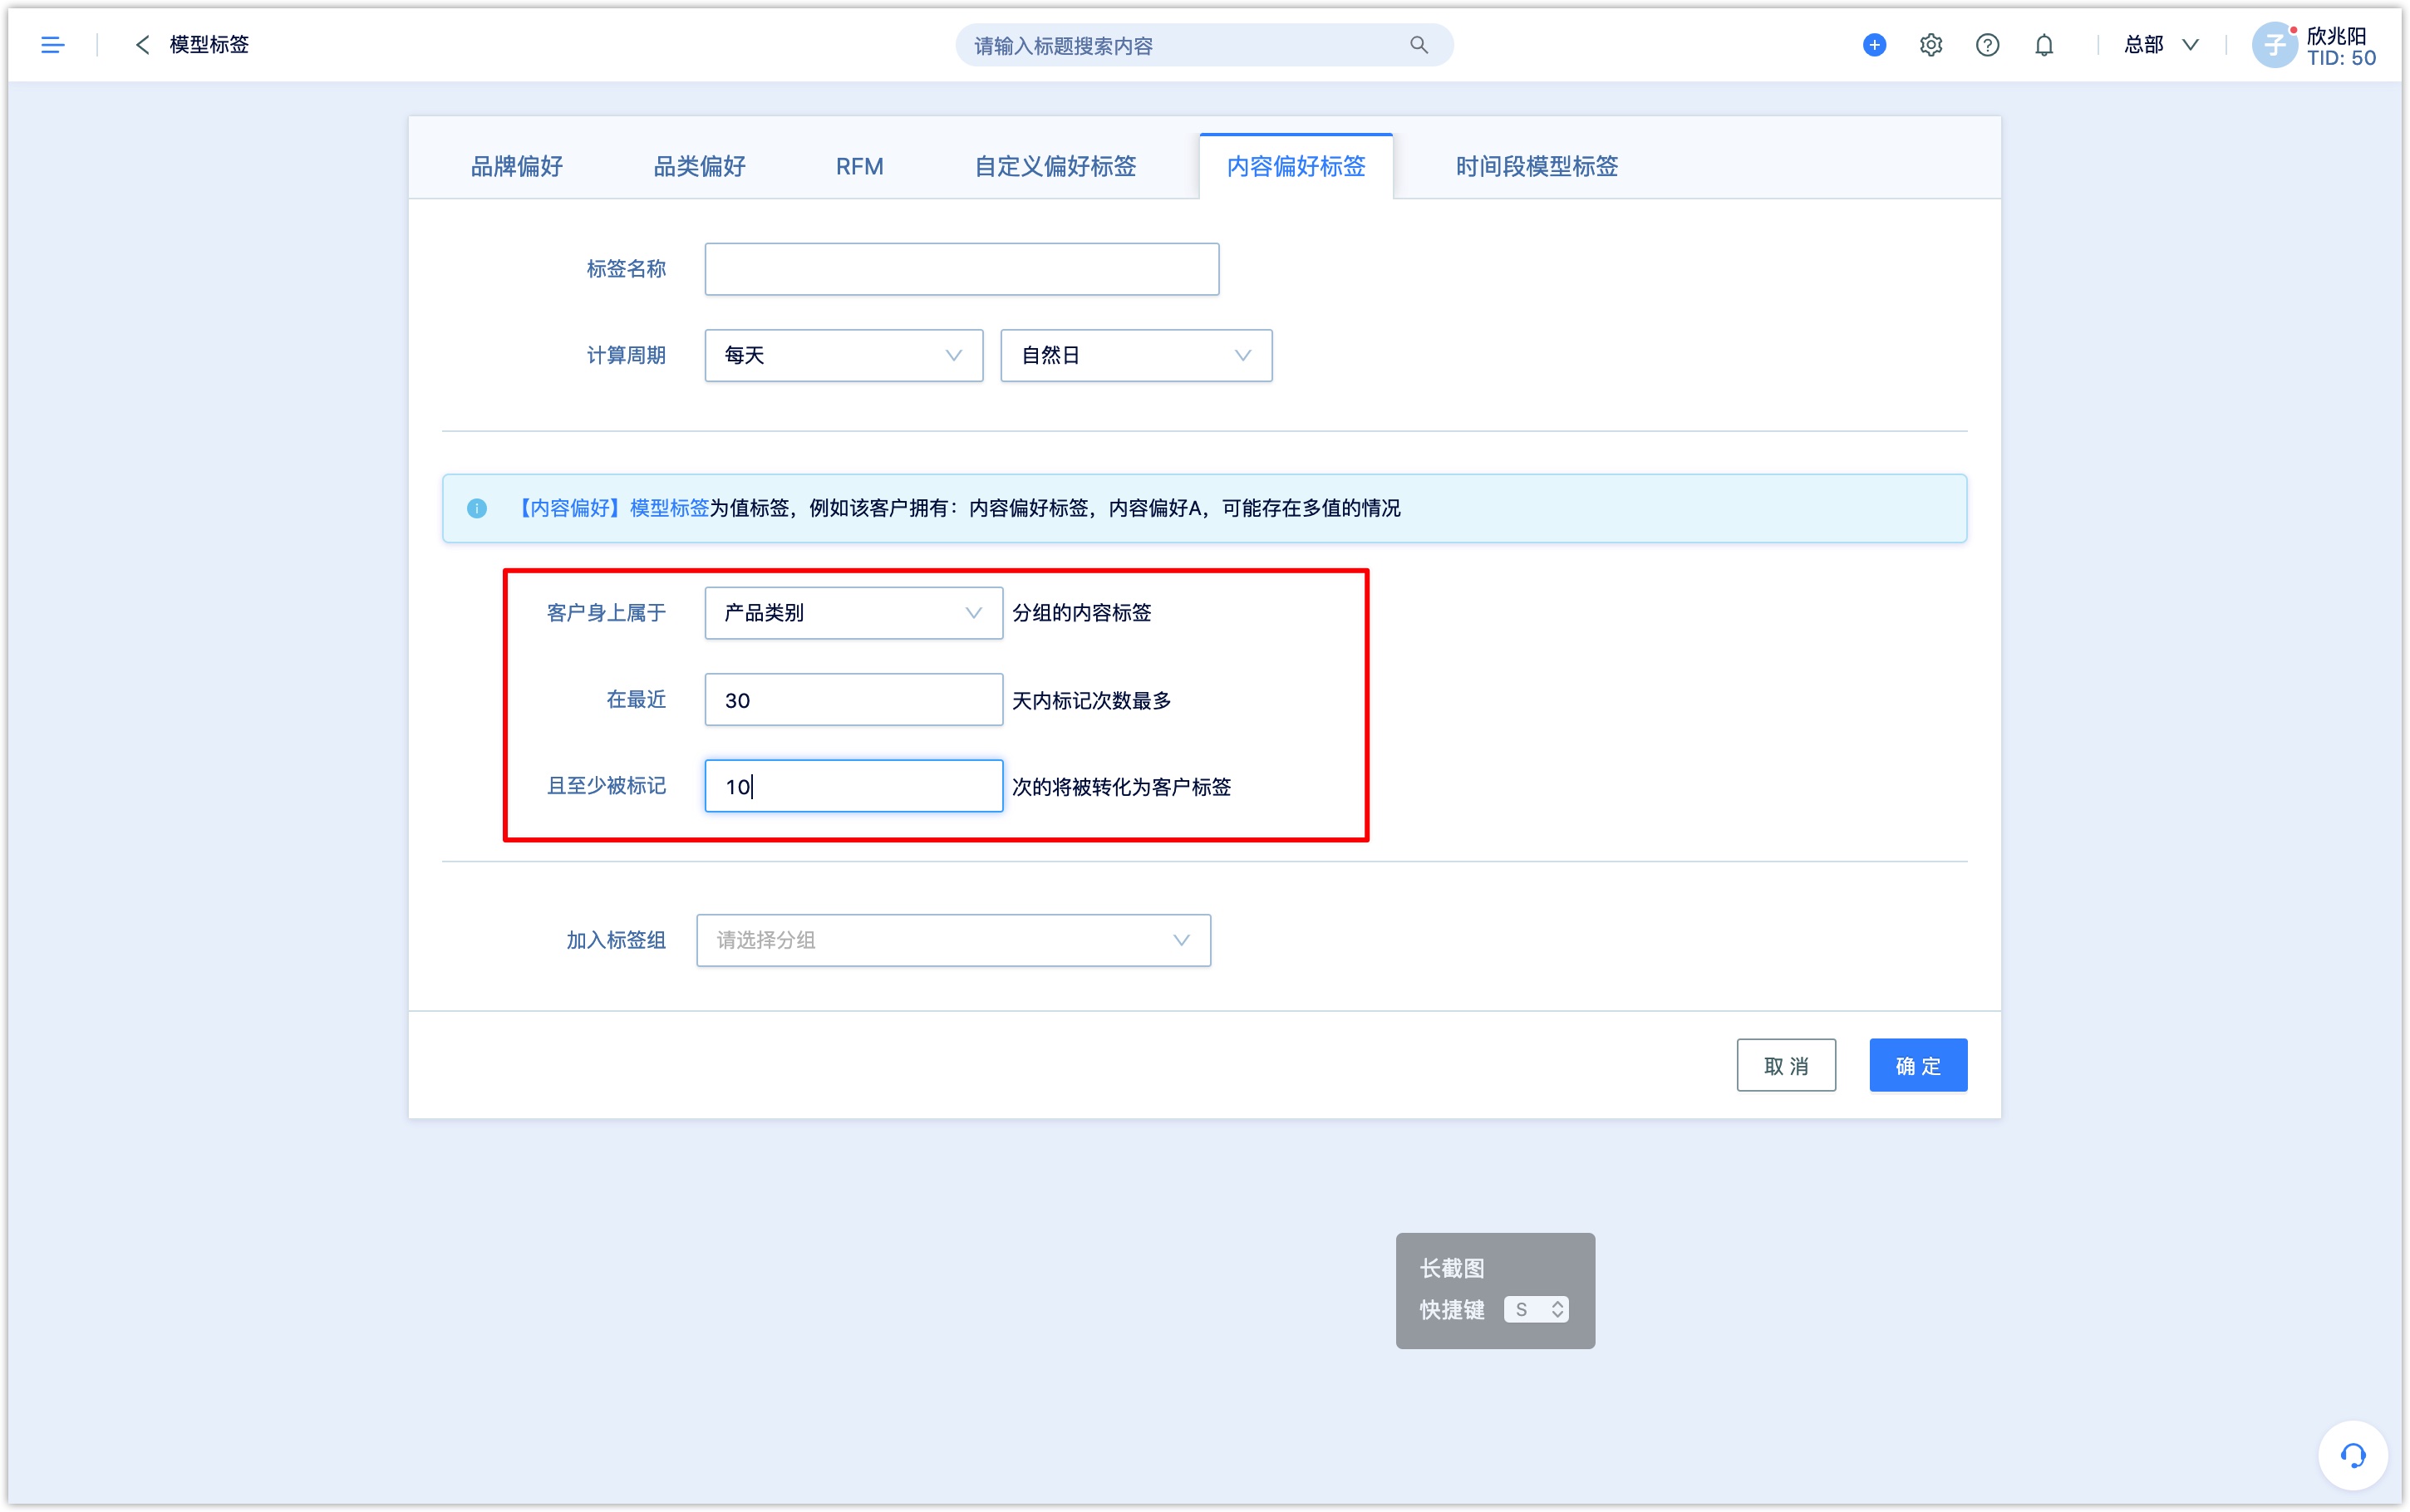
With the Content Preference Model, it is possible to calculate the customer's content preference and convert content tags into customer tags.
5.5Time Preference Model
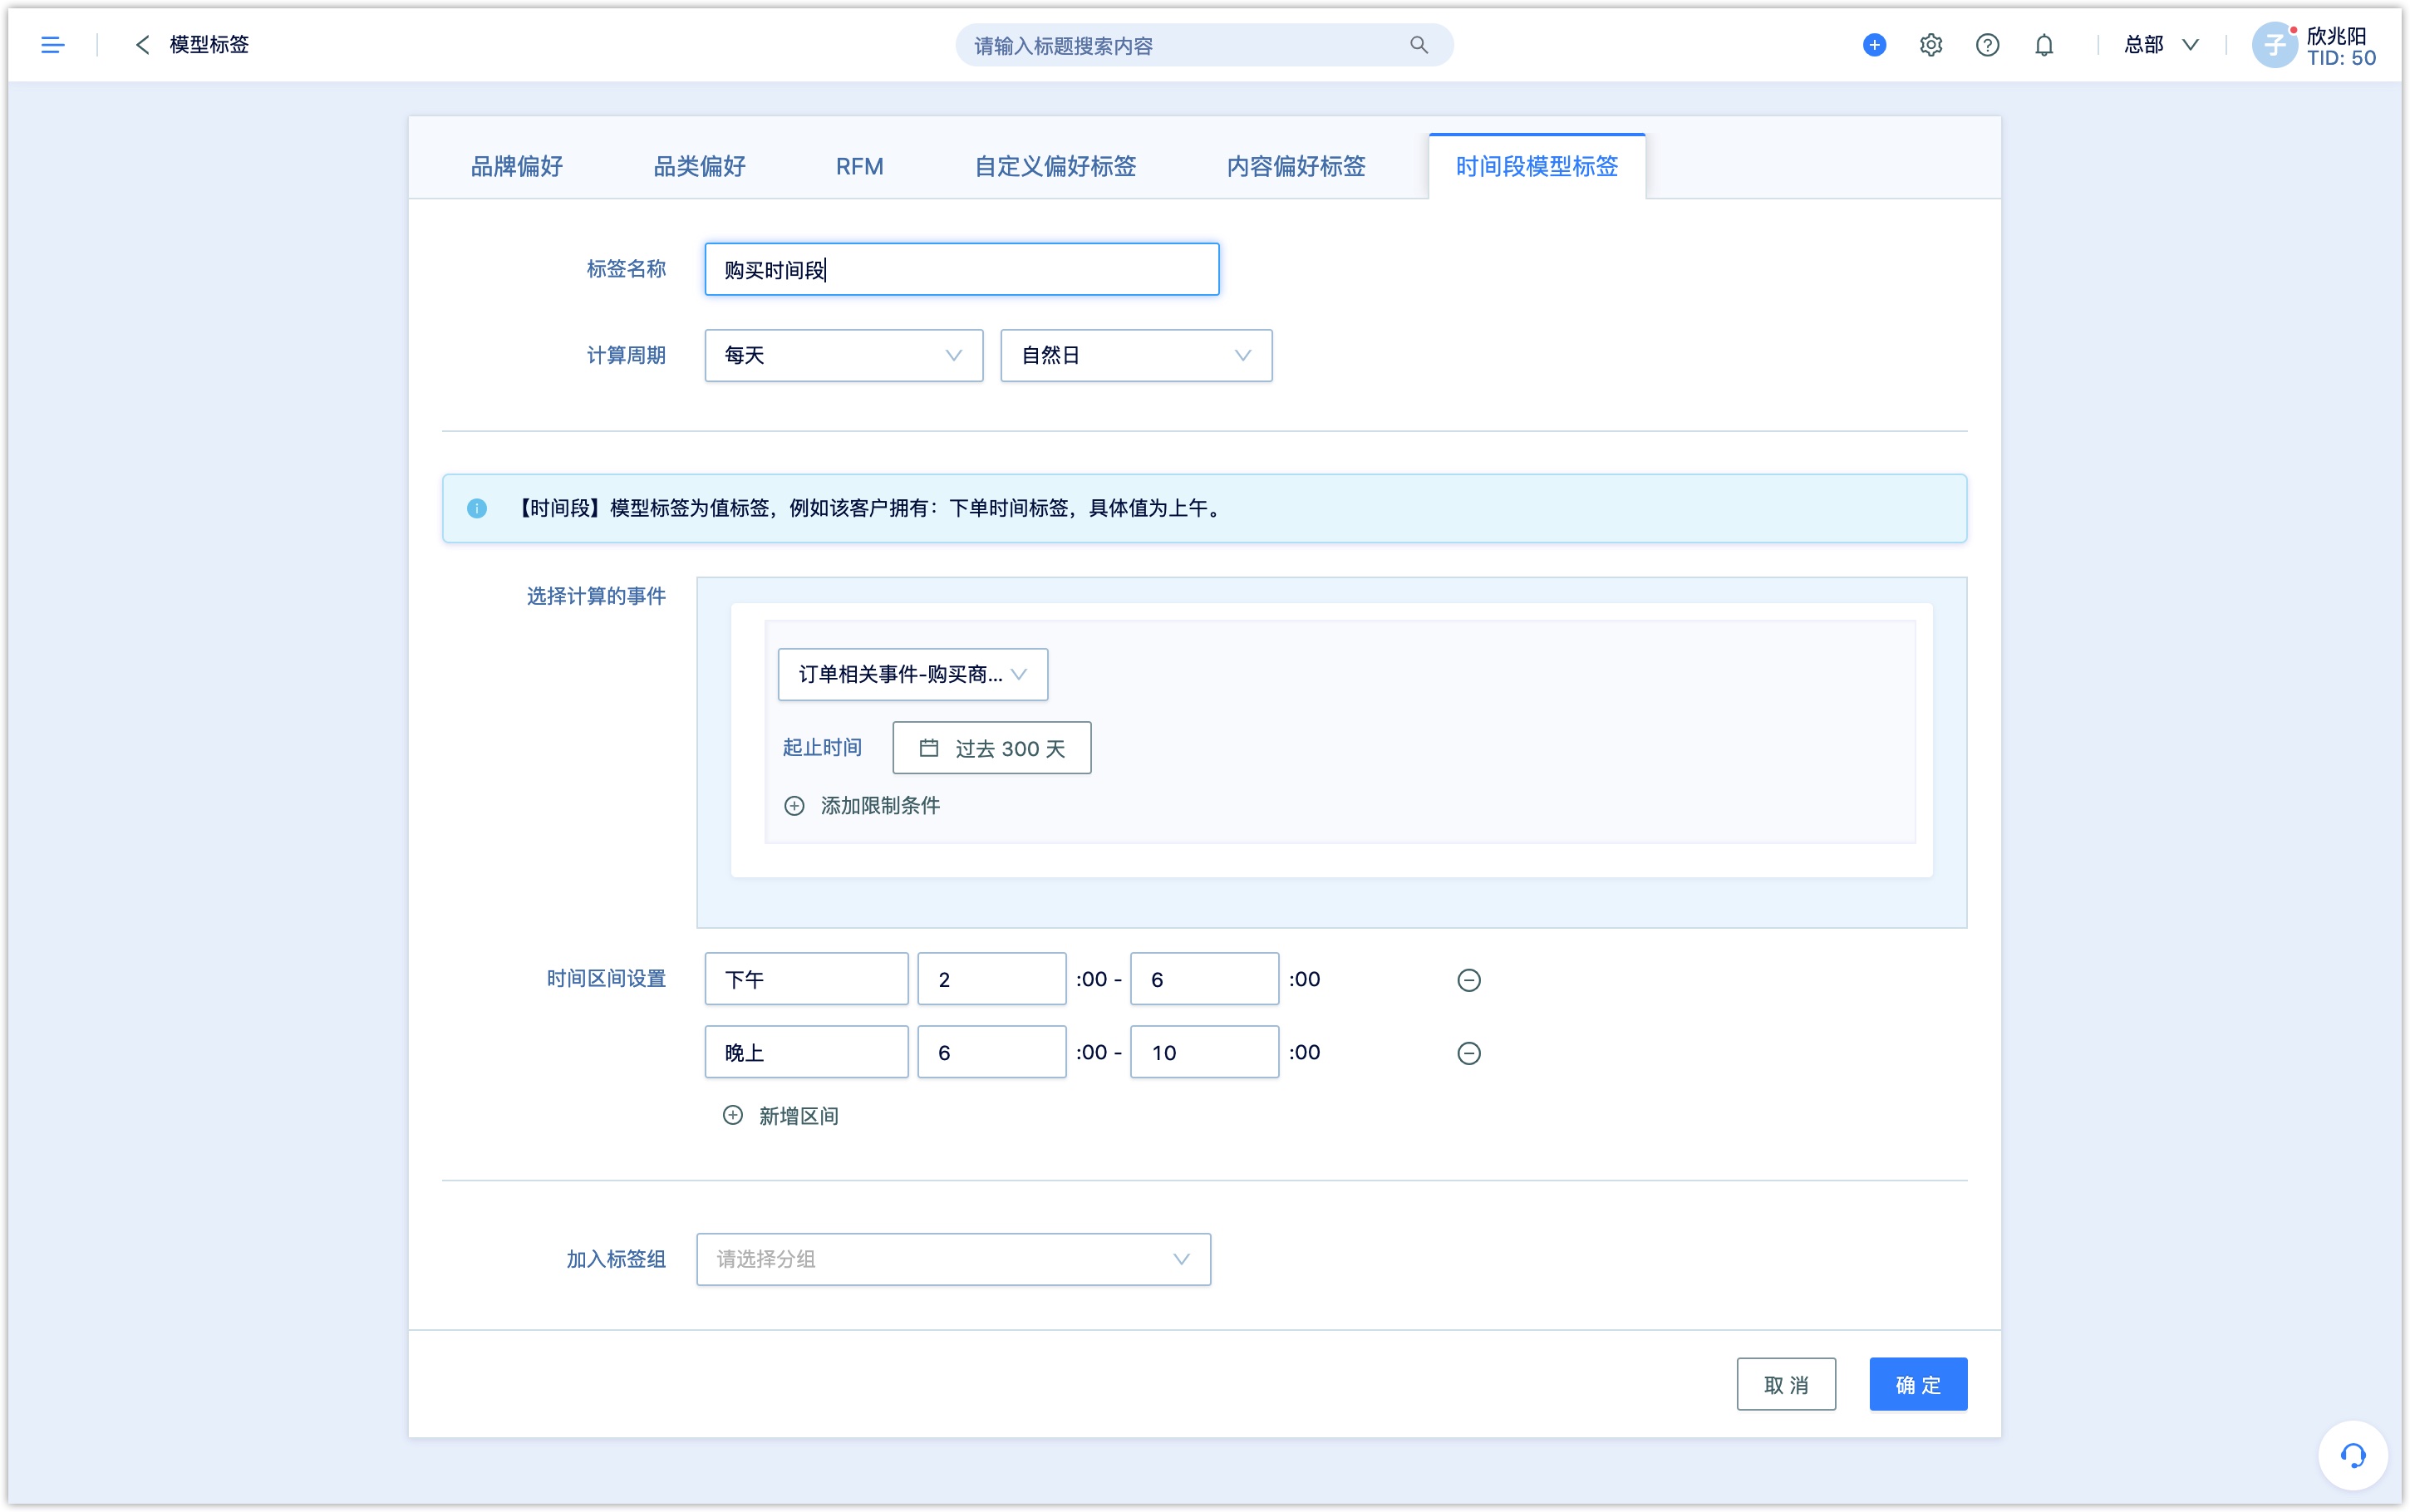
Time Preference Model Tag puts the time period during which a certain behavior event occurs the most times on the customer as a preference tag, indicating that the customer makes the behavior event most frequently during the time period.
For example, to calculate the customer's consumption time preference, select the event to be calculated as the Purchase of Goods and Services event, and define 14:00 to 18:00 as the afternoon, and 18:00 to 22:00 as the evening.
The customer who made the most purchases between 14:00 and 18:00 will be labeled as Consumption Time Preference: Afternoon, and the customer who purchases the most times between 18:00 and 22:00 will be labeled Consumption Time Preference: Evening.
6.External tags
Static tags, smart tags, and model tags are all generated in the DM Hub system, and external tags are generated in a third-party system. The external tags and the mapping relationship between external tags and customers can be imported into the DM Hub system through files
The external tag cannot be edited or modified in DM Hub, but the external tag can be deleted by calling the API.
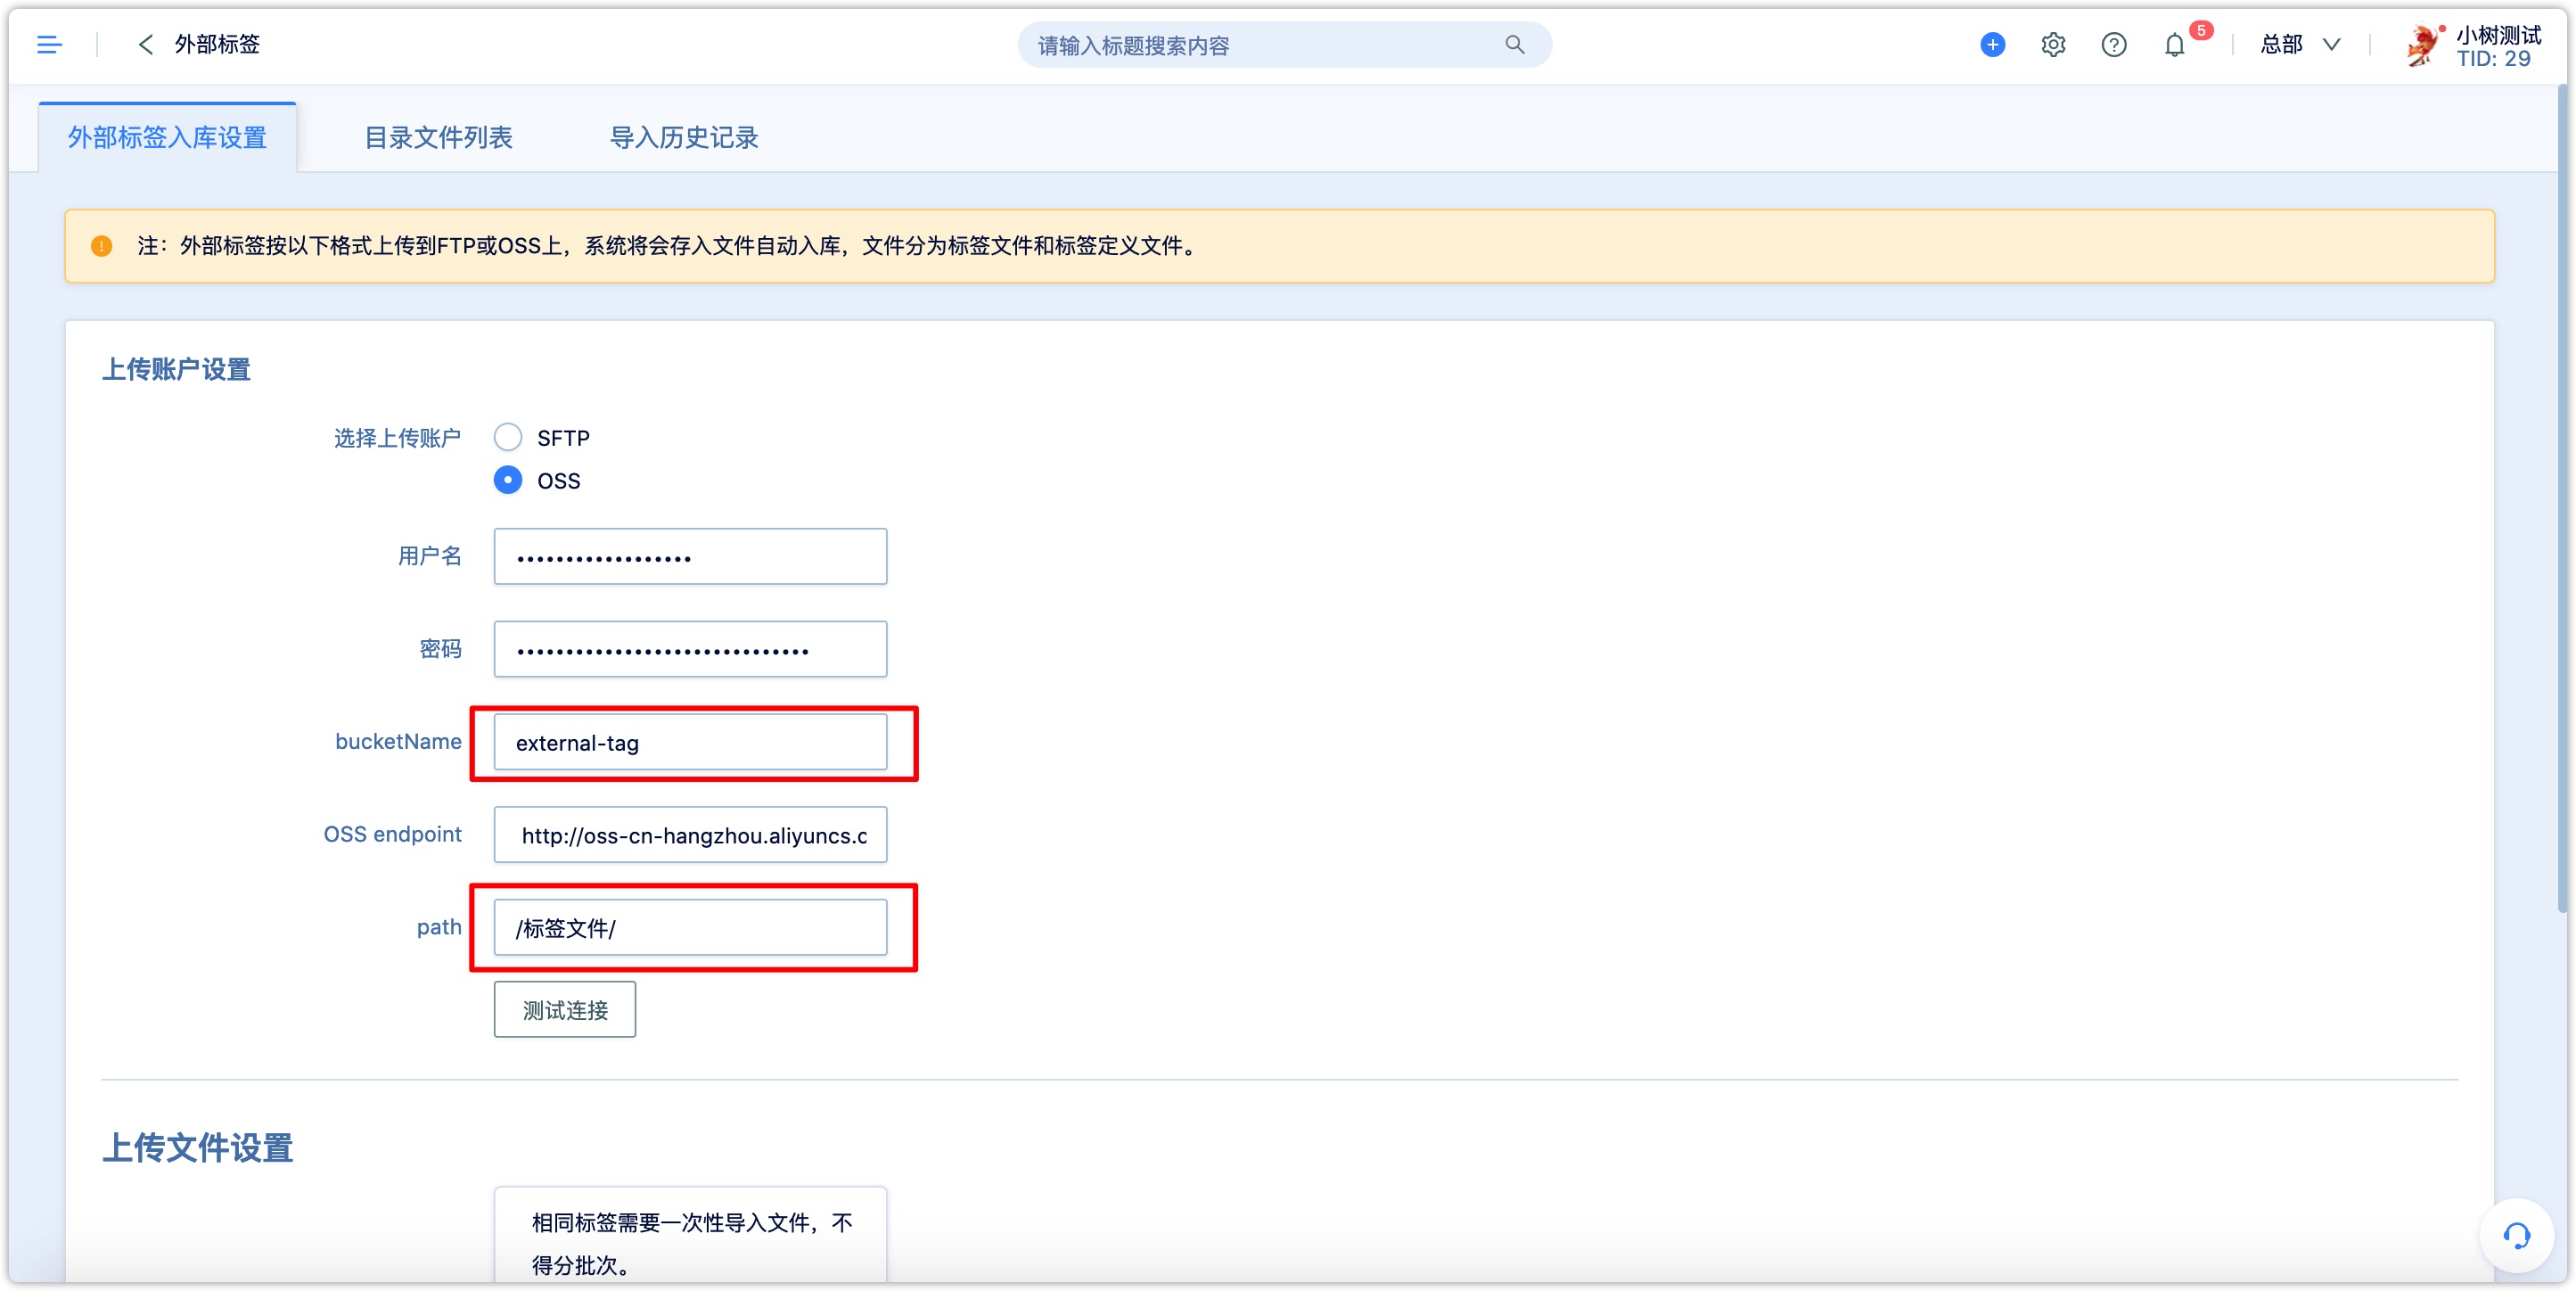
Before importing external tags, you need to provide information such as the account password of the OSS or SFTP server and configure it in the DM Hub system, and then upload the file to the corresponding directory of the OSS or SFTP server.
Note: The currently uploaded file only supports comma-separated CSV files whose encoding format is utf-8.6.1Setting OSS or SFTP
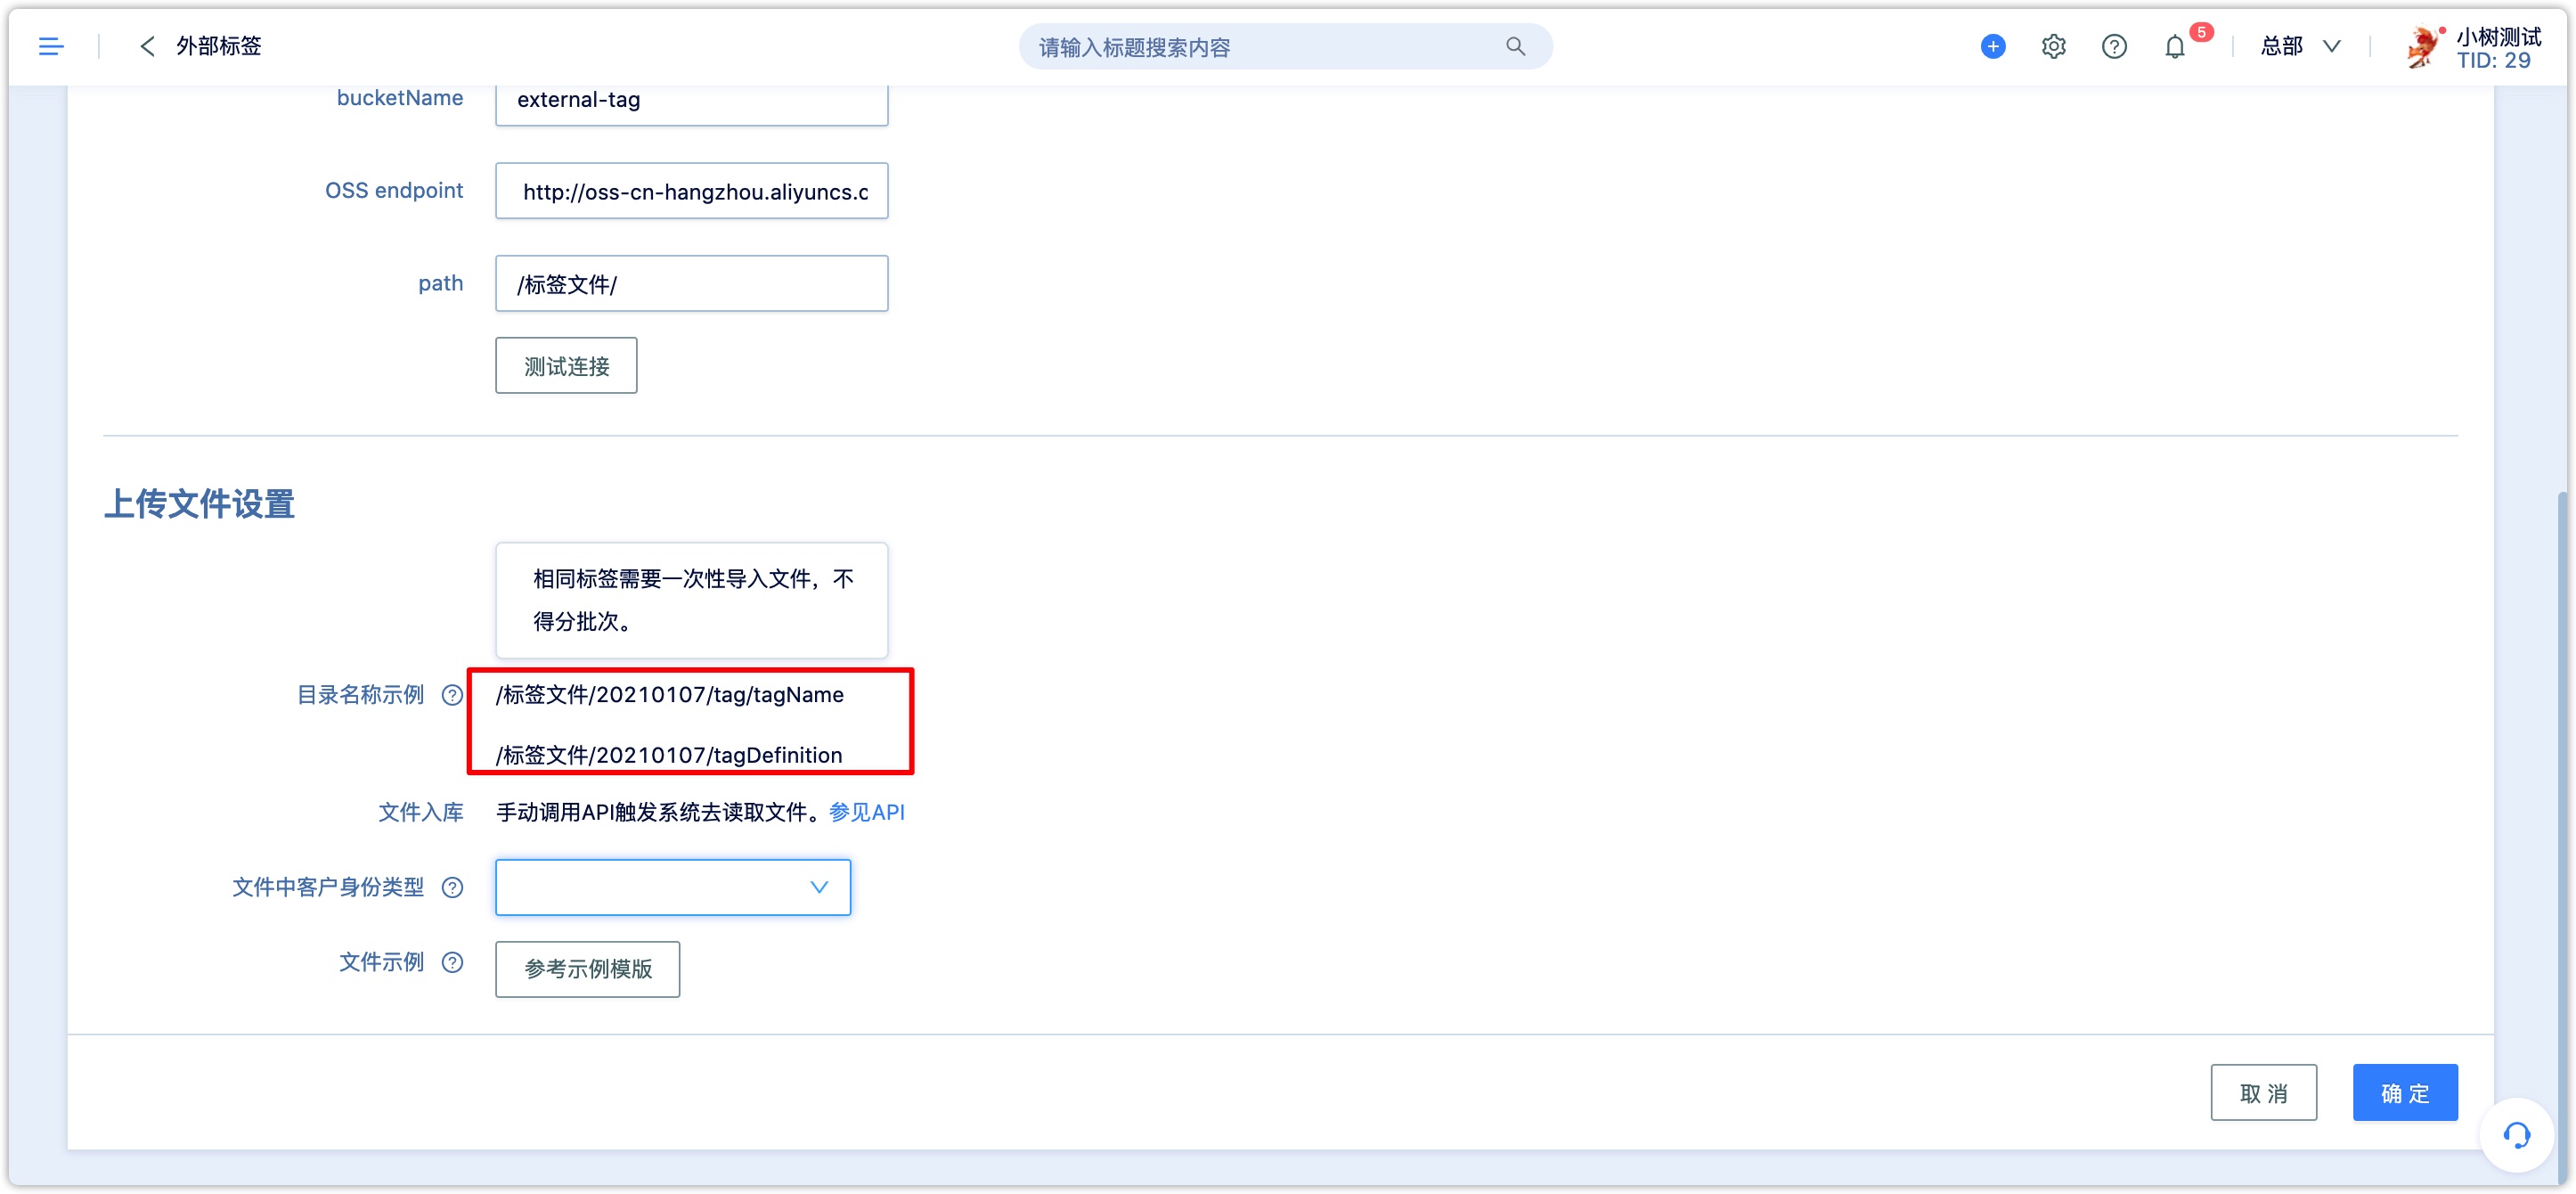
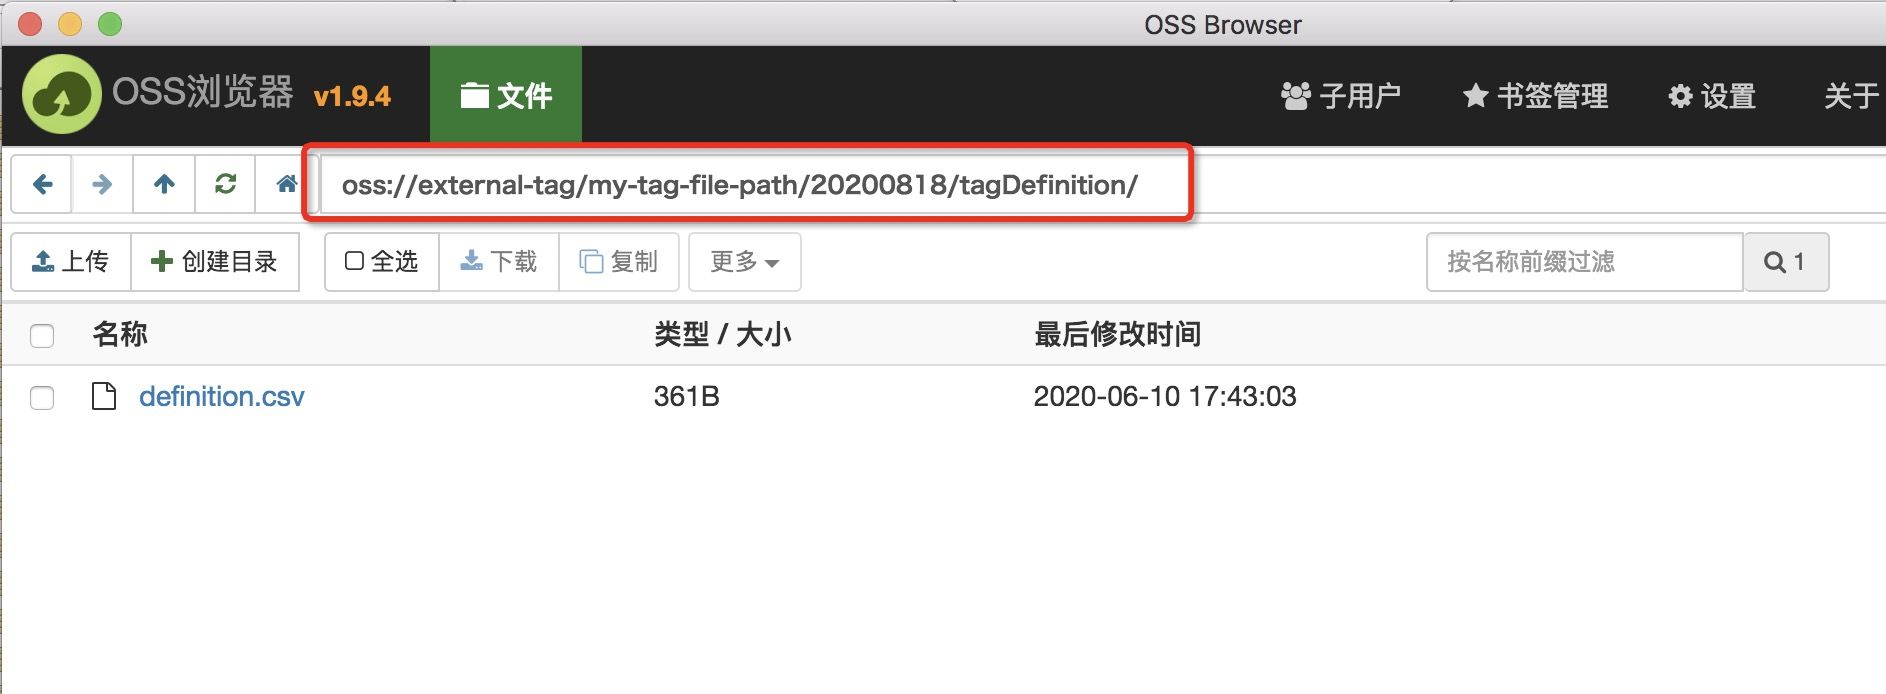
If the buketName configured in the DM Hub is external-tag and the path is /my-tag-file-path/. Call the API to import a tag named [Brand Preferences], and the date of calling the API is August 18, 2020. You need to upload the tag to the /external-tag/my-tag-file-path/20200818/tag/brand preference/ directory, and upload the tagdefinition file to /external-tag/my-tag-file -path/20200818/tagDefinition/definition directory.
There can be multiple files in the /external-tag/my-tag-file-path/20200818/tag/brand preference/ directory, which can improve the calculation speed. Each file should not exceed 1GB and not Less than 100M, and must be a standard comma-separated CSV file.
The example in OSS Browser is as follows:
Tag file:

Tag definition file:
6.2Tag file and tagdefinition file
Requirements for tag file
The imported external tags can be divided into three types: ordinary tags, single-value tags, and multi-value tags.
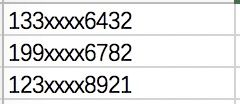
Ordinary tag:There is only one column in the uploaded tag file, which is the identity of the customer, without the header. Each row represents the identity of a customer, and no repetition is allowed (if there is a repetition, DM Hub will remove it). Customers matched by identity will be marked with this tag. Take the customer's mobile phone number as the mapping relationship field, the sample file is shown in the figure below:
Single-value tag:There are two columns in the uploaded tag file without headers. The first column is the customer identity and the second column is the tag value. Neither the value nor the identity is allowed to be empty, and the identity is not allowed to be repeated. If the identity is repeated, only the first row is retained, and the repeated data will be de-duplicated. Customers matched by identity will be marked with this tag and the single value of the tag. Take the customer's mobile phone number as the mapping relationship field, the sample file is shown in the figure below:

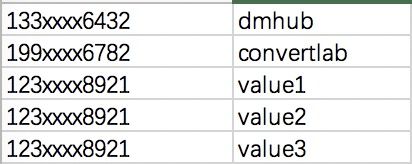
Multi-value tag:There are two columns in the uploaded tag file without headers. The first column is the identity, and the second column is the tag value. Neither the value nor the identity is allowed to be empty. When there are multiple values under this tag of the customer, it corresponds to multiple lines in the file. Take the customer's mobile phone number as the mapping relationship field, the sample file is shown in the figure below:
Requirements for tagdefinition file
The file name of the tag definition file must be definition.csv, and the file must have a header. The column names and descriptions of each column from left to right are as follows:
- tag:tag name, required, no special characters are allowed. Such as "brand preference".
- tagType:tag type, required, only "ordinary tag" or "value tag".
- valueType:the type of the tag value, required when tagType is a value tag. It can only be "number", "text", "date", "date and time". The value of date or date time is milliseconds timestamp.
- multiValue: Whether it is a multi-value tag, required when tagType is a value tag. Can only be "Y" or "N".
- group:The name of the group to which it belongs, which is not required. If there is a group, the tag group needs to be created in the DM Hub by calling the API, such as "brand group".
The sample upload file is shown in the figure below:

7.How to tag customers
You can tag customers in the following ways:
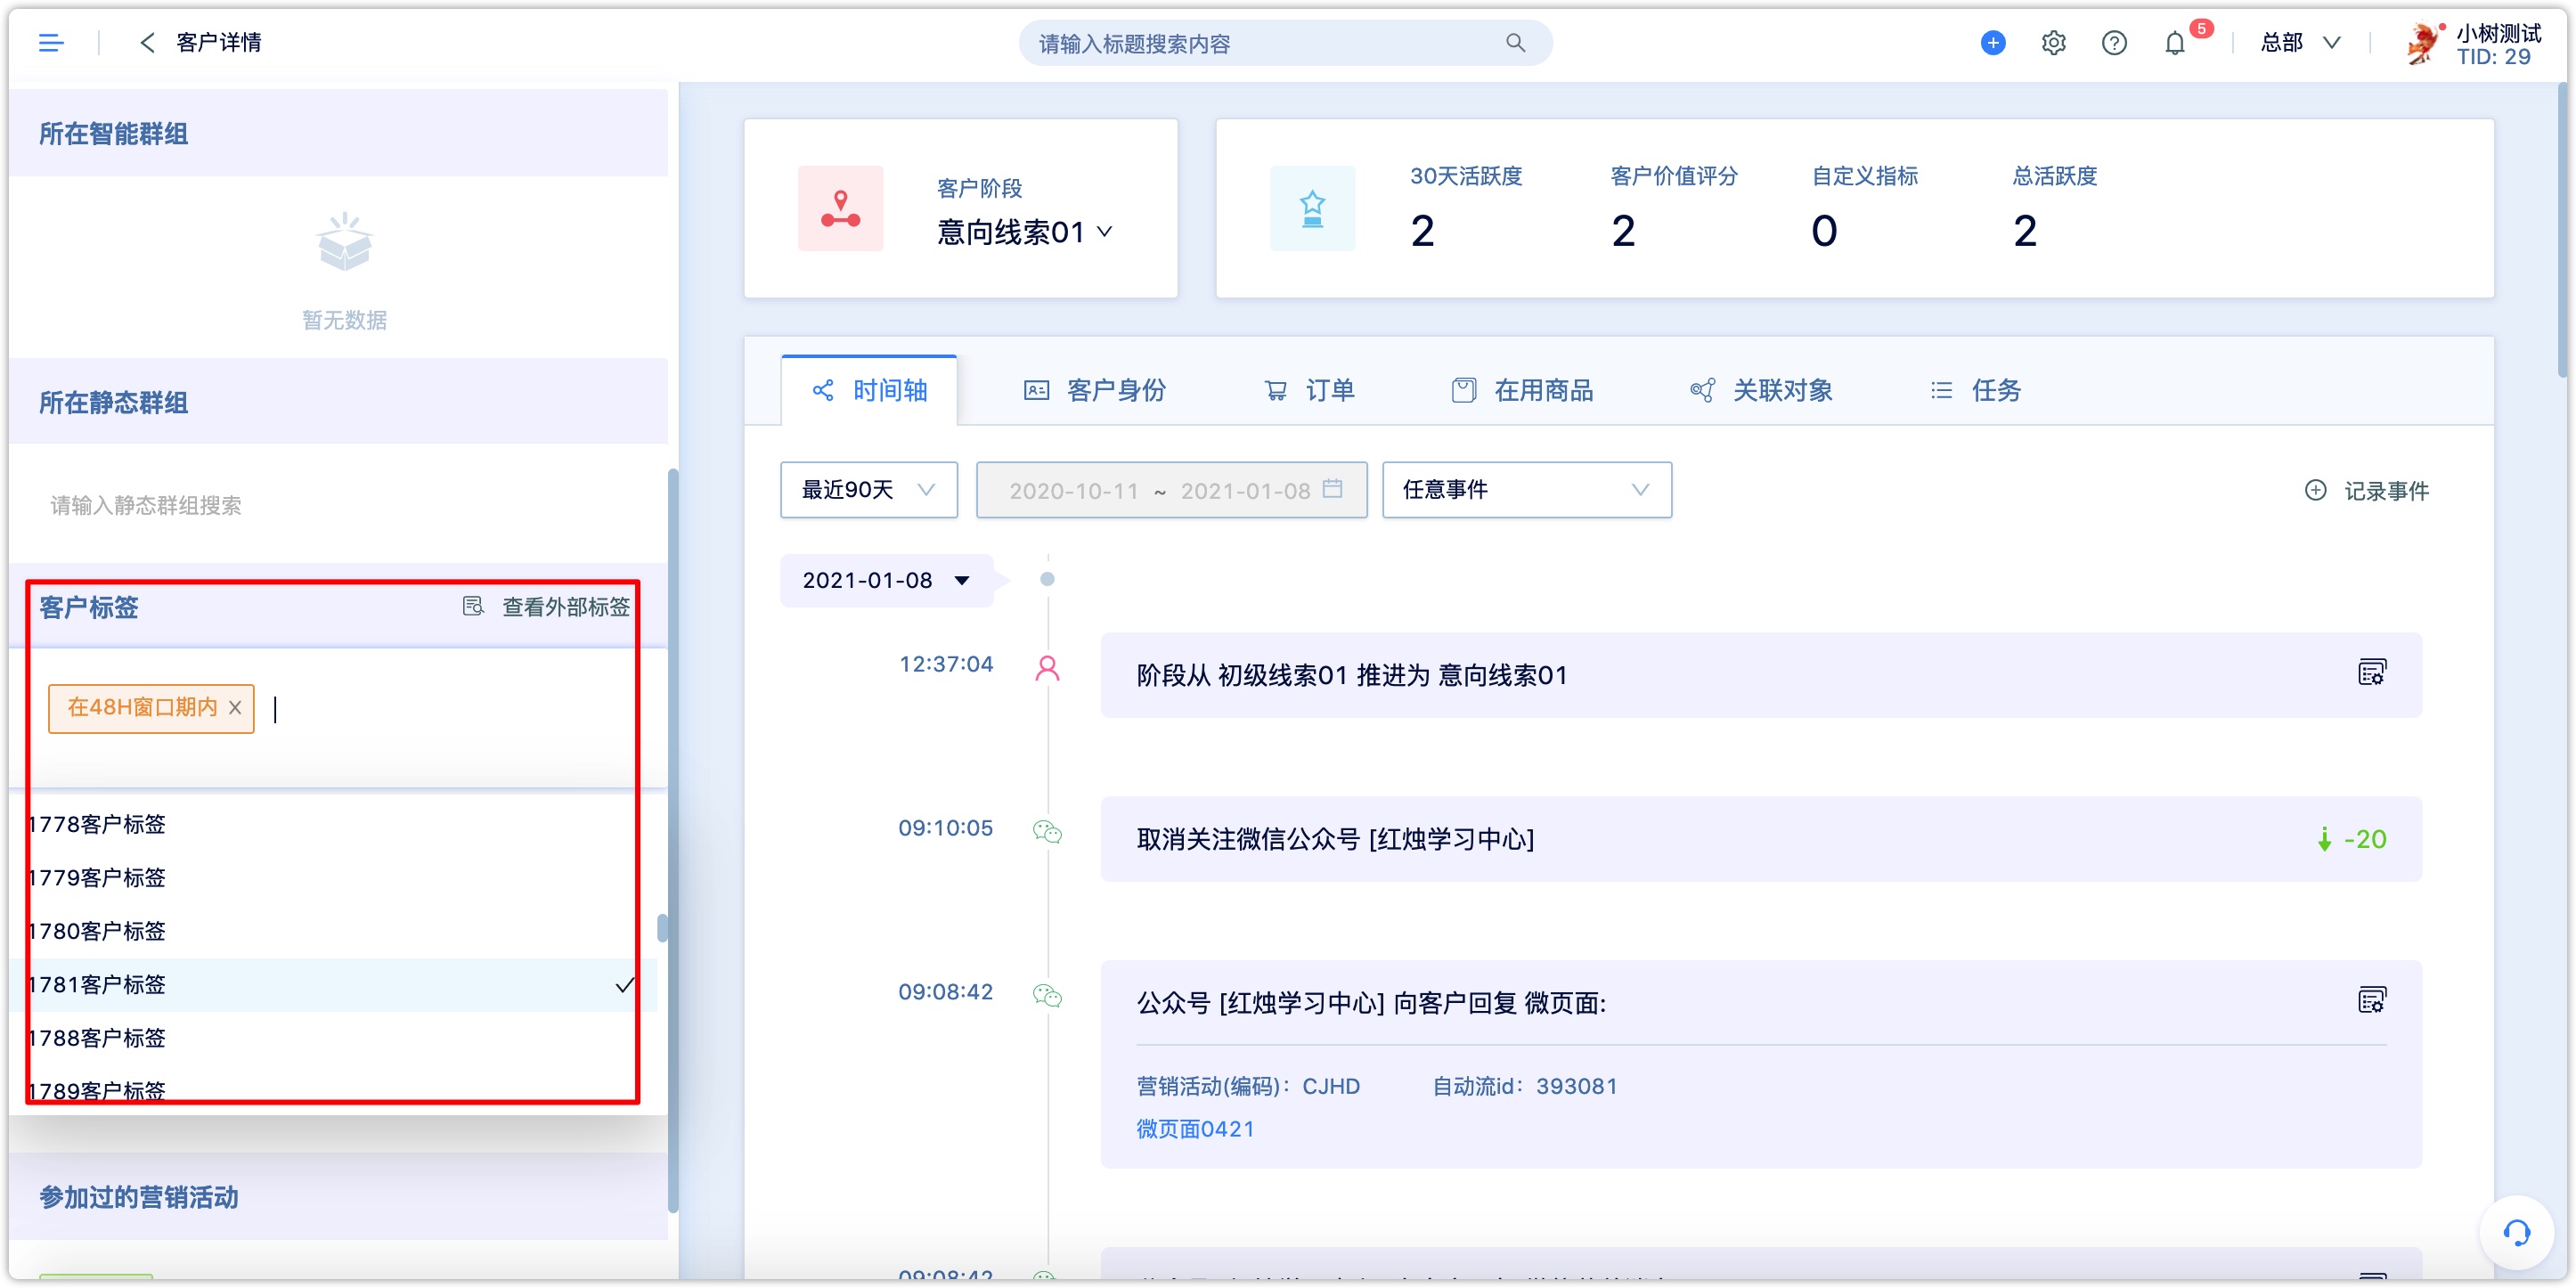
- 1.When understanding the customer’s characteristics or preferences, manually enter and select the static tag on the customer details page.
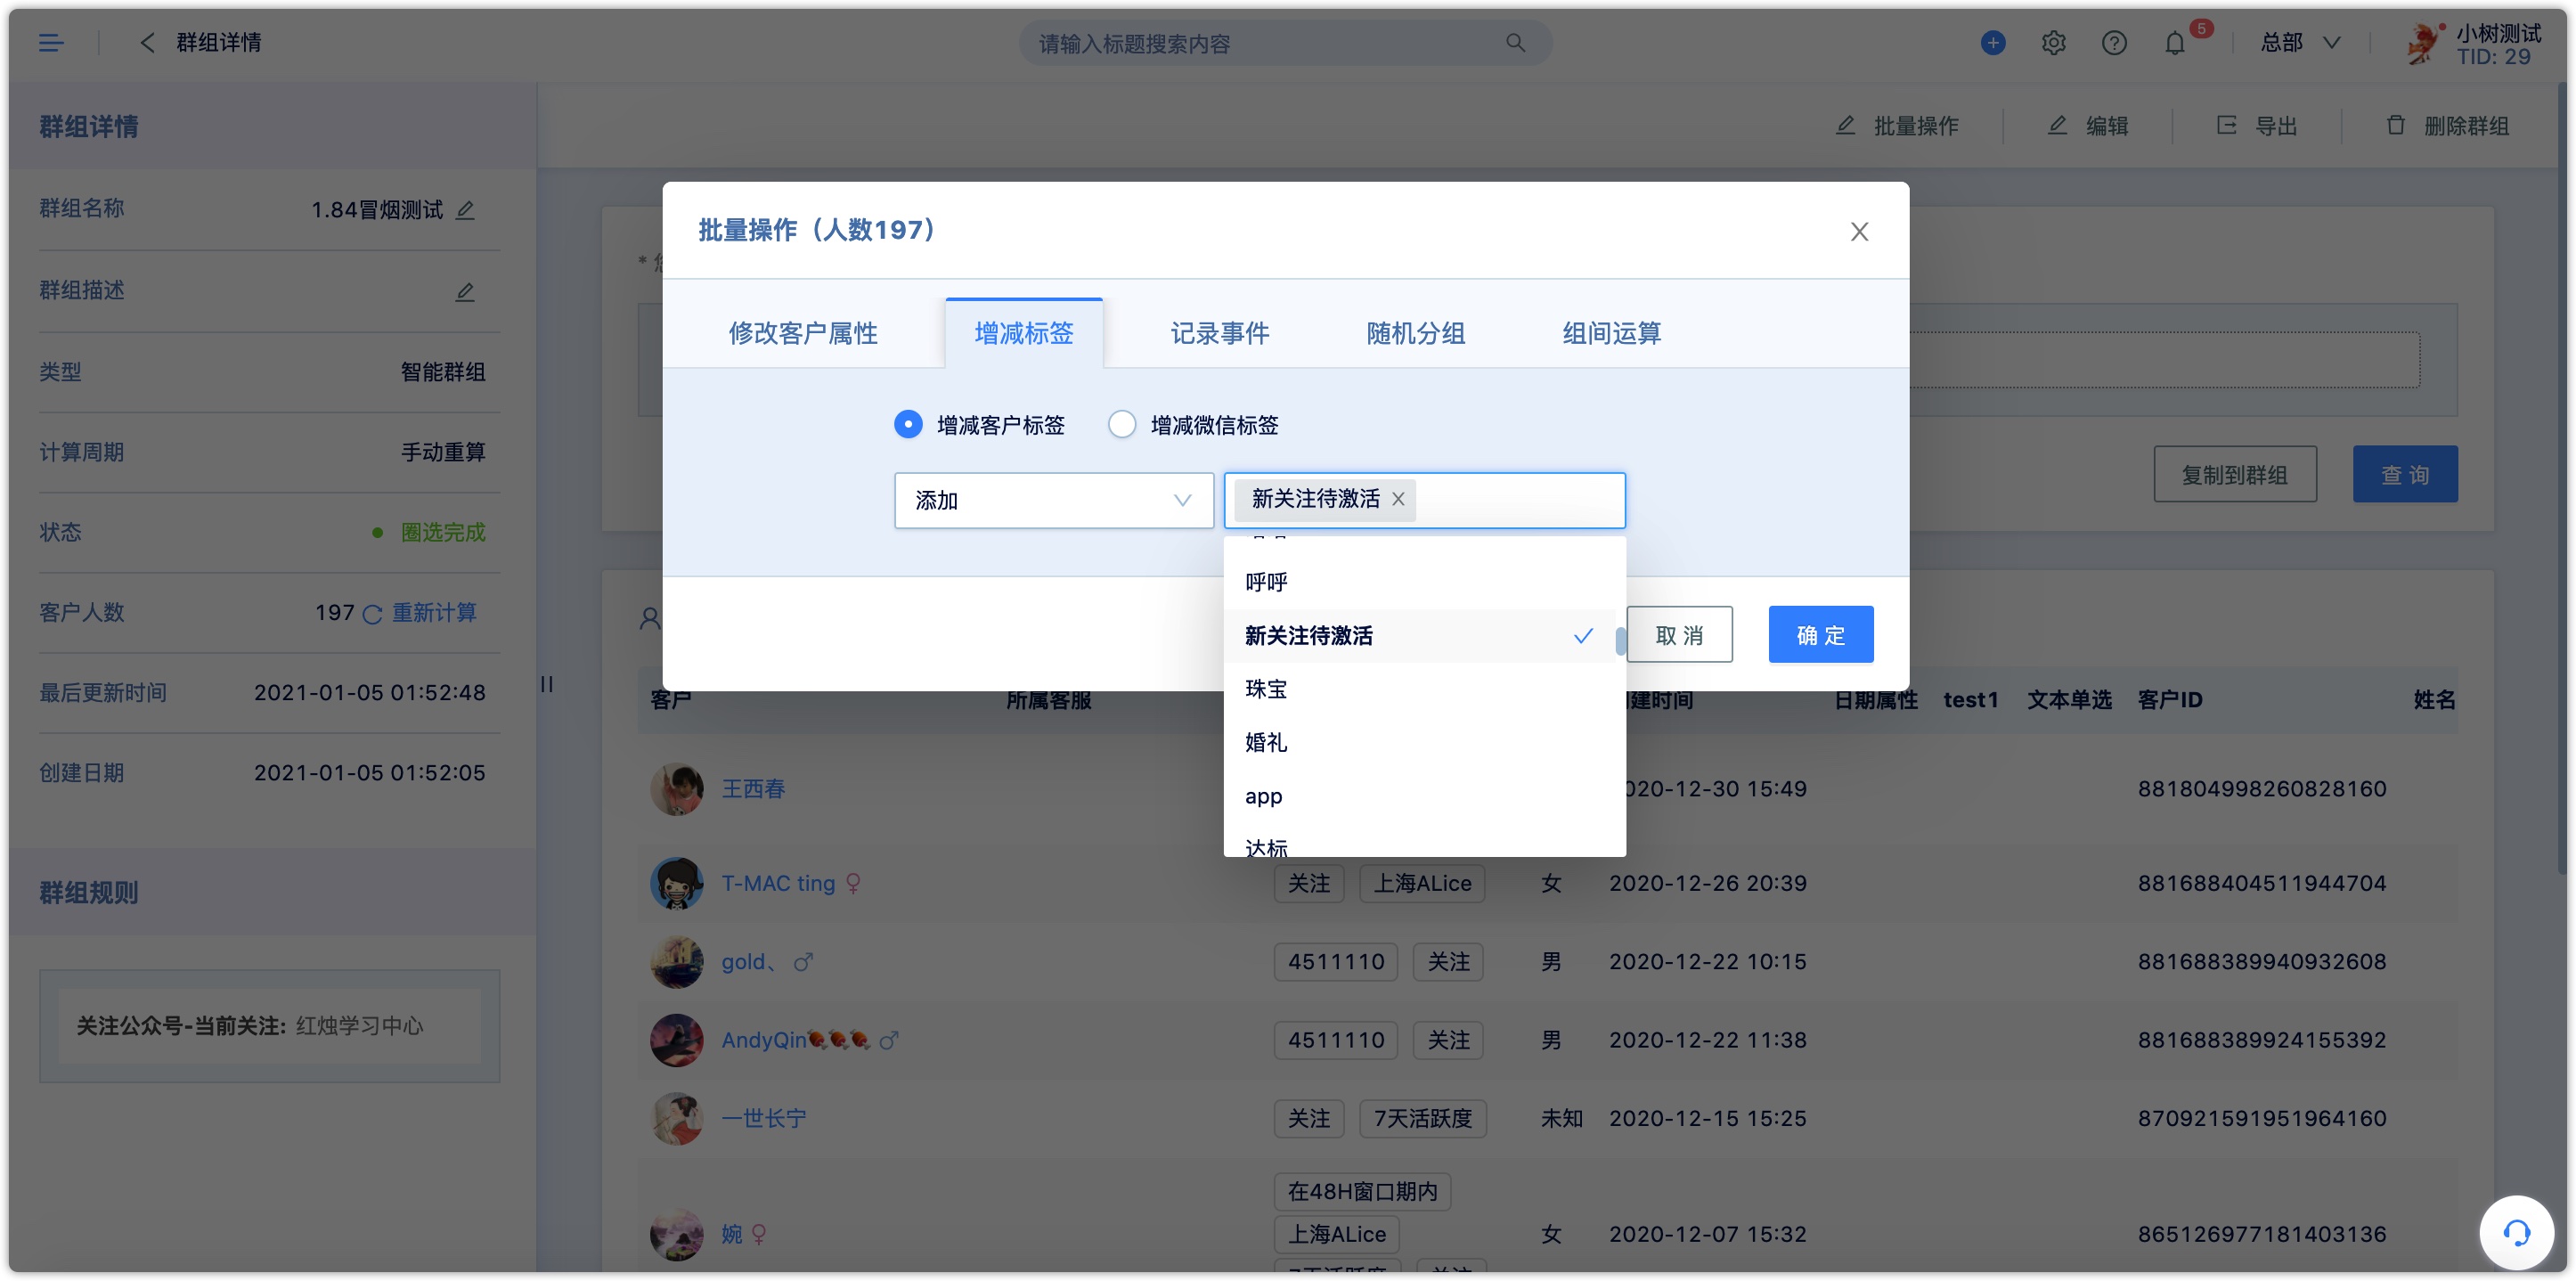
- In the group batch operation, tag the customers in the group in batches.
- Set the tagging action in the Automation Flow. If the customer enters the flow node, it can be automatically tagged without manual operation.
